Schauderbasis
Changelog 5
Here is what I worked on since the last changelog.
tried out typst
I tried a new typesetting system: typst It is so awesome.
I love the command line interface. I love how simple it is in comparison with LaTeX. I love that it has a scripting language embedded. And I love that it invites you separate layout from data.
There are lots of interesting templates. But I didn’t find something that suited me well enough, so I just wrote my own. This would be a big undertaking in LaTeX, but in typst I could just learn how to do it on the fly.
My document is not completely done yet, but it is mainly a question of content at this point. I will definitely use typst again, especially when creating documents programmaticly.
Reactivated the Scraper
2 years ago I wrote a webscraper and automated it to run once a day. The program …
- scrapes all the job offers on a special website
- transforms them from html to org-mode
- saves the resulting files into a git repository
I managed to implement all this into a gitlab CI job.
Also the repo of the scraper is the very repo where the data ends up, which I find elegant.
Even more elegant:
This means that the CI job creates a new commit on it’s own repository.
It wasn’t even that hard, here is the .gitlab-ci.yml:
image: python

stages:
  - collect_data
  - commit_and_push

collect_data:
  stage: collect_data
  before_script:
    - pip install -r requirements.txt
  script:
    - python scrape.py
    - find scraped_data | sort    # show off what we created
  artifacts:
    paths:
      - scraped_data
    expire_in: 1 week

# Take the artifacts from the previous job and commit them as new data.
commit_and_push:
  stage: commit_and_push
  only:
    - schedules
  script:
    - git checkout data                 # make sure to use the right branch
    - rm -rf data                       # remove current data
    - rm -rf scraped_data/html          # remove stuff I don't want in the repo
    - mv scraped_data data              # put the new data in place
    - git add --no-ignore-removal data  # put all the changes in data on the index
    - git -c user.email="$GITLAB_USER_EMAIL" -c user.name="$GITLAB_USER_NAME" commit --allow-empty --message="Added data_from $(date +%FT%T)"
    - git push "https://gitlab-ci-token:$GITLAB_PUSH_TOKEN@gitlab.com/$CI_PROJECT_PATH.git" "HEAD:$CI_COMMIT_BRANCH"
The result of running this regularly is a versioned plain text job offerings. This is awesome if you are interested in questions like:
- What offerings contain the word a certain word (like
pythonorarchitect)? (just usegrep/git grep/ripgrep) - How long has an offering been online yet? (just use
git log) - How many offerings are added/removed from the website in a certain time frame? (just use
git diff --stat) - Do offerings change after their initial posting? (
git logagain)
I find this insights fascinating. Especially because the website itself answers none of this questions, yet scraping it over some time provides the answers seemlessly.
…unless the pipeline breaks that is. I had not cared to fix the CI for some time. But now I did and the fix was pretty trivial.
Improved my desktop
I had some time to improve my desktop.
- Use a new nerdy greeter: tuigreet on greetd
- implement a workflow where I can edit screenshots right after taking them. I am still looking for a great tool to edit screenshots with. Perhaps the incoming gimp 3? But gimp has no good arrow-support :(
- allow mouse scrolling in tmux
- use more features of waybar
- add a shortcut to switch keyboard layouts
Changelog 4
I like the concept of those changelog posts. It makes me feel less pressure to write a full story and add pictures or so. It also gives me a better sense of progress.
I noticed that this post is longer then the older ones though. That is something I need to keep an eye on.
I am also not sure about the fact that almost every sentence contains the word “I”. It is a consequence of the forat of course. Every sentence is about something I wanted, decided, tried or did.
Enough of this, here is what I did since the last changelog.
merged my home-manager config into my NixOs config
I used to have separate repos for my home-manager config and my NixOs config. This was useful once when I was using macOs regularly. But I haven’t touched a mac in years, so the split wasn’t helping me anymore. On the other hand it meant that I needed to set up multiple repositories for every new computer. So I decided to merge them.
This was a lot more involved then I thought. Merging 2 git repositories with unrelated histories is surprisingly hard. Especially since I wanted one repo to be in a subdirectory of the other one.
I recently wrote an article about how git filter-branch wants you not to use it. But filter-branch is exactly what you would normally use for such a task, where the history of a repo is heavily edited. Fortunately there is an external software-project, git-filter-repo that is much cleaner and better documented.
I finally managed to do it with git filter-repo --to-subdirectory-filter and then git merge --allow-unrelated-histories.
A lot of backups were created that day. Changing history is about as easy as scify movies make it sound.
set up a Jellyfin instance on the server
I finally have a need for a media center: The kids want to consume the same media again and again (as kids do). I need an easy way for all family members to consume that media with the them.
After having had an eye on kodi and plex for quite some time I decided that I’d rather try out Jellyfin.
Jellyfin is really cool. (Once it is running) it looks quite nice. It fetches tons of metadata from imdb or tmdb. And it forces you to keep your media files in an orderly structure.
Once again, figuring out how to do anything on NixOs was hard. But I am getting better at it, especially since I am slowly getting the hang of nginx. Also reading nix code is getting easier and easier. So it didn’t take too long to get it running.
The hardest thing was finding out why I couldn’t connect to the server. It was set up, I could read it’s logs and all, but I just couldn’t connect to the Jellyfin server. I rubberducked it to Sandra and to my astonishment she gave me the answer right away: “Perhaps you need a restart, or it is the firewall or so?” She is not a very technical person, so this was awesome advice. I had forgotten to open the right ports…
This is what workes for me:
{ lib, config, ... }:

let
  jellyfinPort = 8096;
  jellyfinUrl = "MY_URL_FOR_JELLYFIN";
in

{
  services.jellyfin = {
    enable = true;
  };

  services.nginx = {
    enable = true;
    recommendedGzipSettings = true;
    recommendedOptimisation = true;
    recommendedProxySettings = true;
    recommendedTlsSettings = true;
    virtualHosts."${jellyfinUrl}" = {
      enableACME = false;
      forceSSL = false;
      locations."/".proxyPass = "http://localhost:${toString jellyfinPort}";
      locations."/".proxyWebsockets = true;
    };
  };

  security.acme = {
    acceptTerms = true;
    certs."${jellyfinUrl}".email = "MY_MAILADDRESS";
  };

  networking.firewall.allowedTCPPorts = [
    80 443
  ];

  networking.firewall.interfaces.wiregrill = {
    allowedTCPPorts = [ jellyfinPort ];
  };
}
set up Jellyfin again, but on a local server
I later decided that I wanted to have my media server at home rather then on the internet. So I set up my old raspberry pie 4 and installed NixOs on it. My NixOs config is nice and modular, so I could just enable the module from above and everything worked just as on my server. No problem at all.
I love that so much about NixOs.
used mkOption for the first time
I finally found that it was time to add my own options into my NixOS config. The documentation is fine here and there are plenty examples around.
I need this because the config for backups is almost but not quite identical on my machines. For example the paths of the directories that I want to back up vary. So now I can write one general module that defines some options and every machine sets this option to it’s own value.
Ideally every machine would only specify the following:
backup = {
  enable = true;
  paths = [
    "/home/johannes/SecretPlans/"
    "/home/johannes/PublicPlans/"
  ];
};
The rest (“Where is the backup server?”, “How often should backups be done?”, “How should they be encrypted?”) is defined in the backup-module. That is also a good place to write down some documentation.
This feels very clean to me.
I still didn’t do monitoring of my backups. This is dearly needed though. I don’t want to find out I haven’t done backups for months.
Changelog 3
Addressbook visualization came to a halt
Previously I had tried to visualize my address book as a graph. I stopped when I noticed that the vcf export I had didn’t include the photos. This was a problem of the address book app I use on my phone, so I filed a bug report. This stopped my momentum to work on the project for the moment.
Now that the Simple Mobile Tools have been sold and are likely to go in a different direction I will probably have to replace most of my mobile apps anyway, though.
Work on video streaming solution

I installed Jellyfin (a video streaming) solution on my server. It was reasonably easy (thanks to NixOS), but I soon noticed that I don’t have enough storage space on my server to store all the movies and shows I want. I monitored the Netcup Adventskalender for cheap storage upgrades, but the right thing for me was not in there.
So I will have to buy for the regular price soon. It is not really expensive, so that is fine. After that I will be able to continue the work on Jellyfin.
Backup Sandra’s laptop
The one PC in our home that doesn’t run NixOS is Sandra’s laptop. On NixOS automatic backups are just a question of a few lines of config of course. But on Fedora I had to do everything by hand, including a systemd unit for triggering the backup. I used a guide of course.
The biggest problem I had after that was the initial backup, which took so long that it failed for some reason. The Laptop is a very weak one and I guess it was just too much for it.
So I started out with excluding the big directories (Music and Images) from the backup. Then, when the backup was successful I reincluded them gradually, so only a few GB of data had to be added to backups.
If this had been a work project I would have had to think of something better, but for a private project doing this by hand was fine.
And now we know to have working backups of all machines again, yea!
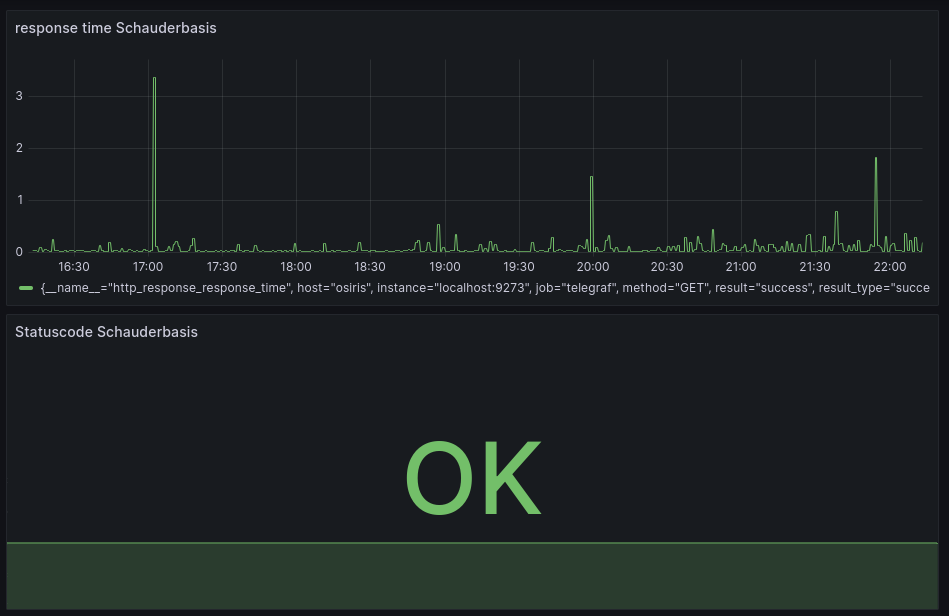
Monitoring
Wouldn’t it be nice if you got an email if there has not been a backup created for a few days? Now that the backups run I would like to monitor them. It is time to have monitoring.
But boy this stuff is complicated. Especially if you want to have it set up in a reproducible and documented way.
Zabbix didn’t work for me, so I looked into Graphana.
Graphana is cool in combination with Prometheus and Telegraf. At some point I also had Loki, Promtail and InfluxDB running. It is nice to see how well everything works together, but I found it very hard to understand what I need. Especially because I don’t even know what I want.
It would probably be easier if I had a working setup to learn from.
In the end I ended up with a selfmade dashboard that monitors my website (schauderbasis.de). That is fine for now, I will try to expand on this at some point.

IOPCC
I found out I had won the IOPCC. I was very proud and tried to explain the achievement to a few non-technical people. All of them were very supporting, but it was clear that I had not been able to get across the point of the contest.
So I wrote a blogpost about it.
Nixos channel update
I noticed that my Laptops Nixos is running on an old channel, so I updated it to the latest stable channel (from 22.11 to 23.11).

I used this guide to upgrade because I don’t do this very often. It went uneventful. Some config parameters had to be renamed and some software had to be replaced because it was not supported anymore (exa -> eza).
I took the opportunity to run nix-store --gc, for the first time in about a year.
Many GB of storage were freed.
But perhaps I shouldn’t have done it:
When I recompiled my system it took nearly an hour (instead of less than a minute, like normally).
I think a big chunk of that is building emacs from master.
Worth it, though.
winner of the first IOPCC
I am a big fan of the “The International Obfuscated C Code Contest” (IOCCC). Their winners page is littered with creative and (in it’s own way) elegant code. Unfortunately I know just enough C to appreciate the code there, I could never write anything like this myself.
So I was on fire when I heard that there was a python-version of the contest: The IOPCC. I immediately started to work on a submission.
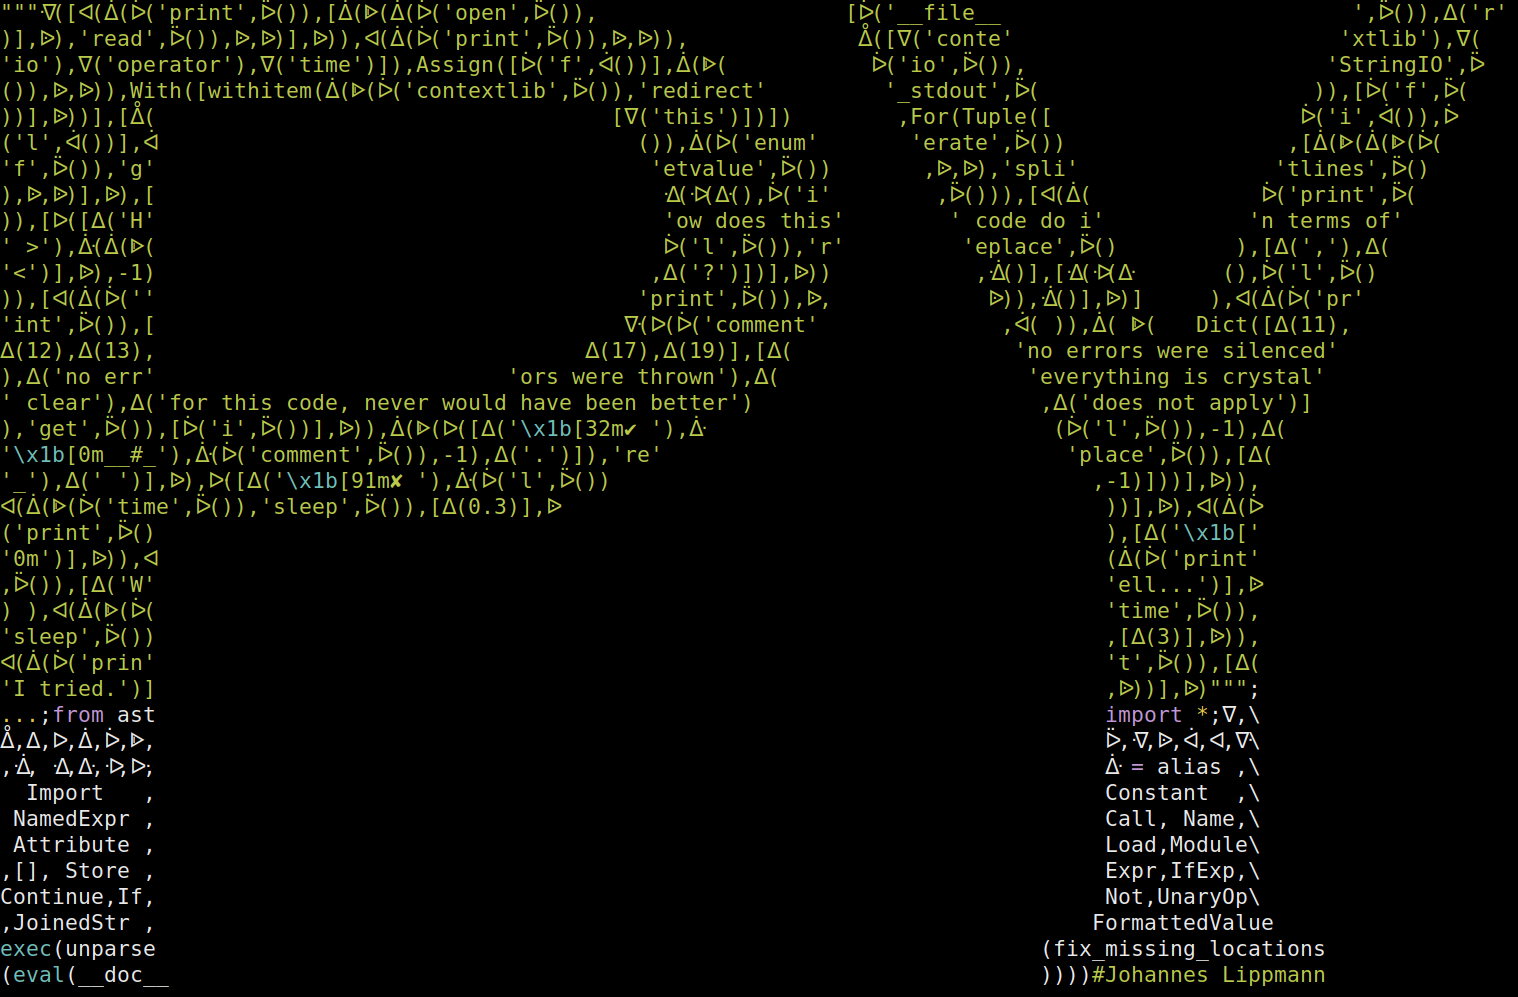
It was a lot of fun on multiple levels. I had wanted to do something with abstract syntax trees for a long time, so I started fooling around with them until I had something sufficiently obscure. Then I started to condense it, make it as obscure as I could and formed it into an ascii art image.
When I was satisfied I submitted the code and waited.
What I submitted
Normally code I write would go into a repo, but this is a piece of art, not a piece of work. It won’t be iterated on anymore, there are no pipelines, no issues. So I will just link the files here in this blogpost:
- The code is save to run, but you should not trust my word of course.
- An explanation of what it does and how it does it.
The output of the code looks like this:

The announcement
I waited and waited.
A few months later the winners are announced. And I am one of them! Horray!
Here is what the Judges said about my code:
Most Introspective.
Very well put together, top-notch obfuscation. Tongue-in-cheek, comments on itself (very meta, which we like).
This definitely goes into my resume. If people see this award winning code they probably won’t hire me, but I don’t care. I am very proud.
Changelog 2
git showpast
I wanted to write a command-line program that would show you the history of some code within a git repository.
- When/How/By whom was it written?
- When/How/By whom was it slightly changed?
- When/How/By whom was it moved?
I know git blame, but this is tedious to use and I still haven’t got the hang of it.
I spent some time deciding on which tools I would like to use for this project.
- Python, because it is the best to get something done?
- Haskell, because it is the best to write logic in. This is one of the rare “much logic, little IO”-problems, which is where haskell normally shines.
- Rust, because I want to get better in rust.
I decided to go for rust (and the excellent git2 crate). Rust is so cool to work with, because of the strict compiler. I really enjoy that.
I even started reading the git mailing list a bit. It was very interesting, but not ultimately useful to my course.
The project died very early, though, with very little code to show for it. Other projects got more interesting to me.
music streaming
I finally got navidrome on my server going. It is a self-hosted music streaming service.
I dislike the loss of control that streaming-services like Spotify etc bring with them. But a selfhosted version? I can get behind that.
Navidrome is cool for multiple reasons.
- It only reads my music directory and doesn’t change it (This is the best. I can work with files and navidrome will discover changes and update it’s internal database.)
- There is a web UI, but every subsonic-compatible client will work (there are a lot of those).
- Installation on NixOs is just a few lines in the config. Getting this right is hard (for me) but once it works it is so consistent, dense and elegant.
Next steps:
- move all my music into one central place for navidrome to read
- add metadata to all the files because navidrome doesn’t really care for directories. (mp3info is use useful for that)
- Install clients on all my devices
- Make it available to others in the house
address book analysis
I wanted to do an analysis and visualization of my address book. I wrote a blog post about a mistake I made in that process. There was a cool parser package for python once (vobject) but it’s development has stalled many years ago. So I wrote a basic parser myself and it was actually quite fun.
I am looking forward to continuing with this project.
vcf confusion

The contacts in the address book on your phone can be imported and exported using the vCard format.
This is basically a text file with a .vcf file extention (for virtual contact file).
It is surprisingly readable, here is an example (slightly redacted example from here):
BEGIN:VCARD
VERSION:3.0
N:Doe;John;;;
FN:John Doe
EMAIL;type=INTERNET;type=WORK;type=pref:johnDoe@example.org
TEL;type=WORK;type=pref:+1 617 555 1212
TEL;type=WORK:+1 (617) 555-1234
TEL;type=CELL:+1 781 555 1212
TEL;type=HOME:+1 202 555 1212
NOTE:John Doe has a long and varied history\, being documented on more police files that anyone else. Reports of his death are alas numerous.
CATEGORIES:Work,Test group
END:VCARD
I mean, what is there even to explain? You can just read it. And if anything is unclear (perhaps why the name is there twice) you can just read all about it on the official standard (RFC 6350). And even that one is nice and readable.
What an awesome format.
I want to analyze my address book
I wanted to do some data analysis on my address book
- I knew what I wanted to do with the data and had an idea what the result might look like.
So I exported it into a
.vcf-file and moved it to my computer.
It was tempting to write a parser for it myself. But one of the things I learned over the last years is to not reinvent the wheel. Especially if the alternative is just an import and reading a bit of documentation.
So I looked on pypi and was pleased to find a lot of vcf packages. 445 - perhaps a bit more then you would expect.
I just tried out one or two, but I got a strange error messages.
vcfpy.exceptions.IncorrectVCFFormat: Missing line starting with "#CHROM"
Hmm, that’s right, there is no line starting with #CHROM in my .vcf-file.
Is my export broken?
Is the package outdated perhaps?
So I tried another package, but I kept getting these error messages.
Strange…
What does $CHROM even mean?
Should I just add it to my file if the package wants it so desperately?
I looked up the standard - there wasn’t anything about #CHROM.
I looked up the error message on the internet - there definitely were people talking about #CHROM in their .vcf-files.
I looked up the documentation of the package - no really useful information.
I kept reading and finally found it:
There are multiple file formats named VCF.
There is the one about contacts, but there is also the “Variant Cal Format” used for genome-data in bioinformatics.
No wonder there are so many vcf-packages out there.
And #CHROM stands for chromosomes of course.
I had been reading the wrong documentation all along. Guess I should have just reinvented the wheel.
Wie Anfänger an Einfachem scheitern

“Snakes and ladders” ist ein so einfaches Spiel, dass es fast keine Regeln zu erklären gibt:
“Würfeln, laufen und wer als erstes ins Ziel kommt gewinnt. Wer auf einem markierten Feld landet kommt woanders raus.”
Ich wüsste wirklich nicht was man mehr erklären sollte.
Im eigentlichen Sinn ist es nicht einmal ein Spiel: Es gibt keine Entscheidungen, welche die Spieler treffen können, keine Fähigkeiten werden unter Beweis gestellt - man würfelt und zieht. Es ist mehr wie ein Protokoll, das abgearbeitet wird, um einen zufälligen Sieger zu bestimmen. Kaum mehr als ein verkomplizierter Münzwurf.
Aber wer versucht, es mit einem kleinen Kind zu spielen, der kann sehen wie viel implizites Wissen hier vorausgesetzt wird.
Hier ist eine Reihe von Schwierigkeiten, die ich beim Spielen mit kleinen Kindern hatte. (Um die Situation zu vereinfachen hatten wir auf alle Schlangen verzichtet und das Spielbrett sorgsam aufgebaut.)
- Sie wissen nicht, wer als nächstes dran ist.
- Sie wissen nicht, sie man würfelt.
- Der Würfel ist runter gefallen und unterm Sofa verschwunden.
- Sie wissen nicht, was die Zeichen auf dem Würfel bedeuten.
- Sie wollen lieber mit dem Würfel selbst spielen.
- Sie wissen nicht das jeder Spieler nur eine Spielfigur hat
- … und diese nicht mitten im Spiel mit der eines anderen tauschen darf.
- Sie wissen nicht, wie weit sie laufen dürfen.
- Sie laufen in die falsche Richtung.
- Sie können sich nicht auf das Spiel konzentrieren, nicht mal während sie selbst dran sind.
- Die Spielfiguren sind verrutscht und keiner weiß mehr wo sie waren.
- Sie wissen nicht mehr welches ihre Spielfigur ist.
- Sie wollen nicht warten bis der Vorgänger mit seinem Zug fertig ist.
- Sie wissen nicht, wann das Spiel zu Ende ist.
- Sie wissen sehr genau, wer gewonnen hat.
Ich schreibe das alles voller Respekt. Ich weiß sehr genau was es bedeutet, ein Anfänger zu sein.
Das ist einer der Gründe, warum gute Dokumentation zu schreiben unglaublich ist: Es ist sooo schwierig vorherzusagen, wie viel der Leser schon weiß.
changelog
I do a lot of personal computerstuff over the weeks. Most of it ends up in a repository of some sort (if it is not in a repo, have you even done something?) A few things end up in a database, which is fine, too.
But I don’t write about most of it. Apart from the git log there is no changelog, no releases (everything is released immediately) and no Retro.
Thats mostly OK. Most stuff I do is small and not aimed at the public (even when I do it in the open, almost all of my code is on gitlab). So if I do a commit or two every month there is not much to tell.
But wouldn’t it be nice to have some document of accomplishment every once in a while? An opportunity for retrospection? Lets try that.
So here is what I did in these days:
talks
In the last weeks I have written a website for the talks I have held. It was only the second site that I wrote completely from scratch. I am quite proud of it.
I used hugo as a site generator, but wrote the theme completely myself. I had an easier time figuring out the hugo templates, the HTML and the css. MDN is a really good resource.
The most difficult part was getting the css work for both mobile and desktop.
This was a big project for me.
There is still a lot to do content wise (writing transcripts, asking the rightholders for permission to distribute recordings of talks) but I am comfortable having the site online already.
elfeed
Elfeed is a Feedreader for Emacs. It has a great reputation within the community. It fetches the feeds itself by default, but with elfeed-protocol it can sync with different servers like Newsblur or ttrss. Elfeed-protocol has seen some critical improvements over the last few weeks, so I tried it out once more.
Elfeed sits in the intersection of 2 things I love: emacs and RSS. It’s gorgeous and I would love to use it, but when I first tried it in 2020 it missed some (for me critical) features. Those were resolved, some of them just a few weeks ago.
But I am not sure the sync of the read-status works reliably. I will have to try it some more. I am also in the in the process of reading through the code. This is bit hard for me because (e)lisp is still a bit hard for me to read.
hello world in sh

When I write a sh-script, this is how I start:
#!/bin/sh
# usage: ./greeter Johannes

set -eux
set -o pipefail  # only works in bash

greet() {
    echo "Hello $1"
}

greet "$1"
(Don’t forget to make the script executable: chmod +x greeter)
This template is useful because it encourages good standards.
This post is here mainly so I can find the template whenever I want to write a quick script. But since you are already here, lets go through it, line by line.
What is in the template
Shebang
#!/bin/sh
It allows you to run the script directly (./greeter Johannes) instead of with an interpreter (sh greeter Johannes).
Usage hint
# usage: ./greeter Johannes
A small reminder on how to use the script (because I will certainly forget it).
defensive programming
set -eux
If there is an error the script should stop immediately.
What it does (as described in bash -c "help set"):
-e: Exit immediately if a command exits with a non-zero status.-u: Treat unset variables as an error when substituting.-x: Print commands and their arguments as they are executed.
The last one is great for debugging. If you want to read more about these flags with more context, start reading here.
set -o pipefail # only works in bash
This is a bit of an outsider, because it is bash specific. I try to write my code as POSIX compliant as possible, but I don’t do so religiously. So this can stay in my opinion.
What it does is change the collective exit code of commands that are chained together by pipes.
Lets say you want to list all the home-directories sorted by alphabet.
You would write ls /home | sort and get an exit code of 0: All is fine.
But what if you have a typo in it?
ls /homee | sort will print ls: cannot access '/homee': No such file or directory to stderr,
but the exit code still indicates that all is fine.
That is because the exit code of the chain of commands is just the exit code of the last command - and sort did just fine with no input.
set -o pipefail will make this behave as expected:
The first nonzero status code will determine the status code of the whole chain
(and with the -e from above the script will abort).
Only if every single command exits with 0 then whole command will have exit code 0 as well and the script will continue.
In our case we would get an exit code of 2.
Function definition
greet() {
    echo "Hello $1"
}
Define a function in a POSIX compliant way.
The arguments are not declared in the breakets as in python (that would be cool).
Instead they are just assumed to be there and called with $1 (or $2 for the second argument, etc).
Function call and script arguments
greet "$1"
Call the above function with an argument.
The argument could be any string (greet "Sandra"), but I chose to use to forward the first argument of the script.
Script done
Now you can just script away. By the way, make sure to check it for errors with the incredible shellcheck.
Do not sort your screws

I used to have a medium-sized toolbox in my basement. Then recently I got my hands onto a relatively big amount of tools. They were not sorted at all.
From what I can tell the previous owners used to keep the tools in the whatever room they used them in last. “Finished the sink? Just put screwdivers and the leftover sealing rings in the kitchen-box.” I guess it worked for them.
It didn’t work for me. I threw all the piles together and spent multiple evenings sorting. Tools, material, boxes…
Sorting through your stuff is fun. I have been a fan of Marie Kondo since I read her book the first time, so I wasn’t afraid to let go of a lot of stuff. It is a joyfully way to spend a few hours.
One thing I didn’t get sorted out were the screws. There were just too many different ones.
What others do

I looked up how other people sort their screws. High shelves with small boxes, sorted by length, thickness, head type… There are selfmade tools that assist the sorting and big machines that do it all on their own.
All those solutions don’t fit my situation. My screws comes from many years of leftover screws, partly rescued from older furniture repuposed. I don’t have 5 or 10 or 20 kinds of screws, more like 100. At the same time, it is very seldom that I have 10 of the same kind.
I also seldom need a very specific screw. And if I did I probably wouldn’t have it in stock. Most of the time I need “2 Wood screws around this length, not too thick” or “anything with a round head like this”.
What works for me
So everything got into a big pile, in a big open box. Only those screws and dowels that are still in their original package were allowed to stay there. All of this went into a drawer.
This was not exactly a stroke of genius. It was simply the thing that required the least amount of work. For now I was fine with not making the problem worse.

I turned out to work extremely well though.
- doesn’t take a lot of space
- very easy to maintain
- finding a fitting screw is fairly easy (although finding a single certain screw is hard)
- there are practically no sunken costs (no stacking boxes, no rack, no time invested into sorting thousands of small parts), so I am very open to improvements
I sorted them a little bit
After using that system for some time I noticed that I could do a little better. This was mainly because I found that my screws could be divided into two piles very naturally: Wood screws vs Metal screws. So I separated them into two different containers.
I think this works because of two reasons:
- The division line is very clear (so both sorting and searching are easy)
- The resulting piles are about equal in size (roughly a relation 1:2), so the split really cuts down the search space.
For those reasons this divide increased searching speed without sacrificing the spirit of the system. The advantages get hurt just a little bit, but the trade of is worth it in my opinion.
I later split the bigger pile into long screws (>3cm) vs short screws (≤3cm), which works for the same reasons. I don’t think more splits would improve the situation for me, though.
Conclusion
In some situations the best sorting system is not to sort at all. Keep in mind that this is a valid option, too.
Trying out StreetComplete

The other day I found that StreetComplete is on F-Droid. I had heard of that app when it came out but had totally forgotten about it. Time to give it a try.
How it works
The goal is to go outside and add information to OpenStreetMap from your phone.
The app is probably the most modern app on my phone, it looks like it anyway. You need to login with your OpenStreetMap account (I barely remembered having one). Then you get a map and select an area where you would like to do quests. Those are scattered around in the area and you can choose which one to take. (You can also specify which kinds of quests you would like to do. Personally I don’t like to decide on types of houses and don’t want to measure the width of roads, so I don’t.)
After choosing one you get a simple question with some answers to choose from. Sometimes you are asked to enter some text (a house number or the name of a shop). But mostly the questions are multiple choice, with illustrated answers. This makes deciding on the right answer much easier.

Common questions in my area (gnihihi) are:
- Is there a sidewalk on that street?
- What kind of surface is here?
- Is there a bench/trashcan/streetlight at this bus stop?
- Is that sign still there?
Once you have answered the question the answer is directly uploaded to OpenStreetMap. You can even do it without mobile data! Then the answers are uploaded when you have WiFi next time. Awesome.

How it feels
It reminds me of those augmented reality games (Pokemon Go from 2016, Ingress from 2014) that were very in a few years ago. I never played those, but I imagine they felt similar to this.
Everything about the app is fun. Answering simple questions is fun, getting outside to clear your area from quests is fun, walking into random streets for some quest is fun. The kids like it, too. We were having a lot of fun with it.
Once you uploaded your answers you can have a look on OpenStreetMap and see them in the map right away. This in turn made me do some editing on the Map in the browser as well. OpenStreetMap’s Browser Editor (called iD) is really good these days, and so is the wiki where all the tags are explained in detail. And iD will even link those wikipages on within the editor so you can look them up effortless.
When I started contributing to OpenStreetMap I often was afraid that I would label something wrong and ruin the map for everyone. But in StreetComplete the quests are well chosen. The questions are direct and the options are clear, so you can answer confidently. And if you think you did something wrong anyways you can undo your answer.

Conclusion
After 3 days with StreetComplete I now have cleaned up the small area where I commute regularly. Some tasks can even be done from the bus, if you are quick. On occasion I will have to explore other areas.
StreetComplete does a good job at lowering the barrier of entry for mappers. I love it.
Annoyed with Sir Arthur Conan Doyle

My wife and I read stories to each other. It is a great way to go to sleep. At some point we started to do the Sherlock Holmes books by Sir Arthur Conan Doyle. A faithful translation of the originals.
The books are fun.
- The mysteries are interesting.
- Having read the originals (or a good translation) shines a new light on the many many adaptations that we are out there. A lot of them play with the original texts.
- The moments where Holmes goes “I know everything about that person just from having a close look” are always fun.
- Sherlock Holmes is in public domain. This gives me a feeling of opportunity - I could do everything with the material. (It is more of a theoretical opportunity though, I am not in the business of adapting literary figures.)
It is clear that crime novels have come a long way since 1887.
- Some of the situations/conversation feel a bit set up. Watson is constantly super-surprised about Holmes deductions. One would expect that he would learn to expect them (even when he can’t do them himself).
- Some of the solutions feel trivial. This is probably unfair against those stories, but by today’s standards I expect a clever and complex solution to a mysterious problem. “It was some guy who wanted the money, so he just did the next best thing” is just not interesting.
- Some ideas have been reiterated on so often that they feel old and predictable. Once again, this is not the originals fault, more of an achievement.
But there is one thing about the story structure that really annoyed us.
It happens at the end of some cases. The culprit has been found and arrested, it is more or less clear what happened. Holmes has had all his moments of cleverness. Now all we need is something to conclude the story.
But then the culprit gets a backstory. And that backstory is told in very much detail. Either by himself or just by the narrator. That’s fine and all, but it doesn’t add to the action. It is just another plot, nearly completely unrelated to what the book is about.
Examples would be:
- Chapter 12 of “The Sign of the Four” (1887)
- Chapter 1 to 5 of the second part of “A Study in Scarlet” (1890)
(I will admit that this seems to be only a problem of the earlier books.)
It feels like the author had thought of this backstory for the baddie and - when he finished writing - noticed that he did never use it in the tale. So instead of working it into the text he just pasted it in at the end, like an appendix.
This takes away from the books flow, and it makes me sad because I like them a lot.
It’s fine though, the later books don’t have the problem (or at least to a lesser extend).
Do not use this software

There is a piece of software on your computer that you shall not use.
It is not broken or alpha-software, it works perfectly fine. It is part of git after all, the basis of almost all modern and not so modern software. But have a look at it’s manpage and you will find a big warning to please not use it.
I am talking about the command git filter-branch.
Just have a look at it’s manpage.
I quote:
WARNING
git filter-branch has a plethora of pitfalls that can produce non-obvious manglings of the intended history rewrite (and can leave you with little time to investigate such problems since it has such abysmal performance). These safety and performance issues cannot be backward compatibly fixed and as such, its use is not recommended. Please use an alternative history filtering tool such as git filter-repo[1]. If you still need to use git filter-branch, please carefully read the section called “SAFETY” (and the section called “PERFORMANCE”) to learn about the land mines of filter-branch, and then vigilantly avoid as many of the hazards listed there as reasonably possible.
I read a lot of documentation: manpages, infopages, html-manuals, api-references, docstrings and (occasionaly) even as books. But I don’t remember reading about a piece of software that tries so hard to convince you to not use it, while simultaneously being available on nearly every computer in the world.
I found that quite amusing.
Hide the tmux statusbar if only one window is used
What?
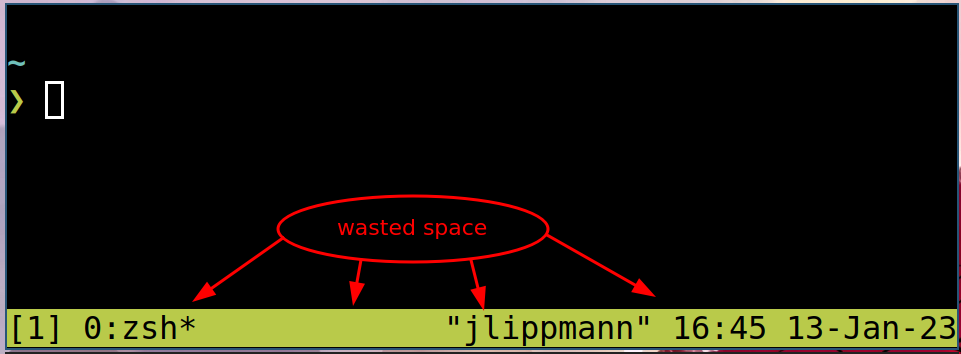
I want the tmux statusbar to show only if I have multiple tmux-windows open. When only one tmux-window is open, then the status bar should be hidden.
Why?
I like tmux, it is awesome. But I don’t use it in most shell sesssions.
My window manager (swaywm) is very good at creating and closing terminals. I often spawn them for a quick command and close them after a few seconds. So most of the time I do not need tmux in my terminals.
On the other hand, tmux features a big shiny green statusbar. That is usefull if I want to manage multiple tmux-windows. But if I don’t do that, then the status bar is distracting and takes up valueable space. Therefore I do not want that in every terminal I spawn.

Then again sometimes I am kneedeep into some project and then would like to use some tmux features. But at that time it is somewhat too late.
The best solution would be to have tmux running in every terminal, but have the status bar only show up if I start using multiple tmux-windows.
How?
Showing or hiding the statusbar permanently is as easy as adding one of the following lines to the tmux config file:
set -g status on
set -g status off

I was supprised to find out that automatically hiding the status bar doesn’t seem to be a very common thing to want. I didn’t find much on this, but it was quickly clear that I would have to use hooks and conditionals.
Then I found a github issue about my very usecase. The solution they suggested did only work half of the time unfortunatelly. (It failed to hide the statusbar when you would have multiple windows and start closing them from the left.) But I did manage to get it working by adding more hooks.
Here is the relevant part of my tmux.conf
# only show status bar if there is more then one window
set -g status off
set-hook -g after-new-window      'if "[ #{session_windows} -gt 1 ]" "set status on"'
set-hook -g after-kill-pane       'if "[ #{session_windows} -lt 2 ]" "set status off"'
set-hook -g pane-exited           'if "[ #{session_windows} -lt 2 ]" "set status off"'
set-hook -g window-layout-changed 'if "[ #{session_windows} -lt 2 ]" "set status off"'

Hooks are a bit of a pain in tmux, I wasn’t able to get a list of all active hooks. Closing the tmux session wouldn’t reset the hooks already set. So I had to reset the hooks by killing tmux (not just the session, tmux itself).
Done
So now I can have tmux active in every terminal I open. It won’t show the status bar if it is not needed, only if I have more then one window. I am quite happy with this new setup.
I quit Social Media

I get addicted to social media quite easily. It doesn’t do me good, I tend to sink a lot of time into it.
I usually use only one network at a time. I have had accounts on:
- Facebook: because all my classmates were there
- Twitter: because people there were so funny
- App.net: because Tim Pritlove promoted it
- Reddit: (because many interesting communities live there)
Each of those was hard for me to quit.
I also tipped my toes into the Fediverse, a collection of decentralized social networks: GNU social (almost the same as Mastodon today) and Friendica (which I even hosted myself). While there were some very interesting communities there (mostly nerds and trans-people) I never got hooked enough to stay. The reason might be that those networks don’t work so hard to make you addicted to them, which is a good thing.
What I didn’t quit yet
I still watch a lot of Youtube, but I don’t “like”, “subscribe” or “comment” there, so it is not really a social medium for me, just a medium. I use it as a portal for video-podcasts. At some point I will probably have to reduce this, too.
I read a lot of Blogs (and similars) via my feedreader. The open web is just the best. And I don’t think I will ever want to stop that. My share of it is this blog you are reading right now.
I do use mail, messenging and phones. But those are not social media to me, I would call them social networks.
How to quit
From time to time I realize that I have a problem with an addictive website. And some time later I get a “It’s time to quit”-moment. What works for me then is quiting cold turkey, by doing some of those:
- Log out on every device
- Delete the account
- Delete the site from my browser history (so I don’t get suggestions when typing an url)
- Block the site via DNS
- Tell my wife/friends that I quit
This has worked well for me, and after a week or so I rarely feel the need to go back.
Blogging on mobile

I want to write and publish blog posts from my mobile (which is running Android).
what is needed
Since this blog is being generated using a SSG in a CI from markdown files which life in a repo, this means I need to do the following:
- Clone a private repo from gitlab
- Add markdown/image files to the existing ones and edit them.
git addthose files to the repo andgit pushit to origin.
The CI will do the building and publishing itself then.
I want to use only free software if possible. Especially I don’t want to use any google services like the Playstore.
Let’s go through the points inorder:
1. Clone a (private) repo from gitlab
I was optimistic that there would be a capable git client on fdroid, but I couldn’t find anything suitable. There are some vendor specific clients (like GitNex for Gitea) and git-touch looked promising (but turned out to be a tool for managing accounts, not repos)
So I went for tmux (basically a terminal with a shell for Android) and installed git by hand. It doesn’t feel very polished for mobile but at least it is a shell and I can do what I want there.
To authenticate against gitlab I created a personal access token with the scope “read_repository” and “write_repository”. Then I could use special gitlab-magic-syntax to use this token in the branches path:
git clone https://gitlab-ci-token:{TOKEN}@gitlab.com/Kaligule/schauderbasis.git
There I had my repo.
2. Add images and markdown files
There are plenty of useful image-/markdown-editors on fdroid. Notes seems to fit my usecase very well.
I had some difficulties getting the paths right in tmux. I chose to blame android and java for this. Long story short: I had to call
termux-setup-storage
in termux and move the repo into what android seems to use instead of a home directory. Strange. But now all the apps can agree on where the repo is.
3. Perform a git add and git push
We basically did all the work in step 1. Just fire up tmux and type. I didn’t find an app that could even do these simple tasks.

this post is a proof of concept
Literally. I did this whole post on my mobile.
it doesn’t feel great
Honestly, it works but it still sucks. Working with a touch keyboard as the main driver on every step is no fun. But at least everything is under control and I can replace the tools until I am happy with them.
Write a program that reproduces itself

If you like to program, here is a neat little excercise:
Write a program that outputs it's own source code.
It is really fun, you should try it now. For me it is the kind of excercise that won't leave your head once you have written the first line of code.
Spoilers ahead.
How I did it
Python
I am most fluent in python, so that's what I tried first. After some trial and error I had this, which got me pretty close:
var='x'
print(f'{var=}\nprint({var})')
var='x' print(x)
Now all I had to do was to find good value for var and hope that the escaping would work out.
I ended up with this.
var='print(f"{var=}\\n{var}")'
print(f"{var=}\n{var}")
var='print(f"{var=}\\n{var}")'
print(f"{var=}\n{var}")
You can check that this really does output it's own source code by putting it into a file and running (in bash):
diff code.py <(python code.py) && echo "Success"This was fun, but I did use a bit of f-string magic. Can we get a similar solution in another language?
sh
Solving a problem in a shell-script is either really easy or really hard. Lets find out:
var='x'
echo -e "var='$var'\n$var"
var='x' x
The first attempt works reasonably well,
but when we replace the string x with echo -e "var='$var'\n$var" then we get into trouble.
var='echo -e "var='$var'\n$var"'
echo -e "var='$var'\n$var"
var='echo -e "var= $var"' echo -e "var= $var"
As always when you work with complicated strings in shell scripts, escaping special characters becomes unreasonable difficult.
In the end, I couldn't get it to work.
How to google it
A program that prints it's own source code is called a quine.
You may now google it, or just read the wikipedia article (which is great). I especially enjoyed the cheating section, where it mentioned that an empty program is technically a valid quine, as it outputs nothing when executed.
There is also rosetta code, which lists many solutions that I don't understand and some cheats.
How much control over the problem do you have?

There is a problem and a team who should do something about it. That team wants to communicate to others how much control over the problem they have. So they draw a scale, we will call it the problem-under-control-scale.
Here are some points they might mark on it (sorted roughly from bad to good):
- We don’t know there is a problem.
- We suspect there is a problem.
- We know there is a problem.
- We know there is a problem and how bad it is.
- We know there is a problem and how to find out more about it.
- We know where the cause of the problem lies.
- We were able to reproduce the problem.
- We know the cause of the problem.
- We understand the problem.
- We are looking for solutions.
- We know there is a solution.
- We know where to find a solution.
- We have an idea how a solution might look like.
- We are choosing between multiple apparent solutions.
- We know how we want to solve the problem.
- We are implementing a solution.
- We are testing a solution.
- We have solved the problem for now.
- We have solved the problem.
- We have solved the problem and learned from it.
- We have solved the problem and documented our learnings.
- We made sure problems like this can be solved easily in the future.
- We made sure problems like this can not happen anymore.
(I am sure there are more possible steps. For example, what if additional help is needed at any point?)
What to use the problem-under-control-scale for
I like this problem-under-control-scale, because it allows to think about problems in an abstract way.
- One of my favorite topics for talks/blogpost is “How we once improved our position on that scale”.
For example:
- “How we went from
We know there is a problem.toWe have solved the problem..”
- “How we went from
- In your teams’ update meeting you probably like to talk about
We are choosing between multiple apparent solutions.or better. But really important would be to talk about everything worse thenWe understand the problem.. - Quite often people stop when they got to
We have solved the problem for now., when they really should push further down the scale. - Open your favorite news-site. Most of them articles will be about problems. At which point are they on the problem-under-control-scale?
- You could also try to categorize posts on social media this way.
- Note how the first third of the scale doesn’t mention solutions at all. Don’t jump to solutions straight away. Sometimes knowing the problem might even be enough.
- Most ads try to sell you a solution to a problem you didn’t really have
(at least you made it so far without the advertised product).
So they have to get you from
We don’t know there is a problem.all the way to at leastWe know where to find a solution.(but not accidentally toWe have solved the problem for now.or better, because that wouldn’t sell anything). Try to see how they manage that next time you see an ad. - Most jobs pay so the employee solves some kind of problem.
When you get a problem to deal with, where is it on the
problem-under-control-scale? Close toWe suspect there is a problem.? (You are a detective then, cool!) Or more atWe know how we want to solve the problem.? (… and we want you to implement that solution)
What else could we do with the scale?
I think you could get some nice graphs if you pair the problem-under-control-scale with some other scale. Time perhaps? Or costs? Expertise_needed?

You would then plot the the course of your problems on the resulting coordinate system. This could help to answer questions like:
- Which step in the problem solving journey takes the most time/effort?
- Where do you get stuck most often?
- Should you perhaps approach your problems in a different way to get stuck less often?
Meine Quellen für die Welt der freien Software

Ich komme zur Zeit nicht viel zum schreiben. Dafür gibts gute Gründe, aber manchmal macht es mir etwas aus. Es ist auch nicht so, dass es nichts zu erzählen gäbe, aber die Zeit…
Naja, hier ist eine kurze Liste von Feeds, mit denen ich mit der Welt der freien Software in Kontakt bleibe. Selbst dann, wenn ich wenig Zeit habe.
Blogs, die häufig geupdated werden.
- GNU/Linux.ch: Meine Lieblingsnewseite zur Zeit. Sehr offene Community, richtig stark. Für mich ist es ein gefühlter Nachfolger von Pro-Linux.
- Linux News
- Emacs news (english): Die Emacs Community ist stark, aber auf viele Plattformen verteilt. Die unsterbliche Sacha Chua sammelt einmal die Woche alle interessante Sachen zusammen. Podcasts:
- Binaergewitter: Laberrunde mit fittem Team, die viel Informationen zusammentragen und einordnen.
- Python bytes (english): Die finden alles amazing, solange nur das Wort “Python” darin vorkommt. In eigentlich jedem Podcast sind ein oder zwei feine Fundstücke drin.
- Radio Tux: Fühlt sich ein bisschen wie ein Magazin an. Auf dem Radar:
- LinuxWeeklyNews (english): Einer der sehr wenigen bezahlten Feeds, die für mich attraktiv sind. Sehr technisch und sehr in die Tiefe.
Außerdem floge ich noch etwa 150 privaten Blogs (zb Xe Iaso, Drew DeVault, Brian Moses ) und den “offiziellen” Blogs von etwa 80 Projekten, die mich speziell interessieren (zb Godot, Thunderbird, Neovim ) Jeder schreibt selten, aber zusammengenommen gibt es jeden Tag was zu lesen.
(So vielen Quellen gleichzeitig zu folgen ist natürlich nur möglich, wenn man RSS/Atom-Feeds benutzt.)
Wenn ich das hier so aufschreibe fällt mir auf, dass fast alle deutschsprachig sind. Eigentlich cool, dass es da so viel deutsches Material gibt. Ich wäre aber auch an mehr guten englischsprachigen Blogs interessiert.
I wrote a hugo theme

I just love the concept of static site generators (SSG) for websites. They allow to separate content and presentation really cleanly:
- content is defined in some textfiles using some markup language
- the presentation is defined in
- a configuration file that sets some global metadata
- a theme, which is mainly a bunch of templates and css and potentially some JavaScript.
My blog has been generated using a SSG (namely hugo) for a long time, during which I switched between quite a few themes.
the most minimal theme
I always wanted a blog-theme that was as simple as possible. There are a lot to try, but I never found something that fitted me perfectly. I don’t want Integration of Google Analytics or Disqus or any other third party. I don’t want to need a cookie banner because I don’t use any cookies. This is not a social media platform, it is a blog and I started it for a reason.
But I was also aware of how little I know about JavaScript and CSS. And about design. So building a theme myself seemed to be out of reach for me.
But then, some time ago I revisited motherfuckingwebsite (and it’s many successors) and even though I can see the satire I wanted my blog to be somewhat like that. This seemed doable.
So I wrote some html-templates. It worked somewhat well but there was no denying that the black-and-white aesthetics of bare HTML was hard on the eyes.

nice css that I don’t have to write myself
Around that time I rediscovered classless css themes. Basically a classless css theme is a bit of css that is designed to make generic HTML look good. Generic HTML means that there don’t need to be special classes in it, just the standardized html5 tags. There are quite a lot of these themes available on the internet, most under free licenses. This was exactly what I needed.
I added a single configuration setting to my theme: It determines which classless theme you want to use. I added a sensible default and documented everything. I also let the user of the theme decide whether they want to load it from the web on each visit or whether they want to host it themselves.

And there we are: A theme for Hugo. Flexible in it’s looks, minimal in it’s design and beautiful in my opinion.
Some things I learned on the way
-
HTML is really expressive. I had assumed that markdown was about as powerful as Markdown. I was clearly wrong: there are soo many HTML tags for all sorts of things. My favourite finds include:
-
Hugo’s documentation is hard to use. I really wish it was decided into different sections for what I assume are it’s three main target groups: website-builders, theme-builders and hugo-developers.
-
I really wished to find a set of best-practices for building themes. Instead you are on your own with all the opinions of the internet as your best guideline. This also shows when you try to switch between themes: You almost always have to adapt some config that is specific to the implementation of that theme only.
-
The theme format and ecosystem of Hugo both have great parts that are simple and powerful (like the
theme.tomlor how thelayoutsdirectory is structured). Other parts look like the result of yearlong growth and people doing “whatever works” (like the requirements for themes). -
For the demo site I needed some cool images. I found a lot on unsplash and it was fun to collect unrelated images that fit together.
-
It is hard for me to know if a site is accessible or not. There are some web services that will score your site automatically, but I don’t really trust those. So for now I will just browse the site with a command line browser (lynx or w3m) and if that works well I feel like I have done enough. I am especially happy about constructive feedback in the point.
-
putting together a theme is one thing, finishing it as a project is a lot more work. You know, like doing a public repository, the demo site with nice pictures under free licenses, the documentation, a license, testing, CI/CD etc. But having done all that also means that I can be sure that it will continue to be usefull AS it is, not just a bunch oft dead code that nobody can get to work anymore.
reformat paragraph
Lets say we have a paragraph1 of plain text - probably in a markup language like Markdown, Orgmode, Asciidoc or LaTeX.
Then there are 4 sensible ways this paragraph can be formated:
- unfilled
- Everything is in one line. This can be achieved using the
function
unfill-paragraphin purcells unfill package. - filled
- Every line has at most
xcharacters 2. This makes a mass of text look uniform and prevents horizontal scrolling. This can be achieved with the functionfill-paragraph. - one-sentence-per-line
- This works very well for version controll, especially if the text is in some markup language. Diffs of small changes look very nice and readable. This format can be achieved with the custom function fill-senteces-in-paragraph I wrote below3.
- custom
- If the author wants it in his very specific way then nothing should stop him from formatting his text as they wants. Obviously this can not be done by the editor.
Here is an example of how they would look like in a text:
Unfilled: Lorem ipsum dolor sit amet, consectetur adipiscing elit. Sed do eiusmod tempor incididunt ut labore et dolore magna aliqua. Ut enim ad minim veniam. Quis nostrud exercitation ullamco laboris nisi ut aliquip ex ea commodo consequat.

Filled: Lorem ipsum dolor sit amet, consectetur adipiscing elit. Sed
do eiusmod tempor incididunt ut labore et dolore magna aliqua. Ut enim
ad minim veniam. Quis nostrud exercitation ullamco laboris nisi ut
aliquip ex ea commodo consequat.

One sentence per line: Lorem ipsum dolor sit amet, consectetur adipiscing elit.
Sed do eiusmod tempor incididunt ut labore et dolore magna aliqua.
Ut enim ad minim veniam.
Quis nostrud exercitation ullamco laboris nisi ut aliquip ex ea commodo consequat.

Custom: Lorem ipsum dolor sit amet,
consectetur adipiscing elit.
Sed do eiusmod tempor
incididunt ut
labore et
dolore magna
aliqua. Ut enim ad
minim veniam. Quis nostrud
exercitation ullamco laboris nisi
ut aliquip ex ea commodo consequat.
So the first 3 formates can be done by emacs directly. Building on the
results of the article "Fill and unfill paragraphs with a single key"
on https://endlessparentheses.com I want a single keybinding (M-q)
that cycles the paragraph through all of those fomattings.
This is great for 4 reasons:
- I can keep my existing muscle memory where
M-qisfill-paragraph, because we are basically building an extention to that command. - We don't loose functionality because there is no reason to call
fill-paragraphmultiple times in a row anyways4. - I only have to commit a single keybinding for reformating (keybindings are hard to remember well and short keybindings are rare for emacs users).
- I can repeatedly press the
M-quntil I like the formating. This allows me to go through the formattings quickly and see what I like best.
Having one keybinding cycling the text through different states is not very common in emacs, but it is not unheared of either:
recenter-top-bottom(bound toC-lby default) cycles through different views of the same buffer.org-cycle(bound toTABin orgmode) does rotate through different views of subtrees.
So lets try to build this.
Get all the formating functions
First we need to have a funtion for each format that reformats the current paragraph into that format.
The function fill-paragraph is conviniently built into emacs. For unfill-paragraph we can just use this package.
(use-package unfill)Now fill-sentences-in-paragraph we will have to write ourselfs:
(defun fill-sentences-in-paragraph ()
  "Put a newline at the end of each sentence in the current paragraph."
  (interactive)
  (save-excursion
    (mark-paragraph)
    (call-interactively 'fill-sentences-in-region)
    )
  )

(defun fill-sentences-in-region (start end)
  "Put a newline at the end of each sentence in the region maked by (start end)."
  (interactive "*r")
  (call-interactively 'unfill-region)
  (save-excursion
    (goto-char start)
    (while (< (point) end)
      (forward-sentence)
      (if (looking-at-p " ")
          (newline-and-indent)
        )
      )
    )
  )
Note that using forward sentence means that emacs needs to know how your sentences look like.
Read the documentation on sentences, especially the part where sentences are/aren't followed by a double space5.
Cycling through the functions.
Now we need a function that behaves different on consequtive calls.
(defvar repetition-counter 0
  "How often cycle-on-repetition was called in a row using the same command.")

(defun cycle-on-repetition (list-of-expressions)
  "Return the first element from the list on the first call,
   the second expression on the second consecutive call etc"
  (interactive)
  (if (equal this-command last-command)
      (setq repetition-counter (+ repetition-counter 1)) ;; then
    (setq repetition-counter 0) ;; else
    )
  (nth
   (mod repetition-counter (length list-of-expressions))
   list-of-expressions) ;; implicit return of the last evaluated value
  )
We can try this out by running (cycle-on-perpitition '("a" "b" "c")) a few times.
The result is (as expected): a, b, c, a, b …
I especially like the thought that even though repetition-counter is a
global variable and there is only one of them, we can use
cycle-on-repetition in different commands and the repetition-counter
will only ever count the repeats of the last envoked command. That is
because the switch is detected when this-command and last-command
are compared.
Putting it together
Now we can use a list of functions (functional programming, yeah!), cycle through those and call the result each time.
(defun reformat-paragraph ()
  "Cycles the paragraph between three states: filled/unfilled/fill-sentences."
  (interactive)
  (funcall (cycle-on-repetition '(fill-paragraph fill-sentences-in-paragraph unfill-paragraph)))
  )
And finally we bind that to M-q, to replace/extend emacs default behaviour.
(global-set-key
 (kbd "M-q")
 'reformat-paragraph
 )
Badabing Badaboom, our function is live. I use it very often when writing texts (like this blogpost) in emacs.

Some notes:
- I am quite proud of
cycle-on-repetition, it is one of the first complex behavours that I implemented in emacs-lisp all by myself. - my emacs config is public so you can have a look to see if this code is still part of it or not.
- If you liked this idea,
follow me on insta…then try to reimplementrecenter-top-bottomusingcycle-on-repetition.
A paragraph is one or more senteces separated from the rest of the text by two or more newlines.
x is controlled by the variable fill-column
There are many versions of similar functions around, I chose one that worked best for me.
The article on endlessparentheses calls that a "free feature"
This is a holy war I wasn't aware of.
entr should be part of every linux installation
If you use the commandline as your IDE, then entr is super usefull. As most unix programms, it does exatly one thing: “Run arbitrary commands when files change”
The syntax goes like this:
NAMES_OF_FILES_TO_WATCH | entr ENTR_FLAGS COMMAND COMMAND_FLAGS
Example usage
The entr website lists a bunch of usecases and examples, some are quite elaborate.
Here are some of the things I do with entr:
Export a markdown file to pdf and reexport it so that it is always up to date
Many converter tools
(like latexmk, hugo and diagramms)
have a flag that makes them watch for changes in files (and do their thing then).
But this doesn’t feel like it should be in there.
Why would they all reimplement the same functionality?
Using entr feels more natural and is more composable.
ls thesis.md | entr pandoc --to pdf thesis.md
find . -name "*.md" | entr -c hugo # I am using this line while writing this blogpost
Have a self-updating list of all TODOs in my org-file
echo "thesis.org" | entr -c rg TODO /_
This is nice when you are killing TODOs in your project and want to have a small “dashboard” of the remaining ones.
(the /_ will be with the name of the file that changed)
Run the testsuit when I changed the code or tests
Whenever I have some tests failing I use this command so I don’t have to restart the test after every attempted.
find . -name "*.py" | entr python -m pytest
continously try out my script
ls nondestructive_script.bash | entr -c bash /_
This will run the script whenever I change it (which is nice as long as I am sure that the script doesn’t do something terrible). I can then examin the output and adapt the script.
entr is very unixoid
I really wish it was preinstalled on all unixoid systems. It fits so well into the ecosystem:
- It works on files
- It works on text
- It doesn’t produce any output (unless you ask it to)
- it composes well with other programs as stdin (especially
ls,findandgrep --files-with-matches)
The only strange thing is that the files to watch are specified through stdin.
The interface doesn’t feel like a filter that way, a bit like xargs cat
But one gets used to that.
entr plays especially well with make (because make only acts on files that have changed).
entr a bit more Meta then other commands
entr is a meta command, it is intended to call other commands.
This distinguishes it from familiar programms like tail, wc, sort, uniq, curl etc.
and puts it more in line with watch, time, xargs and sudo.
entr is the best
I really like to have entr around. Luckily it is available for allmost all linux distros and even macOS.
I speak nix now

After living in a love-hate relationship with my nixos-configuration it finally came to the point that it became too big of a file to handle. I already had it versioned (nearly everything I write is versioned). But now the file approached a few hundred lines at I was going to loose my grip on it.
A few hundred lines of code is nothing. But a few hundred lines of config is a whole lot. Especially if you don’t know the configuration language well. Or if the config is about very different aspects of a complicated system.
I know I had to find a solution. There were two obvious ones:
- Manage the config in org-mode (literate-config-programming) as I do with my emacs config.
- Learn more about the nix-language and split the file up into modules.
I knew I would have to make a decision and I dragged it around with me for about a week. Then a night came where I couldn’t sleep and I used it to read a lot about nix, especially this article. And finally it clicked.
I had a breaktrough.
When I finally understood how import function works in nix I was blown away in a storm of motivation.
Over the next days I rewrote my config into a series of modules, nice and separated.
(I can only work in the evening on stuff like that, often no more then 20 minutes a day.)
I learned a lot about nix in the process, a lot of pieces fell into their place.
Now my laptop and my server share many modules and it is easy to add new ones without adding much complexity.
It feels great.
This has happened before. I declared emacs-config-bankruptcy multiple times before I finally got it and brought it all into a nice, organized format. Since then the config grew and grew, is counts 2000 dense lines of config and holds over 40 chapters on minor-modes alone. Yet I don’t fear touching anything in it. I even read other peoples configs from time to time, taking good ideas from them.
My emacs config is under control. And now my nixos-config is, too.
Proof of concept: Backup from Unix to Nixos with Borg

I want to get a directory backed up with borg on my nixos-server (regulus.fritz.box).
The client may just be a regular unixoid, doesn't have to be nixos (I am using MacOS for testing).
All the commands (unless explicitly stated otherwise) are executed on the client.
Both systems have borg installed.
This is a tutorial, so most explaining will be about what to do, not why to do it.
Setup
We first create the directory with our valuable data.
echo "1234567890" > files_to_back_up/zahlen.txt
echo "abcdefghijklmnopqrstuvwxyz" > files_to_back_up/buchstaben.txt
For borg to access the server without a password we need to create a keyfile pair (on the client). Name it however you want.
ssh-keygen -N '' -t ed25519 -f key_backups_of_NUE-MAC-087_id_ed25519Generating public/private ed25519 key pair.
Your identification has been saved in key_backups_of_NUE-MAC-087_id_ed25519.
Your public key has been saved in key_backups_of_NUE-MAC-087_id_ed25519.pub.
The key fingerprint is:
SHA256:KAkg+ve2A+D9TWYYdlshCIECDfP3SWAXAyml8NkZFPA jlippmann@NUE-MAC-087
The key's randomart image is:
+--[ED25519 256]--+
|Oo.=@*+o |
|+*+*.=... . |
|..*.E . . . |
| ..o +oo. . |
| ..o+.++So |
| ..oo. = |
| oo= |
| .o.. |
| .. |
+----[SHA256]-----+Have a look at the public key:
cat key_backups_of_NUE-MAC-087_id_ed25519.pubssh-ed25519 AAAAC3NzaC1lZDI1NTE5AAAAIE+u6Q/ycvxM1XG7JitWqla/nTKvT29rHS9IUjZMaPwH jlippmann@NUE-MAC-087Now we tell the server about this key and what should be done with it. Nixos will do all the complicated stuff for us (creating a user and paths, setting the rights correctly), we just have to add the following to the (server-)nixos-configuration.
  services.borgbackup.repos = {
    my_borg_repo = {
      authorizedKeys = [
        # Here goes the public key we just created
        "ssh-ed25519 AAAAC3NzaC1lZDI1NTE5AAAAIE+u6Q/ycvxM1XG7JitWqla/nTKvT29rHS9IUjZMaPwH jlippmann@NUE-MAC-087"
      ] ;
      # where the backup will be placed
      path = "/var/lib/my_borg_repo" ;
    };
  };
Rebuild and switch. A user of the name borg has been created, has been assigned the mentioned directory and the key has been placed in the correct spot. You can check that this worked like this (still on the server):
cat /etc/ssh/authorized_keys.d/borgcommand="cd '/var/lib/my_borg_repo' && borg serve --restrict-to-repository . ",restrict ssh-ed25519 AAAAC3NzaC1lZDI1NTE5AAAAIE+u6Q/ycvxM1XG7JitWqla/nTKvT29rHS9IUjZMaPwH jlippmann@NUE-MAC-087Initialize the backup
We will have a password, which is the password for our backup itself. To be more precise: it is the password for a key stored in the backup-repo with which the backup wil be encrypted. It has nothing to do with the keypair we created earlier (which is just for connecting to the server). To safe time we will export this backup-passwort to a shell variable beforehand. There are other ways, for example setting a BORG_PASSCOMMAND. If you don't you will be asked to enter the password each time interactively (which is nice for exploration but bad for scripting.
export BORG_PASSPHRASE="test"Now back on the client we can init the borg repo. Note especially the trailing colon and dot in the adress.
borg init --encryption=repokey-blake2 --rsh "ssh -i key_backups_of_NUE-MAC-087_id_ed25519" borg@regulus.fritz.box:.By default repositories initialized with this version will produce security
errors if written to with an older version (up to and including Borg 1.0.8).
If you want to use these older versions, you can disable the check by running:
borg upgrade --disable-tam ssh://borg@regulus.fritz.box/./.
See https://borgbackup.readthedocs.io/en/stable/changes.html#pre-1-0-9-manifest-spoofing-vulnerability for details about the security implications.
IMPORTANT: you will need both KEY AND PASSPHRASE to access this repo!
Use "borg key export" to export the key, optionally in printable format.
Write down the passphrase. Store both at safe place(s).To confirm that we indeed created the repository remotly we can check that the repo was created on the server:
ls /var/lib/my_borg_repo/config data hints.1 index.1 integrity.1 nonce READMEBack on the client again, lets do this key export that was mentioned after we initialized the repo. I THINK that key is what the repo is encrypted with.
borg key export --rsh "ssh -i key_backups_of_NUE-MAC-087_id_ed25519" borg@regulus.fritz.box:. test_export
cat test_export
BORG_KEY ab6cb44a7ed5b13e6bb9fd62e93731d741de161d031aa74c5e903a7c1e9cb9ef
hqlhbGdvcml0aG2mc2hhMjU2pGRhdGHaAZ5SR2ULbAiQQxcmb1tD+y99ZEzBll9Pe/D0C0
dlQAniuUFgHa2J/dCH3FNkT92QfzgQW3k/SP6obl5JOYRUJRGEPJNYa2RwcSquV9xpqnTg
/QsOWNJQuQBX2dZIMWRiHYVKvXiK11jPI0HyO1c8SV9YgfH8mJtWd+0uX4eLnqCFGBWXfO
hTgKMdRTtkcV89HjZqYI4fW64AnSB6DLPyQutm0jXeRFdYtdZbujufS5SRb9rBYxcypOSu
8TT5zNcu+Sus2vr5gc303CXM9Ktv8wYiuErC6YlP5dClfU8N9ihqS91lIc32R1QbufTSgt
h0yBEugYqGLRDr+ZVGVdwojshgQoyECH9l87FNyQnExvFXm2TNg0O8gWwnja+xNU+0yta5
DNG2tHmCi99Et10ezKton6MXIGcWBwErFlZ5E+vG1pmP3AiUVM7gtUCICp/foJWhoQKlf5
U8xUDid/t34/YGv9kHAWpvXWVQej1lAC4kpaVQ+ZcyGOSN9VUKCniOmbF1ip2cymF0biYn
CnOR5G1Bwc+XSbLlVmUR/xwIJOakaGFzaNoAIAEIyyWhmLMISUJYyy2Iay4O9o7cffYSzR
mUjalZJFK9qml0ZXJhdGlvbnPOAAGGoKRzYWx02gAgpY+xYO83BALtVodzGH4aJgpD6jzt
5Ao3IMLckcx5xeSndmVyc2lvbgE=Create a backup
Now we can do our first backup:
borg create --stats --rsh "ssh -i key_backups_of_NUE-MAC-087_id_ed25519" borg@regulus.fritz.box:.::01_first_backup files_to_back_up------------------------------------------------------------------------------
Archive name: 01_first_backup
Archive fingerprint: e40e34c423ed1dba3ab1243840a3840b244f0f423f8bc96e50773879ae3184cd
Time (start): Sat, 2020-12-26 22:13:26
Time (end): Sat, 2020-12-26 22:13:26
Duration: 0.04 seconds
Number of files: 2
Utilization of max. archive size: 0%
------------------------------------------------------------------------------
Original size Compressed size Deduplicated size
This archive: 1.20 kB 1.12 kB 1.12 kB
All archives: 1.20 kB 1.12 kB 1.12 kB
Unique chunks Total chunks
Chunk index: 4 4
------------------------------------------------------------------------------Now we can see if it is realy there:
borg list --rsh "ssh -i key_backups_of_NUE-MAC-087_id_ed25519" borg@regulus.fritz.box:.01_first_backup Sat, 2020-12-26 22:13:26 [e40e34c423ed1dba3ab1243840a3840b244f0f423f8bc96e50773879ae3184cd]And see what is in it:
borg list --rsh "ssh -i key_backups_of_NUE-MAC-087_id_ed25519" borg@regulus.fritz.box:.::01_first_backupdrwxr-xr-x jlippmann 1728021072 0 Mon, 2020-12-21 07:48:10 files_to_back_up
-rw-r--r-- jlippmann 1728021072 11 Sat, 2020-12-26 22:04:13 files_to_back_up/zahlen.txt
-rw-r--r-- jlippmann 1728021072 27 Sat, 2020-12-26 22:04:13 files_to_back_up/buchstaben.txtchange some files and back up again
Now we add/change some files, create a new backup (without –stats this time) and check if it is there as well.
echo "ABCDEFGHIJKLMNOPQRSTUVWXYZ" >> files_to_back_up/buchstaben.txt # change a file
echo "gnu penguin chamaeleon" > files_to_back_up/animals.txt         # add a new file
# new backup
borg create --rsh "ssh -i key_backups_of_NUE-MAC-087_id_ed25519" borg@regulus.fritz.box:.::02_second_backup files_to_back_up
List all the backups.
borg list --rsh "ssh -i key_backups_of_NUE-MAC-087_id_ed25519" borg@regulus.fritz.box:.01_first_backup Sat, 2020-12-26 22:13:26 [e40e34c423ed1dba3ab1243840a3840b244f0f423f8bc96e50773879ae3184cd]
02_second_backup Sat, 2020-12-26 22:15:35 [7a9d60039583b5c01dbf50df4b3f11c7736f1f5701c8822cc80b97e90aa2d220]
Look into 02_second_backup.
borg list --rsh "ssh -i key_backups_of_NUE-MAC-087_id_ed25519" borg@regulus.fritz.box:.::02_second_backupdrwxr-xr-x jlippmann 1728021072 0 Sat, 2020-12-26 22:15:33 files_to_back_up
-rw-r--r-- jlippmann 1728021072 11 Sat, 2020-12-26 22:04:13 files_to_back_up/zahlen.txt
-rw-r--r-- jlippmann 1728021072 54 Sat, 2020-12-26 22:15:33 files_to_back_up/buchstaben.txt
-rw-r--r-- jlippmann 1728021072 23 Sat, 2020-12-26 22:15:33 files_to_back_up/animals.txt
Looking at the size of the file buchstaben.txt we see that it has grown.
Restore from backup
Next we loose our precious directory by accident…
rm -rf files_to_back_up # Oh no!… and want to get an old version of it back.
borg extract --rsh "ssh -i key_backups_of_NUE-MAC-087_id_ed25519" borg@regulus.fritz.box:.::01_first_backupThe files are back, as expected.
ls -la files_to_back_uptotal 16
drwxr-xr-x 4 jlippmann 1728021072 128 21 Dez 07:48 .
drwxr-xr-x 12 jlippmann 1728021072 384 26 Dez 22:40 ..
-rw-r--r-- 1 jlippmann 1728021072 27 26 Dez 22:04 buchstaben.txt
-rw-r--r-- 1 jlippmann 1728021072 11 26 Dez 22:04 zahlen.txtfun errors

I am currently rewriting Chris Wellons’s racing simulation in rust as a training exercise. His program is really nice in that it is visual, interesting and well under 500 lines of Code - really inspiring. (I wouldn’t have minded speaking variable names and comments though).
Rust is still hard for me, I am mostly fighting the borrow checker. But the extremely helpfully error-messages and Stackoverflow mostly help me get over it.
There is a magical moment in creating simulations: The point were errors don’t break the simulation, they just cause strange behavior. The most famous example is probably the drunk cats in dwarf fortress.
In my simulation the problem was that I just couldn’t get the driver to drive the course without hitting a wall. It should steer into the direction that has the most free space and adjust it’s speed according to how much free road is ahead (more on that later).

(The map is drawn by me and it is only 300x200, so it might look blury on your screen.)
These errors are so great because you can try to reason within the logic of the simulation. Is the car going to fast/slow? Is the turning radius to big? Does the driver act too sudden on curves? Or perhaps the map is to difficult and the turns are too sharp?
After trying a few things out I decided to visualize the field of view of the the car. As is in the original simulation, the car does 3 raycasts: to the left, forwards and to the right. It then decides how to steer the car based on how much space it has in each direction.
Here is what the car sees on the course:

It’s immediately obvious that something is wrong here. There was a sign error in the y-axis in the calculation for the raycasts. It is a bit like the driver was looking at the street over a mirror.
I love that kind of debugging. Instead of error messages, stacktraces and debuggers you think about the car, the map and what the driver sees.
Here is the fixed version, just a minus sign away:

Nix on macOS

Nix is packagemanager like nothing I have seen anywhere else (I have suspicion that Guix goes in a similar direction, but I haven’t tried it out yet). Using it is a bit similar to using a package manager for the first time: Once you have seen the light, there is no coming back.
That’s why I have Nix running on 3 machines currently: My main Laptop, my “home-server”-raspberry-pi and (since this weeks) my MacBook for work (I am in the happy situation that my current employer allows devs much freedom on their work-devices).
Nix can’t replace brew completely yet, just because brew has so many packages that are not available via Nix. I am not yet at the point where I can create my own Nix-packages, so for more special things I still rely on brew. But for everything else…
After installing (two great blogposts about that: 1, 2) there are two ways I make use of Nix:
- listing
~/.nixpkgs/darwin-configuration.nixto list the packages I want (similar to NixOS) - using
nix-shellto create development-environments (similar tovirtualenvin python.)
I have not yet suggested using nix to my coworkers, but if it continues to be amazing as it is, I think I will.
Install NIXOS on raspberry pi 4

Given a raspberry pi 4 with
- an ethernet connection
- a micro-sd card
- a usb-keyboard
… this is how to set up the RP with nixos so that you can ssh into
it. We won't need to attach a screen to it. All we need beyond above
is a computer with an internet connection that can write to the SD
card (using dd).
This is not a tutorial, this is a howto (and cheat sheet for my future
self), so I won't explain too much here. Also the commands might still
use some paths from my computer (like /home/johannes/).
All of this is necessary as of the time of writing the RP4 is not officially supported by NixOS. But I really fell in love with the declarative configuration of NixOS, so I had to install it anyway. Fortunatelly there is some documentation from people who did it before me, but I didn't find a complete howto.
Install NixOS
Download the image
(for me it was
nixos-sd-image-21.03pre249162.1dc37370c48-aarch64-linux.img) from
here:
https://hydra.nixos.org/job/nixos/release-20.03/nixos.sd_image.aarch64-linux
Make sure you check the hashes.
Prepare the SD card
Put SD card into computer and write image on SD card.
CARFULL HERE, better check (with lsblk) the of is really the SD card.
sudo dd if=~/Downloads/nixos-sd-image-aarch64-linux.img of=/dev/mmcblk0 status=progressBoot into NixOS
Plug SD-card out and into the raspberry pi. Connect it to power - it should boot into NixOS now.
Set password for ssh login
We have to set password (mypassword) for default user nixos to log
in via ssh, so plug in a usb keyboard and type:
passwd
ENTER
mypassword
ENTER
mypassword
ENTER
This is much easier with a display attached. But if you don't have an adapter for micro-hdmi (or a display), just do it blindly.
We won't need the keyboard from now on.
Log in via ssh
In my setup the address of the pi is nixos.fritz.box. So we should
be able to ssh in with the password set above.
ssh nixos@nixos.fritz.boxI will call this session the "remote" from here on.
Build NixOS from a config
Create the nixos config
First create a config, especially the hardware-configuration.nix. On remote:
sudo nixos-generate-configI wrote a minimal config to save some time. It is a slimmed down version of the config that is generated with nixos-generate-config. I added the boot settings from the NixOS Wiki and removed everything that I understood well enough to be sure it is not necessary for working on nixos via ssh.
Now mv the minimal config to the pi:
scp configuration.nix nixos@nixos.fritz.box:configration.nixOn the pi, move it to the right place (replacing the generated one) …
sudo mv /home/nixos/configration.nix /etc/nixos/configuration.nix… and rebuild the OS from the config.
sudo nixos-rebuild switchProfit
kill remote session (C-d) and log in again, but with your username and password set in the config file.
ssh johannes@nixos.fritz.boxResult
We should now be able to log into the pi, change the config and rebuild the OS.
Just play with the code

When I want to do something for fun, this is what I do:
- Plan it (find a date and time, ask people I want to participate)
- Prepare it (pack the necessary stuff, drive there, set up the table/workspace)
- Do it
- Clean up (drive home, put everything back, remove tmp-files)
Now that I think about it, the workflow is pretty similar to what I do when I want to work on something not for fun.
It is easier for babys
While playing with my daughter I noticed that she does it differently. She doesn’t plan or prepare anything, she just jumps from “the idea of doing something” to “Do it”.
This results in a number of games I couldn’t even have planed:
- Making noises with the gummi guiraffe every time her mother walks by
- Me patting her back to the rythm of “the lion sleeps tonight”
- Climbing the ever growing mountain of cushions I built up to stop her from falling from the bed
In a way this is how I used to work on my side-coding-projects: I would browse through the code and do to it whatever I thought of doing.
I would add features spontanously, refactor what I stumpled upon or do research on how something works, just because my eye fell on it.
This workflow was not very productive in the sense of reaching goals or finishing projects. But it was great for learning, relaxation and gradually improving the codebase. If development is a discussion, this is the smalltalk.
And while my workflow changed a lot in the last years, I think this a great way to get to know a codebase. Just play with it.
Lies keine Oden, lies die Ausgangsbeschränkungen

Die Ausgangsbeschränkungen (wegen COVID-19) ändern sich ab und zu und haben dann sofort große Auswirkungen auf unser Leben. Deshalb sind dann Zeitungen und Radiosendungen voll mit Diskussionen und FAQs: “Was ist nun erlaubt, was nicht?”
Das ist ja auch in Ordnung. Es wäre aber schon wichtig zu wissen, dass man auch die Verordnungen im Original lesen kann:
https://www.stmgp.bayern.de/coronavirus/rechtsgrundlagen/
Am Ende gelten auch nicht die Regeln, die der Söder in der Pressekonferenz erzählt, sondern das was im Gesetz (oder in diesem Fall in der Verordnung) steht.
Darum mein Plädoyer: Bevor du Abhandlungen über Gesetze liest, lies vorher die Gesetze selbst.
Sie sind genauer.
Sind alle Kreise gleich?
Das Verhältnis von Umfang und Fläche eines Kreises ändert sich mit der Größe des Kreises. Aber sind nicht alle Kreise gleich/kongruent? Sollte dann nicht auch das Verhältnis immer gleich sein? Bei Umfang zu Durchmesser ist es ja auch für alle Kreise gleich.
Ein Freund kam neulich mit dieser Frage zu mir. Er hatte sie mehreren Leuten gestellt und alle konnten ihm die Formel für das Verhältnis herleiten. Aber Formeln anschauen ist nicht das gleiche wie verstehen. Tatsächlich ist es eine sehr gute Frage, die an die Grundlagen des Messens heran reicht.
Gleiche Messgrößen
Größen, die Dinge aus der gleichen “Kategorie” (zB Länge, Gewicht, Geschwindigkeit) beschreiben kann man direkt zueinander ins Verhältnis setzten (-> vergleichen). Zum Beispiel:
- Dein Auto ist schneller als meines (Kategorie Geschwindigkeit)
- Umfang eines Kreises und sein Durchmesser (Definition von $\pi$ (pi), die Kategorie ist hier Länge)
Unterschiedliche Messgrößen
Bei unterschiedlichen Kategorien kann man nicht direkt vergleichen
- Bist du schwerer als du hoch bist?
- Sie ist so dumm wie die Nacht finster ist.
Hier können wir verstehen, warum das Verhältnis Umfang zu Flächeninhalt eines Kreises nicht einfach so zu messen ist: Die Kategorien (Fläche und Länge) sind verschieden.
In diesen Fällen muss man zuerst die einzelnen Größen “messen”, also ins Verhältnis zu einer Einheit setzten (siehe den Exkurs unten).
Hat man nun die beiden Größen ins Verhältnis zu ihren Einheit gesetzt kann man diese Verhältnisse vergleichen. Man muss aber die Einheit dazu nennen:
- 5 kg Mehl für 4 EUR -> 0,8 EUR/kg
- 1 Liter Wasser hat eine Masse von 0,998 kg -> Die Dichte von Wasser ist 0,998 kg/l
Nun können wir also den Umfang und den Flächeninhalt vergleichen, wenn wir uns vorher auf Maßeinheiten (zB cm und cm^2) festlegen. Sobald wir das aber tun sind eben nicht mehr alle Kreise gleich: Sie unterscheiden sich in ihren Radien. Das Verhältnis ist nicht platonisch, es hat eine Einheit (1/cm).

Kongruenz kann man übrigens nicht als Argument heranziehen, dass Umfang zu Fläche konstant sein sollten. Denn Kongruenz bedeutet nur, dass die Verhältnisse von Strecken konstant sind - und die sind alle in der selben Kategorie.
Exkurs: Einheiten an sich selbst messen.
Eine Einheit sollte außerhalb des zu messenden Systems definiert sein:
- Er ist 1,80 Meter groß (Vergleich zum Urmeter) und 90 kg schwer (90 mal schwerer als das Urkilogramm).
- Das Mehl kostet 4 Euro (Vergleich zu dem Wert, den wir einen Euro nennen)
- Andromeda ist 2500000 Lichtjahre entfernt (Vergleich zur Strecke, die Licht in einer gewissen Zeit zurücklegt).
Wenn man stattdessen eine Einheit an dem definiert, das man messen will, dann ist das Verhältnis trivial und die ist Messung nutzlos:
- Das Monster ist so groß, wie ein Monster groß ist.
- In einen Hefeteig soll so viel Mehl, wie in einen guten Hefeteig rein kommt.
So leicht lässt sich die Mathematik nicht austricksen.
First step to NixOS

Given my OS history (Windows -> macOS -> Fedora -> Arch Linux) these were the options I was interested in as a next one:
- Gentoo (but I have no interests in compiling everything myself)
- GNU Hurd (but I don’t think it is ready yet)
- Arch Linux (There was nothing bad about it except the installation process)
- Manjaro (because it is Arch with an installer)
- NixOS (because I like writing configurations)
I decided on NixOS because I could see me using it for the next years (other then Gentoo and GNU Hurd) and it would give me the opportunity to learn something completely new (other then Arch and Manjaro that I used for a few years now).
Since my old laptop T440S was gone and beyond repair I got my hands on an old T430S (which makes it amazingly easy to swap parts) and created a bootable USB Stick. And then …
some wonderful things happened in my private live and I had no time to go further.
It has been a few months, but I finally could pick up my experiment with NixOS. Booting from the stick was easy and before you know it you get a Desktop Environment. There are some multiple tools to help you get the disk in the shape you want before the real installation begins.
While I know how my way around the commandline the same can not be said about partitioning, formating and file systems. It seems like there are multiple definitions of “device” for different programms and I wouldn’t even know how a good setup would look like. I clearly lack knowledge in this area.
The NixOS manual
uses a lot of commands that sounded obscure to me (parted, mkfs
and mkswap) so I choose to follow a guide from
alexherbo2
that seemed more detailed and recommended “GParted for
discoverability”. Unfortunatelly I got stuck when creating new
partitions. I couldn’t assign any other filesystems then ’linux-swap
and ‘minix’.
Asking for help in the IRC (#nixos) got me some advice (from colemickens, thanks a lot) - he encouraged me to give the commands from the manual a try (because I didn’t have much to loose on that machine). It turned out that they did work as advertised. When I typed them in by hand I got a better understanding of what they did than from just reading/copying/pasting them.
The rest of the installation process went as expected. I had a little trouble because I hadn’t installed the network-manager before rebooting (so I couldn’t install it later because I had no network-manager to get the wifi going) but fortunately the Ethernet worked out of the box.
So now I have a working NixOS on my Thinkpad. Having managed the
installation so far makes me a bit proud and I am looking forward to
learn the nix way. I really like it so far, but didn’t have much time
to play with it. Currently I only have emacs, network-manager,
sway and firefox installed, qutebrowser will follow. That should
be enough to get along for a while, the next step is to migrate my old
data.
Using Newsblur's API

Everybody should have a feedreader for RSS feeds. Lately I decided to subscribe to some feeds of local organisations (like the zoo, some local fablabs or the nearest police station). Things that take place nearby are more interesting after all.
So yesterday I found that our city administration provides some RSS-feeds - many actually. They are all listed on this website. So I want to subscribe to all of them. I didn’t find an easy way to subscribe to many feeds at once through the Newsblur web interface, so I decided it was a good day to test out the Newsblur api. (While the API is well documented, I found that I missed having some examples to play around with. So here is my example.)
For authentication I got my session coockie like this:
curl -X POST \
    --cookie-jar session.newsblur \
    --data "username=$MY_USERNAME" \
    --data "password=$MY_PASSWORD" \
    https://www.newsblur.com/api/login
After that, the file session.newsblur contains something that looks
like a sessionid:
#HttpOnly_.newsblur.com TRUE / FALSE 1601234874 newsblur_sessionid xa3w22sometokenspecifictome6duds
As a test I tried reading a list of all my feeds (the json_pp is just for formating):
curl -X GET \
    --cookie session.newsblur \
    "https://www.newsblur.com/reader/feeds" \
    | json_pp
This works just fine and contains information about my personal feeds, so we know I did the authentication right.
Next I want to subscribe to a single the feed
(https://www.nuernberg.de/internet/newsfeed/stadtportal_ausstellungen.xml,
taken from the site mentioned above) and add it in the folder
regional. The documentation for this
command tells us we
will need to add the two arguments as url parameters. Since the url
contains suspicious caracters like :, ., / and \ (that are
likely to break things) I will use the curl flag --data-urlencode:
curl -X POST \
    --cookie session.newsblur \
    --data-urlencode "url=https://www.nuernberg.de/internet/newsfeed/stadtportal_ausstellungen.xml" \
    --data-urlencode "folder=regional" \
    "https://www.newsblur.com/reader/add_url"
The output again is some json, telling my information about the newly subscribed feed:
    {
    ...
      "subs" : 1,
      "feed_link" : "https://www.nuernberg.de/internet/newsfeed/Stadtportal - Ausstellungen",
      "id" : 7686975,
      "min_to_decay" : 240,
      "updated_seconds_ago" : 15878,
      "stories_last_month" : 6,
      "favicon_text_color" : "white",
      "fetched_once" : true,
      "search_indexed" : true,
      "last_story_seconds_ago" : 541185,
    ...
    }
A look at the Newsblur’s website tells us that we really did subscribe to the feed and it was placed in the correct folder. So we are nearly there! Let’s get a list of all the feeds that are linked in the site of the city administration:
lynx -dump -listonly "https://www.nuernberg.de/internet/stadtportal/feed.html" \
    | grep xml | awk '{print $2}' > feeds_to_subscribe_to.txt
We get a file with one feed address per line (36 in sum). Now all that is left is to loop over them and subscribe to them one by one.
cat feeds_to_subscribe_to.txt | while read feed
    do
        curl -X POST \
            --cookie session.newsblur \
            --data-urlencode "url=$feed" \
            --data-urlencode "folder=regional" \
            "https://www.newsblur.com/reader/add_url"
        sleep 1 # don't spam the api
    done
And there we go: We subscribed to each of the feeds listed on the website.
I didn’t have much opportunity to work with APIs, yet. But it was fun to play around with this one, there is nothing to be afraid of.
Rescue data from a Mac that won't start anymore
My wifes macbook didn't start anymore, it tried but went into the same error again and again. This is how I got the data from the old hard drive.
- Get yourself a drive to rescue the files to (we will call it
LIFEBOAT). Connect it to the mac. - Enter Recovery mode by pressing
CMDandRat startup. - Get yourself a terminal (in the upper menu under "Utilities").
- Make sure
LIFEBOATcan be found under/Volumes/LIFEBOAT. - Make sure your userdata is in
/Volumes/Macintosh HD/Users/YOURUSERNAME. - Copy the files you need to the
LIFEBOATwith a simplecp -rcommand. - Close the Terminal (
CMD-Q) and shut down the Mac.
The critical step is clearly step 5. If the data is not there, I have no idea what to do.
The mac I used was running an old version of OSX (Mavericks) and I think in the newer ones the files might be encrypted.
I did have two backup plans:
- Try to find whatever is left from the files with TestDisk, perhaps after copying the drive to make sure I don't destroy anything by excident. This was a recommendation of Pascal and David.
- Pay someone to rescue as much data as possible. There are companies for this.
In the end I was very glad to get everything back.
awk is a language
Most of us know awk as the program that you use when you want only
that one column of your output. Just pipe it through awk '{print
$3}' and the third column you get.
Fewer people know that awk is a programming language. It is specialized for processing structured input like tables.
As an example we will analyze this table of events at of the first Quidditch match of the first Harry Potter book, Griffindor vs Slytherin.
| player | team | points |
|---|---|---|
| Johnson | Griffindor | 10 |
| Spinnet | Griffindor | 10 |
| Flint | Slytherin | 10 |
| Flint | Slytherin | 10 |
| Flint | Slytherin | 10 |
| Flint | Slytherin | 10 |
| Flint | Slytherin | 10 |
| Flint | Slytherin | 10 |
| Potter | Griffindor | 150 |
You can run all the awk programs in this blogpost with awk -F,
'PROGRAMM' quidditch.csv or by saving the awk-program into a file and
running awk -F, -f 'PROGRAMMFILE' quidditch.csv. The file can be
found here, it is the table from above with columns separated by ,.`
Get values from column 3
In awk we think of the input as a sequence of records (lines
normally) that consists of sequence of fields (words). These fields
can be adressed by $1, $2 etc (and $0 is the whole record).
Lets extract the column "points": The third field of each record.
{print $3}| points |
| 10 |
| 10 |
| 10 |
| 10 |
| 10 |
| 10 |
| 10 |
| 10 |
| 150 |
Of course the header is not interesting here and we should remove it.
Remove the header
The syntax of awk is a bit different from the programming languages
you might know. In man awk we read:
An awk program is a sequence of patterns and corresponding actions. When input is read that matches a pattern, the action associated with that pattern is carried out.
So a program is a series of statements like this:
<script type="text/javascript" src="https://cdnjs.cloudflare.com/ajax/libs/mathjax/2.7.1/MathJax.js?config=TeX-AMS-MML_HTMLorMML"> </script>
$$\stackrel{\text{If the input matches this pattern ....}}{\overbrace{\text{pattern}}}\underset{\text{... then run this action on it}}{\underbrace{\left\{ \text{action}\right\} }}$$
In the case of our program above a special case zoccurs: If there is no pattern given every record matches.
To remove the header of the results we can simply add a condition to the program: Don't act on the first line (the record where the record number NR is 1).
NR!=1 {print $3}| 10 |
| 10 |
| 10 |
| 10 |
| 10 |
| 10 |
| 10 |
| 10 |
| 150 |
Sum of a column …
Now lets get the sum of all the points scored by the players. Our first thought here
is to pipe the result into the program sum. But interestingly enough
there is no such program in the world of commandlines as far as I
know. It seems like our ancestors with their great beards were fine
with writing their own version when they saw need to. And when they
did they probably used awk.
NR!=1 {points+=$3}
END{print points}
230
Two things should be noted here:
- the line marked with
ENDis only triggered after all the input has been processed. There is a similar keyword (BEGIN) which allows code to be executed before the rest of the code. (Dough!~) - the variable
pointsdid not have to be initialized.awkis full of sensible defaults and one of them is that a numerical variable with no value is assumed to have the value0if not stated otherwise.
… grouped by another column
To get the result of the Quidditch match we need to sum the points for
every team separately. We can use arrays (which would be called
dict in other languages) for that.
NR!=1 {points[$2]+=$3}
END {for (key in points) { print key " " points[key]}}| Griffindor | 170 |
| Slytherin | 60 |
And here we have our final score of the game.
I really know only one other language which can do this sort of
processing with so little code: SQL. But SQL only works for databases
so it needs a big setup to be useful. So when I find myself with a
bunch of text files in a unixoid environment, then awk is the way to
go.
Oh, and if you think Griffindor totally dominated this match, here is how the score would have looked like if Harry hadn't caught the snitch (which happened more or less by luck).
NR!=1 && $1 !~ "Potter" {points[$2]+=$3}
END {for (key in points) { print key " " points[key]}}| Griffindor | 20 |
| Slytherin | 60 |
Remark
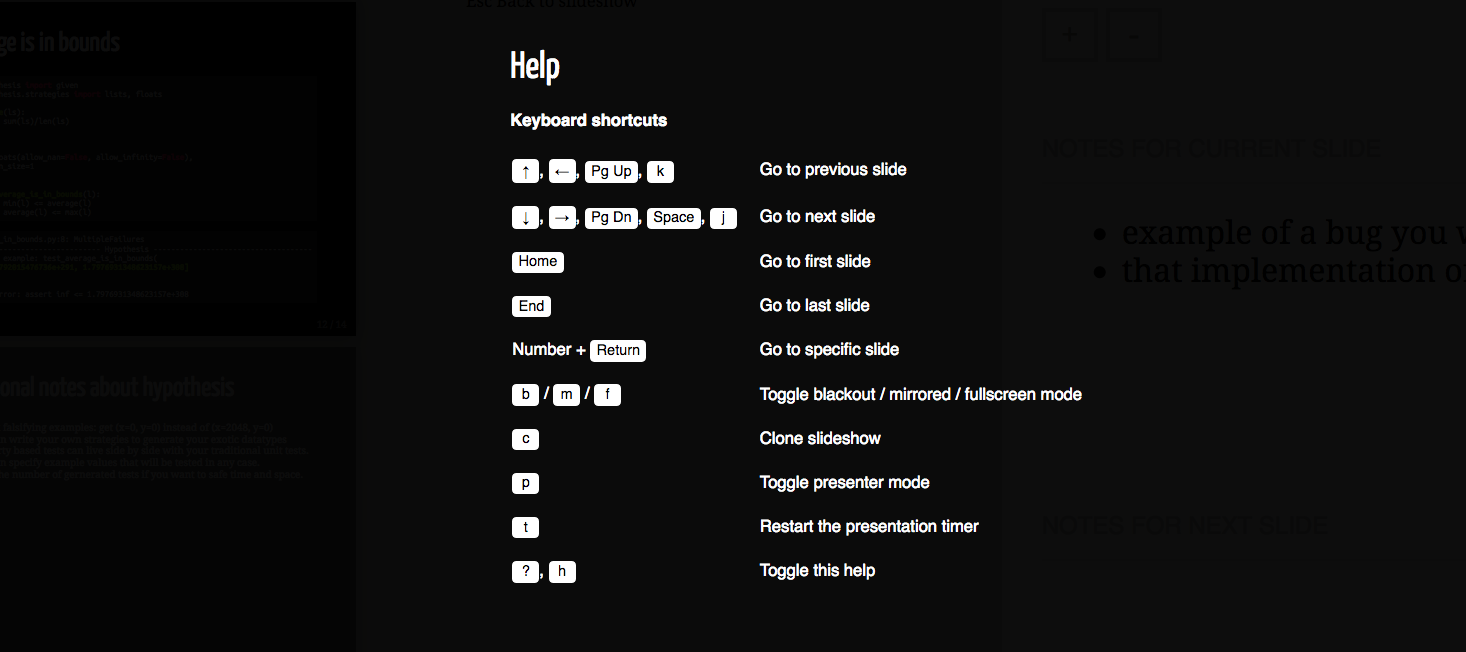
Die letzten Tage habe ich auf der PyconGermany in Karlsruhe verbracht. Die dominanten Themen waren Machine learning, Docker und vielleicht noch ein bisschen BigData. Über Python2 redet eigentlich keiner mehr, das ist schön.
Ich habe viel gelernt und einige spannende Leute getroffen (schöne Grüße an Corrie). Irgendwie schafft es die Pythoncommunity, ein breiteres Feld als die üblichen Nerds anzusprechen (zu denen ich mich selbst dazu zählen würde). Insbesondere das Verhaeltnis Maenner:Frauen war erfreulich ausgeglichen, wenn auch noch nicht 1:1.
Dort habe ich meinen ersten Lightningtalk gehalten. Ich war sehr aufgeregt, zumal der Vortrag auf Englisch sein sollte. Aber es lief sehr gut, ich habe das Zeitlimit eingehalten und die Aha-Momente sind übergesprungen. Ich bin sehr zufrieden.
Für die Slides habe ich Remark.js verwendet: Man hat eine html-Datei, den eigentlichen Inhalt schreibt man im Markdownformat. Das wird dann vom Javascript in Folien umgewandelt, wenn man die Datei im Browser öffnet. Das ist ein cleveres Format, weil es mehrere Vorteile vereint:
- Schreiben in Markdown
- Styling mit der Macht von HTML und CSS
- Code Highlighting mit highlight.js
- Nur ein einzelnes, schlankes Dokument (zumindest solange man keine Bilder einbettet)
- Läuft auf jedem OS, das einen Browser hat.
- Es gibt ein minimales Interface für den Praesentierenden, in dem
Notitzen, ein Timer und die nächste Folie angezeigt wird. Hilfe
gibt es mit
hoder?.

Ein paar Schwierigkeiten habe ich aber noch:
Es ist knifflig, offline zu präsentieren, weil Remark.js aus dem Netz nachgeladen wird. Gerade auf Konferenzen ist stabiles Netz ja keine Selbstverständlichkeit. Man kann das natürlich lösen, indem man das Repo klont und die lokale Version lädt, aber dann ist es halt nicht mehr so portabel.
Außerdem habe ich ein bisschen die Allmacht von Orgmode vermisst, Code einzubinden und den Output direkt generieren zu lassen. Aber das ist ein Luxusproblem, wer Orgmode will muss eben Orgmode benutzen.
Insgesamt war ich mit Remark.js sehr zufrieden und würde es für Praesentationen wieder verwenden. Andererseits kenne ich mich gut genug um zu wissen, dass ich selten zweimal das gleiche Setup für meine Grafiken und Folien verwende. Es gibt einfach zu viele spannende Tools.
Start videos from the commandline

tldr: Just use
mpv VIDEOURLto start watching.
Lets say you want to watch a video, how would you do it from the commandline?
local video file
If the file you want to see is already on your computer, then this can’t be too hard. Just go with your favorite video player (vlc in this example):
vlc ~/Videos/Nyan_Cat.mkv
videos from the internet
So what if the video isn’t already downloaded? Lets say we want to look at this YouTube Video: Nyan Cat.
No problem, we can download it right away with youtube-dl.
youtube-dl -o "~/Videos/Nyan_Cat.mkv" "https://www.youtube.com/watch?v=QH2-TGUlwu4" && vlc ~/Videos/Nyan_Cat.mkv
The reason why we don’t use curl/wget here is that we don’t have
the url of the video file itself (and if we did, we could just
continue to feed it into vlc directly). The video is embedded into a
website and there is no trivial way to get its url. If we ask
youtube-dl nicely (with --get-url) he will tell us, but at this
point we have used youtube-dl anyway, so what’s the point?

Youtube-dl is quite amazing. It supports a great number of video sites and file formats. It also supports playlists, logins for private videos and downloading the audio only. Being controlled from the commandline makes it scriptable, but the best thing about it is that it has been under continuous development for many years now, catching up with all the api-changes from all the supported websites.
streaming, not downloading
Downloading works, but what if we want to start to watch straight away, waiting for the download to finish is unnecessary (especially if the video is a big one, like the 10 hour version of the video above).
Youtube-dl can write the file to stdout (--output -) and tell the
video-player to play from stdin (vlc - in this case).
youtube-dl --output - 'https://www.youtube.com/watch?v=wZZ7oFKsKzY' | vlc -
Unfortunatelly there is no easy way to jump positions in the videos itself.
mpv to the rescue
vlc has a big fanbase, but for quite some time I preferred to use
mplayer, because it has the most minimal gui imaginable (a window
whith the video in it, nothing more) and is easier to use from the
keyboard. Then I found mpv, a pimped version of
mplayer - and everything is perfect. Much like feh for images, it does all I want and goes out of the way otherwise. I just love it.
Mpv makes all the problems from above trivial.
mpv 'https://www.youtube.com/watch?v=wZZ7oFKsKzY'
It uses youtube-dl, can show subtitles in different languages, jumps between positions and has an easy syntax. It is free software (like all the other programs I talked about in this post) and its development continues steadily.
Why not use a browser, like a normal person?
Using a native video-player comes with some cool bonuses. You can configure and finetune it, use media-keys on your keyboard, it plays nicely with the rest of your setup and your window-manager etc.
The only downside I see is that the resolution is not adjusted on the fly if the connection is not good enough to stream in full resolution. That’s why I still use a browser for twitch-streams.
Wieder da

Ich bin wieder da. Der Blog hat lange geruht und jetzt habe ich Lust, wieder zu schreiben.
Der Blog war auch und vor allem deshalb fort, weil wir unseren geliebten Server Gipfelsturm verloren haben. Da sind auch Sandras und mein Ghostblog drauf gewesen und ich wollte erst wieder schreiben, wenn ich beide Blogs wieder so weit habe, dass sie benutzt werden können (Es wäre unfair gewesen, selbst weiter zu bloggen bevor ihr Blog wieder läuft).
Dazu musste ich aber aus schlechten Backups die meisten Artikel wieder herzaubern (viel habe ich von archive.org und dem google-cache gezogen, Viele Bilder hatten wir noch und einige konnten wir wieder zuordnen) und eine ganz neue Bloginfrastrucktur aufbauen. Das war eine lange Reise, aber jetzt bin ich ganz zufrieden. Vielleicht schreibe ich später mehr zu den Details. Die Hauptsache ist, dass ich jetzt große Kontrolle über den Blog habe (wenn was nicht geht kann ich es wahrscheinlich reparieren) und es trotzdem einfach ist, zu bloggen.
Es läuft wieder was in der Schauderbasis.
PS: Der RSS-Feed funktioniert auch: https://schauderbasis.de/index.xml
Bilder aussortieren

Es gab eine Feier, jemand hat Fotos gemacht und rumgeschickt. Oder vielleicht habe ich selbst hundert mal den selbe Essen fotografiert. Jedenfalls sind da ein Haufen Bilder und ich will nur die guten behalten.
Dieses Aussortieren macht wenig Spaß und soll deshalb schnell gehen. Wenn man es gut macht hat man danach nur noch 5-10% der Bilder. Der Lohn: Man kann den wenigen guten Bildern viel mehr Beachtung schenken.
Erstaunlicherweise bietet der einfachste (und schnellste) mir bekannte Imageviewer dafür das beste Interface bereit: feh
Vorbereitung
Wir bilden den Sortierprozess auf das Filesystem ab. Wärend dem sortieren haben wir 3 Haufen von Fotos:
- die noch unsortierten Fotos (
~/Pictures/feier) - die guten Fotos (
~/Pictures/feier/good) - die schlechten Fotos (
~/Pictures/feier/bad)
mkdir ~/Pictures/feier
cd ~/Pictures/feier
mv ~/Downloads/feier.zip .
mkdir good bad
unzip feier.zip
Wir werden die schlechten Bilder erst wegwerfen wenn wir mit dem sortieren ganz fertig sind (so vermeiden wir unglückliche Versehen).
Sortieren
Hier steckt die ganze Magie drin:
feh --auto-zoom --scale-down --action1 "mv %f good/" --action2 "mv %f bad/" .
Übersetzt bedeutet das: “Zeige alle Bilder im aktuellen Verzeichnis (.) nacheinander (als Slideshow) an, so gezoomt das man immer das ganze Foto sehen kann. Wenn ich die Taste 1 drücke, verschiebe das aktuelle Bild ins Verzeichnis good, wenn ich 2 rücke verschiebe es nach bad.”
Nette Annehmlichkeiten sind dabei:
- Wenn man gerade nicht sicher ist, kann man mit den Pfeiltasten einfach zum nächsten Bild springen und die Entscheidung verschieben.
- Ein Bild, bei dem man eine Wahl getroffen hat wird nicht mehr angezeigt. Sind keine Bilder mehr übrig, wird das Programm beendet
- Will man unterbrechen, hilft die Taste
q, was man bisher sortiert hat bleibt auch sortiert. - feh ist zwar schlank und klein, aber zum zoomen und Bilder richtig herum drehen reicht es noch.
- Wie die meisten Unix-workflows ist auch dieser sehr flexibel. Ideen, die man damit schnell verwirklichen könnte:
- einen dritten Ordner (
bin_nicht_sicher) - mehrere Sortierdurchläufe.
- Photos taggen
- einen dritten Ordner (
- Das Interface ist so einfach wie nur irgend möglich: Man sieht nur das Bild und hat genau 2 Tasten für 2 Möglichkeiten.
- Es geht schnell. Wenn man mal ein bisschen drin ist hat man schnell einige Hundert Bilder sortiert.

Nachbereitung
Zum Schluss (und wenn man sich sicher ist) wirft man die schlechten Fotos weg und behält die guten:
rm bad/* -f
mv good/* .
rmdir good bad
Hörbücher auf SailfishOS

Unterwegs höre ich sehr gerne Hörbücher - besonders in vollen öffentlichen Verkehrsmitteln, wo man ohnehin nicht viel anderes machen kann als Musik/Podcasts/Hörbüchern zu lauschen oder seinen Feedreeder durchzuarbeiten. Auf SailfishOS gibt es keinen nativen Client, aber die Standardapp “Medien” funktioniert wunderbar. Wie ist also der Workflow?
Umweg über den Rechner
Bestimmt geht das auch direkt auf dem Telefon, aber ehrlich gesagt habe ichs noch nicht ausprobiert. Außerdem geht es dank ssh/scp sehr flott auch von der Kommandozeile.
Hörbuch finden
Ich könnte es gar nicht besser zusammenschreiben als es im Wiki Audiobooks Subreddit steht.
Für diesen Blogpost wählen wir The Wrong Box auf Librivox.
Hörbuch herunterladen
Hörbücher sind meistens mehrere Audiodateien, zum Beispiel eine für jedes Kapitel. Meistens bekommt man diese schön kompakt in einer zip-Datei, die lädt man herunter und entpackt sie. Manchmal sieht man aber auch nur eine Website voll mit Links zu dein einzelenen Dateien (wsl für Leute, die alles direkt im Browser konsumieren wollen). In diesem Fall hilft dieser Befehl.
lynx -dump https://librivox.org/the-wrong-box-by-robert-louis-stevenson-and-lloyd-osbourne/ | grep 64kb.mp3$ | awk '{print $2}' | xargs -n1 wget
In Worten: Schau dir alle Links der genannten Webseite an, nimm die die auf “64kb.mp3” enden und lade sie einzeln herunter. (Es könnte also schlau sein, das in einem leeren Ordner auszuführen.)
Bei librivox ist das aber eigentlich nicht nötig, man kann alles direkt herunterladen (sogar per Torrent, wohooo!).
Es macht übrigends alles (erheblich) einfacher, wenn die Dateien so benannt sind, dass die alphabetische und die logische Ordnung übereinstimmen.
ssh aufs Telefon
Testweise kann man sich schonmal aufs Telefon verbinden und den Ordner anlegen, wo die Dateien später liegen sollen. Ssh muss in den Einstellungen des Telefons unter “Entwicklermodus” aktiviert werden, dort findet man auch Passwort und IP-Adresse.
ssh nemo@192.168.178.29
mkdir Music/wrong_box
Hörbuch aufs Telefon

Da wir ja jetzt schon alles vorbereitet haben, reicht ein kurzes Befehl:
scp *.mp3 nemo@192.168.178.29:/home/nemo/Music/wrong_box
Das wars schon.
Hören
Wir können alles in der Medien-App anhören. Nach dem aktuellen Kapitel wird automatisch zum nächsten gesprungen.
Firefox History in der Kommandozeile

Firefox ist so bekannt geworden, weil man alles mögliche an ihm einstellen kann. Warum ist es dann so schwer, ihn von der Kommandozeile zu steuern?
Ich würde wirklich gerne ein paar Skripte schreiben, welche die aktuell geöffneten Seiten von Firefox auswerten (zum Beispiel um die aktuelle Seite in eine Liste einzutragen, einen Eintrag in meinen Passwortmanager zu machen oder ähnliches).
Leider ist das scheinbar sehr schwierig, denn dieser riesige Kloß von einem Browser kann scheinbar nicht nach außen kommunizieren (Ich arbeite gerade mit Mozilla Firefox 46). Folgenden Notbehelf habe ich gefunden:
Die neuste Seite ist aktuell
Ich nehme vereinfachend an, dass ich mich nur für die Seite interessiere, die als letztes aufgerufen wurde. Dann muss man nur in der Firefox History nachschauen, welche Seite die letzte war und sie ausgeben.
Warum ist das leichter? Firefox speichert seine History, Bookmarks und noch ein paar andere Dinge in einer sqlite Datenbank: $HOME/.mozilla/iwfal82r.default/places.sqlite. (Der Teil vor “default” sieht jedes mal ein bisschen anders aus, aber das findet man schon. Im Folgenden benutze ich ein Regexsternchen, so dass die Befehle bei jedem funktionieren sollten.) Da ich ja neulich schon etwas Erfahrung mit Datenbanken gesammelt habe, wage ich mich da mal rein.

In der Datenbank
sqlite3 $HOME/.mozilla/firefox/*.default/places.sqlite

SQLite version 3.13.0 2016-05-18 10:57:30
Enter ".help" for usage hints.
sqlite>
Wir sind jetzt in der Datenbank (raus kommen wir mit Ctrl-D). Erstmal schauen wir was es hier für tables gibt:
sqlite> .tables
moz_anno_attributes  moz_favicons         moz_items_annos
moz_annos            moz_historyvisits    moz_keywords
moz_bookmarks        moz_hosts            moz_places
moz_bookmarks_roots  moz_inputhistory
Die Tabelle die wir brauchen ist die moz_places. Hier ist unsere gesamte Browserhistory drin (habe ich hier rausgefunden). Wir schauen uns die Spalten der Tabelle an:
sqlite> pragma table_info(moz_places);
0|id|INTEGER|0||1
1|url|LONGVARCHAR|0||0
2|title|LONGVARCHAR|0||0
3|rev_host|LONGVARCHAR|0||0
4|visit_count|INTEGER|0|0|0
5|hidden|INTEGER|1|0|0
6|typed|INTEGER|1|0|0
7|favicon_id|INTEGER|0||0
8|frecency|INTEGER|1|-1|0
9|last_visit_date|INTEGER|0||0
10|guid|TEXT|0||0
11|foreign_count|INTEGER|1|0|0
Für uns sind url und last_visit_date wichtig (denn wir wollen ja die URL, die zuletzt aufgerufen wurde). Wir tasten uns mal langsam ran:
Alle URLS, die ich je aufgerufen habe
Alphabetisch sortiert.
sqlite> select url from moz_places;
...
Alle URLS, die ich je aufgerufen habe
Nach Datum sortiert.
sqlite> select url from moz_places order by last_visit_date;
...
Wann die letzte URL aufgerufen wurde
sqlite> select max(last_visit_date) from moz_places;
1464029535578940
Hmm, eigentlich sollte hier ein Datum stehen. Laut table_info ist dieses als Integer kodiert. Das Internet hilft weiter.
sqlite> select max(last_visit_date) as raw_visit_date,datetime(last_visit_date/1000000,'unixepoch') from moz_places;
1464029535578940|2016-05-23 18:52:15
Sieht doch gleich viel besser aus, die ISO 8601 lebe hoch. Aber irgendwie ist das um zwei Stunden falsch? Ach ja, Zeitzonen.
sqlite> select max(last_visit_date) as raw_visit_date,datetime(last_visit_date/1000000,'unixepoch','localtime') from moz_places;
1464029535578940|2016-05-23 20:52:15
Geht doch.
Eigentlich brauchen wir diese schick formatierten Strings aber gar nicht, wir wollen ja nur nach Zeit sortieren. Deswegen orientieren wir uns am ersten Versuch.
Die URL, die ich als letztes besucht habe
Genau genommen fragen wir eher nach allen urls, die zu dem Zeitpunkt aufgerufen wurden, an dem wir zuletzt eine url aufgerufen haben.
sqlite> select url from moz_places where last_visit_date=(select max(last_visit_date) from moz_places);
https://www.schauderbasis.de/
Hurra, es funktioniert!
Für Skripte
Damit wir uns nicht ständig in sqlite einloggen müssen, kann man das auch von außen tun.
$ sqlite3 $HOME/.mozilla/firefox/*.default/places.sqlite "select url from moz_places where last_visit_date=(select max(last_visit_date) from moz_places)"
https://www.schauderbasis.de/
So, da ist sie. Die letzte besuchte Url. Das funktioniert, auch sofort nach dem Aufrufen der Url oder wenn der Firefox aus ist.
An der Weboberfläche kratzen

Ich mag Programmieren, aber mit Netzwerk, Browser, Javascript und Webseiten kenne ich mich nicht gut aus. Wenn ich dann einen Fuß ins kalte Wasser halte, ist es schon spannend (für mich). Hier mein jüngstes Erlebnis:
Bilder in Ghost
Meine Freundin hat, wie ich, einen Ghostblog. Anders als ich schreibt sie dort regelmäßig und oft, mit vielen Bildern über Abenteuer in der Küche. Neulich konnte sie plötzlich keine Bilder mehr hochladen.

Fehlerjagd
Fehler eingrenzen:
- Die Fehlermeldung ist wenig hilfreich.
- So wenig hilfreich, das man nicht mal sinvoll danach googlen kann.
- Till und ich haben Blogs auf dem gleichen Server, können aber Bilder hochladen.
- Auf Sandras Blog kann man keine Bilder hochladen, egal ob von ihrem oder meinem Account.
- Firefox, Safari oder Chrome - kein Unterschied
- Verschiedene Dateitypen oder kleinere Bilder ändern nichts an der Fehlermeldung.
- Die offizielle Ghost Dokumentation ist lausig. Immerhin gibt es einen sehr kurzen Abschnitt über Image upload issues. Nichts Hilfreiches. Das angesprochene Cloudflair benutzen wir nicht.
Ideen, woran es liegen könnte:
- Sandras Blog ist von allen mir bekannten Ghostblogs der mit dem meisten Content, insbesondere der mit den meisten Bildern. Vielleicht gibt es da irgendwo ein Quota, dass erreicht ist?
- Sandras Blog ist der mit dem Umlaut in der url (“Gewürzrevolver”). So bitter es ist, das hat bis jetzt einige Probleme gemacht. Liegt es vielleicht daran?
Mehr kann ich jetzt alleine nicht rausfinden, ab hier brauche ich Ansprechpartner.
Mal fragen
Ich befrage Till (der Herr über den Server) und den Ghost Slack Channel help, wo ein Kevin mir freundlich zur Seite steht.
“Gibt es auf unserem Server irgendeine Begrenzung des Speicherplatzes?”
Nein, Till weiß von keinem Quota und ein mysteriöses künstliches Quota bei Ghost scheint auch nicht zu existieren.
“Wo soll ich nach Fehlern suchen?”
Schau mal in den Web Inspektor.
Wie immer, wenn ich mit dem Support spreche google ich nebenbei, was die Antworten bedeuten. Den Webinspektor ist das Tor in die Javascript-Hölle. Here be dragons. Aber here be also a log of what happens in your browser when you interact with a website.

Ich öffne also den Webinspector und versuche, ein Bild auf den Blog hochzuladen. Tatsächlich finde ich nach ein bisschen herumsuchen eine Fehlermeldung.


Die Fehler kommt in Form eines JSON Objektes, die entscheidende Zeile ist:
EACCES, open '/var/www/ghost/revolver/content/images/2016/04/Organigram-svg.png'
Sehr hilfreich sieht das erstmal nicht aus. Aber wenn man mal schaut, was EACCES überhaupt heißt, bekommt man heraus dass es sich wohl um einen permission error in dem angegebenen Ordner handelt. (Diese Schlussfolgerung zieht eigentlich der hilfreiche Kevin aus dem Ghost Chat, ich plappere das nur fleißig nach).
Also nochmal dem Till geschrieben, mit der Bitte die Rechte in dem Ordner zu checken und - tatsächlich, das war es. Der Upload funktioniert jetzt wieder und Sandra kann ihren neuen Blogpost mit Bildern ausstatten (Spargel, Huäääääääh!).
Abschliessende Gedanken:
- Fehlermeldungen sollten immer aus zwei (!) Teilen bestehen: Eine technische (für den Entwickler) und eine menschenlesbare für den User.
- “Something went wrong.” ist keine gute Fehlermeldung. Da ist keine nützliche Information drin. Dass es nicht geklappt hat sieht der User auch so.
- Der Fehlersuche war nicht qualvoll und nervig, denn alle waren geduldig und haben sich professionell verhalten. So macht das Spaß, danke an Till und Kevin.
- Wie so oft bei Computerproblemen gilt: Wenn du noch nicht wirklich selbst versucht hast, das Problem zu lößen, dann ist es nicht angebracht anderer Leute wertvolle Zeit dafür in Anspruch zu nehmen.
- Keiner weiß, wie das mit den Rechten passiert ist (mit den Rechten weiß man das nie so recht). Till war es nicht und auch sonst keiner. Auf dem Server spukt es.
(Titelbild von hier, Pixabay ist eine tolle Quelle für freie Bilder)
ping Datenbank
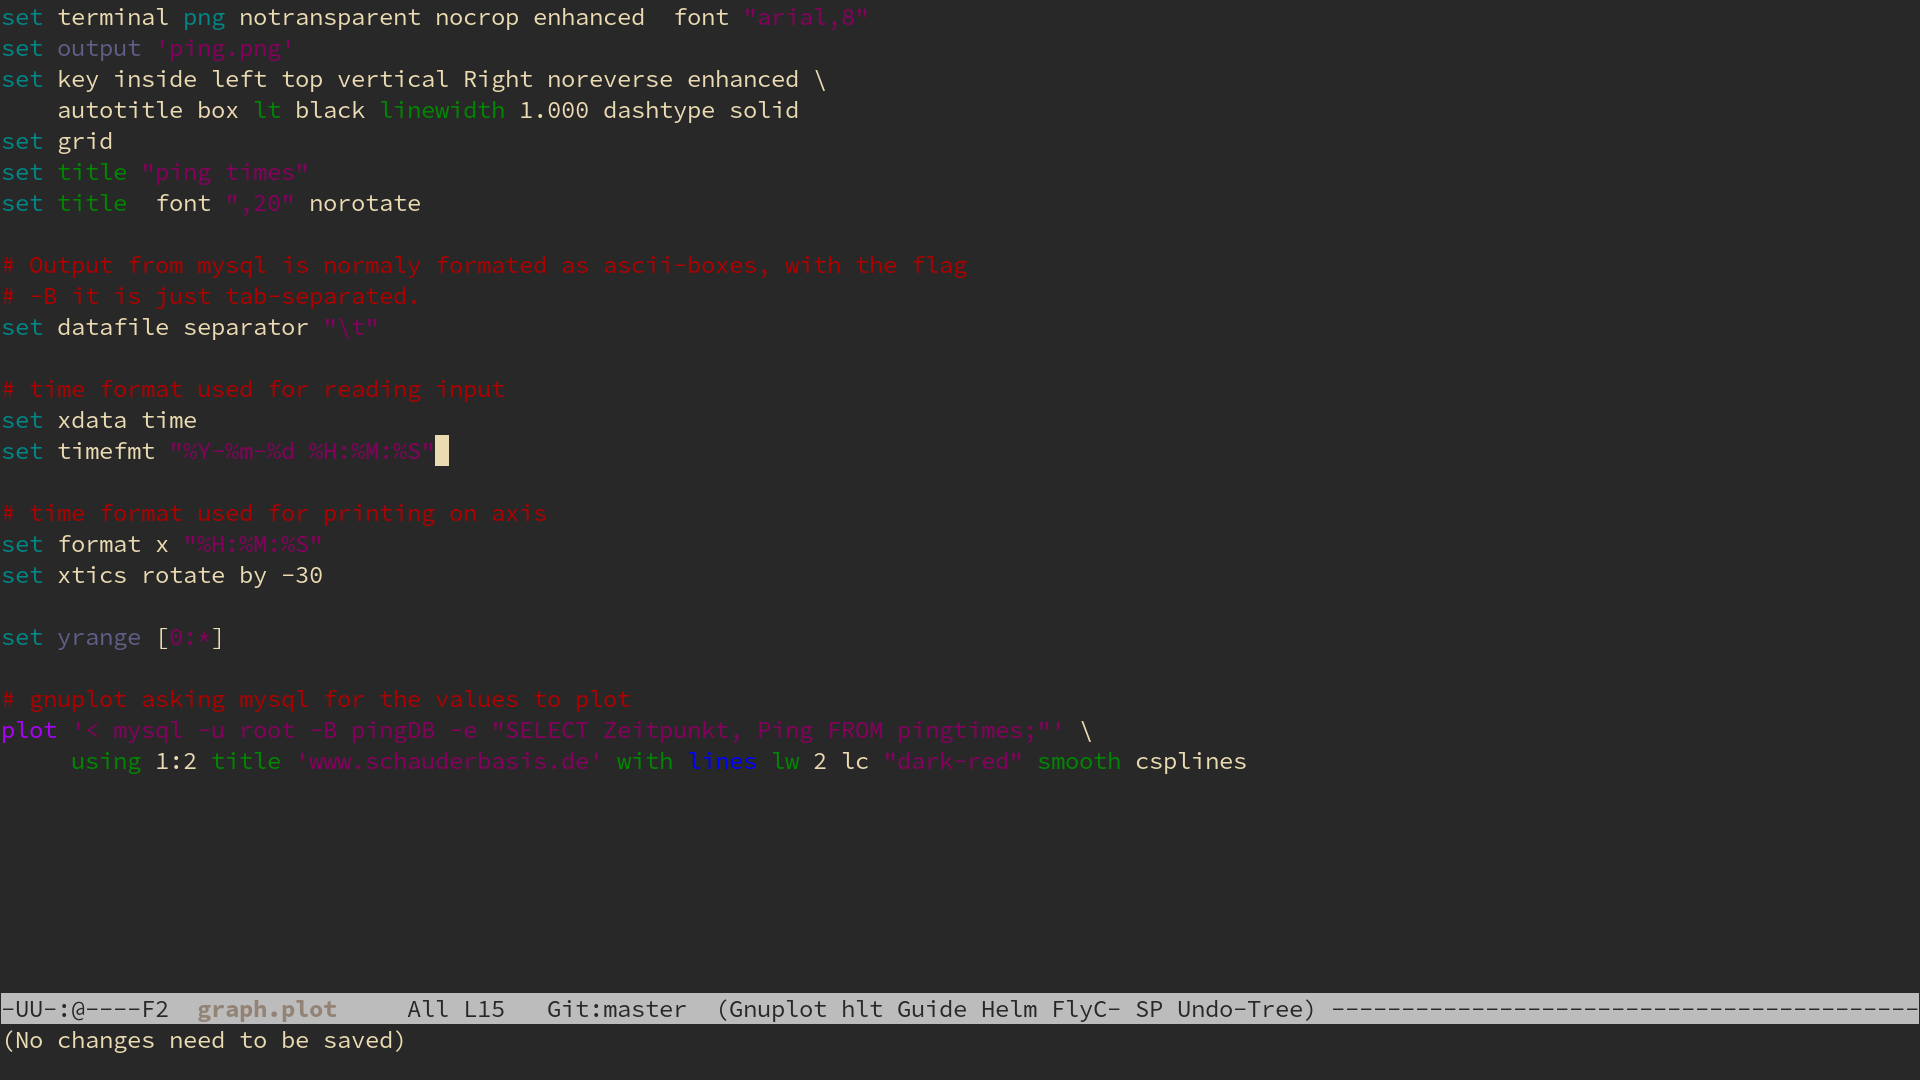
Pingplot war als Vorbereitung für ein etwas größeres Projekt gedacht, für das ich eine Datenbank einsetzen möchte. Also sollte ich erst mal lernen, wie man mit Datenbanken arbeitet.
Tatsächlich habe ich am Ende etwas mehr gelernt als gedacht und ein bisschen älteres Wissen aufgefrischt.
Grundidee
Daten, die laufend generiert werden sollen gesammelt und visualisiert werden. Zum Üben nehme ich den Ping zu einer Website. Der eignet sich weil es ein beständiger Strom von nicht zufälligen, aber auch nicht voraussagbaren Datenpunkten ist.
Es wird 4 zentrale Programme in unserem Setup geben:
- Die Steuerzentrale
- Die Datenquelle
- Die Datenbank
- Die Datenaufbereitung

Mir ist wichtig, das am Ende alles auf Knopfdruck funktioniert. Der Befehl, einen Plot zu erstellen ist nur ein Befehl sein und es ist keine weiteres Eingreifen meinerseits notwendig, erst recht kein hin- und herkopieren von Daten. Dieses Prinzip hat sich bei meiner Bachelorarbeit extrem gut bewährt - irgendwann drückt man nur noch auf den Knopf und hat etwas später 50 Graphen und Diagramme, die man analysieren kann.
Die Steuerzentrale - Gnu Make
Als ich zum ersten mal ein Makefile benutzt habe war ich wirklich begeistert von der Idee: Wenn man in einem Directory ohnehin immer wieder das gleiche macht, kann man das auch automatisieren. Und tatsächlich habe ich beim Programmieren immer ein Terminal laufen, in das ich permanent die selben Sachen eingebe:
- compilieren
- testcase mit den einen Parametern
- testcase mit den anderen Parametern
- Zwischenergebnisse aufräumen, um sie neu zu erstellen
- git
- temporäre Dateien aufräumen– Ups, da war was Wichtiges dabei :(
Stattdessen schreibt man ein Makefile, indem das alles vorformuliert ist und gibt dann nur noch Befehle wie:
make compile
oder
make plot
Dank tab-completion geht das schneller und man vertippt sich nicht ausversehen. Ich finde es ja allgemein ganz gut, wenn ein Programm möglichst viel über sich selbst weiß und sich selbst quasi selbst organisiert (Solange klar ist, das ich noch der Chef bin - die Apple-Lösung mit diesen Mediathekformat, in das man nicht reinschauen kann).
Die Syntax von Makefiles ist erstmal sehr einfach. Man schreibt das target auf, einen Doppelpunkt dahinter - und danach eingerückt die Befehle, die ausgeführt werden sollen wenn das target aufgerufen wird.
plot:
	gnuplot graph.plot
	feh --reload 1 ping.png &
Mehr muss man erstmal nicht wissen.
Die Datenquelle - ein kurzes Shell-Skript
Um den Ping zu einer Website herauszufinden, reicht ein einfaches
$ ping www.schauderbasis.de
PING www.schauderbasis.de (5.45.107.67) 56(84) bytes of data.
64 bytes from v22013121188416155.yourvserver.net (5.45.107.67): icmp_seq=1 ttl=61 time=29.9 ms
64 bytes from v22013121188416155.yourvserver.net (5.45.107.67): icmp_seq=2 ttl=61 time=37.2 ms
64 bytes from v22013121188416155.yourvserver.net (5.45.107.67): icmp_seq=3 ttl=61 time=28.2 ms
...
Uns interessieren die Werte zwischen time= und ms. Um die
herauszubekommen hat für mich folgendes funktioniert:
- Nur noch ein Wert stat unendlich viele:
$ ping -c 1 www.schauderbasis.de
PING www.schauderbasis.de (5.45.107.67) 56(84) bytes of data.
64 bytes from v22013121188416155.yourvserver.net (5.45.107.67): icmp_seq=1 ttl=61 time=29.8 ms

--- www.schauderbasis.de ping statistics ---
1 packets transmitted, 1 received, 0% packet loss, time 0ms
rtt min/avg/max/mdev = 29.865/29.865/29.865/0.000 ms
- Nur noch die zweite Zeile, wo die wichtige Information drin steht:
$ ping -c 1 www.schauderbasis.de | sed -n 2p
64 bytes from v22013121188416155.yourvserver.net (5.45.107.67): icmp_seq=1 ttl=61 time=28.9 ms
- Davon die achte Spalte
$ ping -c 1 www.schauderbasis.de | sed -n 2p | awk '{print $8}'
time=29.1
- Und dann alles ab dem sechsten Buchstaben:
$ ping -c 1 www.schauderbasis.de | sed -n 2p | awk '{print $8}' | cut -c 6-
29.6
Wunderbar.
Mehr Werte
Damit wir nachher eine ordentliche Datenbasis haben, wollen wir viele
Werte hintereinander generieren. Eigentlich macht das ping ja
schon selbst, aber wir bauen uns hier eine eigene Schleife, so das wir Daten sofort einlesen können.
Optionale Argumente (wusste ich vorher auch nicht) gehen so:
# number of datapoints to generate: take first argument or 10 as default
n=${1:-10}
# sleeptime: take second argument or 1 as default
t=${2:-1}
Am Ende (mit ein bisschen Zeug aus dem nächsten Abschnitt) sieht das ganze so aus.
database_name="pingDB"
table_name="pingtimes"
url="www.schauderbasis.de"
dbdo="mysql -u root -s $database_name -e"

# number of datapoints to generate: take first argument or 10 as
# default
n=${1:-10}
# sleeptime; take second argument or 1 as default
t=${2:-1}

for i in `seq $n`
do
    pingtime=$(ping -c 1 $url | sed -n 2p | awk '{print $8}' | cut -c 6-)
    $dbdo "insert into $table_name (Zeitpunkt, URL, Ping) values (NOW(), '$url', $pingtime);"
    sleep $t
done
Gar nicht mal so hässlich, von bash bin ich schlimmeres gewohnt.
Die Datenbank - MariaDB
Es gibt verschiedene Datenbanken für verschiedene Zwecke. Ich habe mich für MariaDB entschieden, hauptsächlich wegen dem Artikel im Arch-Wiki zum aufsetzen und dem Tutorial auf der Website von MariaDB, das mit genau so viel Information gegeben hat wie ich als blutiger Anfänger brauchte.
Beim Lernen hat mir wirklich sehr geholfen, das ich mit einem Makefile arbeite. So konnte ich einfach Zeilen wie diese eintragen:
database_name = pingDB
table_name = pingtimes
general_do = mysql -u root -e
dbdo = mysql -u root $(database_name) -e

prepare_database:
	$(general_do) "create database if not exists $(database_name)"

prepare_table:
	$(dbdo) "create table if not exists $(table_name) (Zeitpunkt TIMESTAMP, URL VARCHAR(30), Ping FLOAT UNSIGNED)";

show_table:
	$(dbdo) "select * from $(table_name)"
Was man sich aufgeschrieben hat, kann man schon mal nicht wieder vergessen.
Tatsächlich ist die SQL-Syntax gar nicht so schlimm, solange man relativ einfache Anfragen stellt. Das war bei mir zum Glück der Fall und das bisschen was ich brauchte konnte ich dann auch relativ flott auswendig.
Am Ende hatte ich eine Datenbank mit einer Tabelle, die (mit dem Skript von oben) so aussah:
$ make show_table
mysql -u root pingDB -e "select * from pingtimes"
+---------------------+----------------------+------+
| Zeitpunkt           | URL                  | Ping |
+---------------------+----------------------+------+
| 2016-01-25 16:56:40 | www.schauderbasis.de | 29.8 |
| 2016-01-25 16:56:41 | www.schauderbasis.de | 30.1 |
| 2016-01-25 16:56:42 | www.schauderbasis.de | 29.0 |
| 2016-01-25 16:56:43 | www.schauderbasis.de | 32.2 |
| 2016-01-25 16:56:44 | www.schauderbasis.de | 28.8 |
| 2016-01-25 16:56:45 | www.schauderbasis.de | 29.6 |
| 2016-01-25 16:56:47 | www.schauderbasis.de | 30.1 |
| 2016-01-25 16:56:48 | www.schauderbasis.de | 29.8 |
| 2016-01-25 16:56:49 | www.schauderbasis.de | 28.6 |
| 2016-01-25 16:56:50 | www.schauderbasis.de | 29.2 |
+---------------------+----------------------+------+
Die Datenaufbereitung - Gnuplot
Eigentlich kam für mich kein anderes Tool in Frage, Gnuplot passt einfach zu gut. Ich habe schonmal was zu verschiedenen Plottern aufgeschrieben und hier war die Entscheidung klar.
Das schwierigste war die Frage, wie man die Daten aus der Datenbank in Gnuplot hinein bekommt. Gut das Gnuplot alles kann:
# Output from mysql is normaly formated as ascii-boxes,
# with the flag -B it is just tab-separated.
set datafile separator "\t"

plot '< mysql -u root -B pingDB -e "SELECT Zeitpunkt, Ping FROM pingtimes;"' using 1:2
Im Prinzip wird hier die SQL-Abfrage direkt von Gnuplot ausgeführt. Kein Problem.
Es ist gar nicht so klar, wie das mit der Zeit eingelesen werden soll. SQL liefert das Datum und die Uhrzeit schön nach ISO 8601: 2016-01-25 16:56:40
Gnuplot kommt von klugen Leuten, die wissen dass es auf der Welt sehr viele sehr schlimme Formate gibt, in der Leute die Zeit angeben. Deswegen gibt man einfach an, in welchem Format das Datum eingelesen und ausgegeben werden soll:
# time format used for reading input
set xdata time
set timefmt "%Y-%m-%d %H:%M:%S"

# time format used for printing on axis
set format x "%H:%M:%S"
Einfacher geht es nicht. Eine Aufschlüsselung der Variablen (falls nötig) gibt es im hervorragenden Handbuch. Es scheint aber das gleiche Format zu sein wie bei dem Programm date, also reicht wsl auch die entsprechende manpage.
Jetzt ist nur noch die Frage, wie der Graph aussehen soll. Ich habe mich entschieden, die Werte interpolieren zu lassen, damit der Graph schön glatt ist. Das Stichwort hier heißt smooth, man sollte es in Gedanken aber immer smooooooooth aussprechen.

Und das wars
Eigentlich ziemlich einfach, hier funktionieren ein paar mächtige Werkzeuge sehr gut zusammen. Es hat Spaß gemacht und ich habe jede Menge über wichtige Standardwerkzeuge gelernt.
Der Code liegt hier zur freien Verfügung (mit freier Lizenz natürlich).
Gedanken zum Projekt
- Für so ein kleines Projekt würde man normalerweise keine riesige Datenbank anschmeißen. Matthias meinte, dass die meisten Leute die nicht wissen welche Datenbank sie benutzen sollen mit sqlight wahrscheinlich am besten bedient sind.
- Bash ist eine furchtbare Programmiersprache. Aber leider sehr nützlich.
- Ich weiß nicht wer sich ausgedacht hat, dass Variablen in Make und bash fast, aber nur fast gleich aussehen und funktionieren. Was soll das?
- Ich war erst ein bisschen genervt, dass man in SQL immer brüllen muss: “CREATE TABLE IF NOT EXISTS pingtimes”. Dann habe ich gemerkt, dass das gar nicht notwendig ist - die Sprache ist case insensitive: “create table if not exists pingtimes”. Manche Sachen (zum Beispiel die Datentypen) habe ich trotzdem in Caps gelassen, das sah irgendwie richtiger aus.
- Wenn ich cooler wäre würde ich einen Cronjob einrichten, der das Skript regelmäßig anstößt (~alle 5 Minuten?). Das könnten interessante Graphen sein.
- Mit wenig Aufwand könnte man das Skript umbauen, so dass andere
Werte aufgezeichnet und verarbeitet werden. Zum Beispiel:
- die Batterie (Wie viel Prozent habe ich im Schnitt noch übrig?)
- RAM und CPU
- Wie viele Wlans verfügbar sind (verschlüsselt vs. unverschlüsselt?)
- Nachdem ich viel im Internet nach Gnuplotschnipseln gestöbert habe entdeckte ich gegen Ende des Projektes, dass Gnuplot ein hervorragendes und ausführliches Handbuch mit vielen Beispielen und Bildern hat. Nächstes mal weiß ich das vorher.
Musik hören

Wenn man irgendwann seine Musik gefunden hat, weiß man recht genau was einem gefällt (bei mir ist es Soundtrack Musik). Woher bekommt man die jetzt? Da fallen einem spontan mehrere Wege ein:
- kaufen
- piratisieren
- im Radio hören
- Streamingdienste
- Konzerte
- freie Musik
Gehen wir da mal kurz durch.
kaufen
Ich habe keine Lust, mir eine große Musiksammlung anzulegen, indem ich einzelne CDs oder Alben kaufe. Das ist teuer und umständlich - und man hört immer wieder das selbe. Falls mich mal einzelne Lieder wirklich wegflashen mache ich das gerne.
piratisieren
Mag ich nicht. Das muss jeder erstmal mit sich selbst ausmachen.
Radio

Radio nervt mich, wegen Werbung und Moderatoren. Für Musik habe ich noch keinen Radiosender gefunden, der mich nicht nach kürzester Zeit genervt hat. Aber es gibt ja auch noch Internet Radio… Hier wird es interessant:
Internetradio
Internet Radio besticht auf mehreren Ebenen:
- Keine Werbung: Die meisten Sender beschränken sich darauf, den Sendernamen alle halbe Stunde zwischen zwei Liedern in den Namen des Senders zu sagen.
- Auswahl: Es gibt ja soooooo viele Internet Radio Sender. Wer einen weiteren aufmachen will muss ja auch Frequenzen aufkaufen - es reicht eine IP-Adresse. Ich persönlich mag das Soundtrackradio.
- skriptbar: Oh ja, da geht viel. Unter anderm werden auch stets die Metadaten (zum Beispiel Name des Stücks, Komponist, Interpret…) mit übertragen. Hier sei auf jeden Fall die Software streamripper erwähnt. Sie gehört zu den großen Schätzen in meiner Software-Repertoire.
- Clients: Es gibt quasi keinen Musikplayer, der mit Internetradio nichts angangen kann. Man hat also freie Auswahl.
Wenn ich am Computer Musik hören will ist es also mit dieser Zeile getan:
mpd; mpc add https://209.9.229.206:80; mpc play
(Naja, eigentlich steht die IP-Adresse in /etc/hosts und für die Zeile gibt es einen Alias.)

Streamingdienste
Zu Streamingdiensten (abseits von Internetradio) habe ich nie einen echten Zugang gefunden. Bestimmt ist das toll für viele, ich habs nie für mich entdeckt.
Konzerte
Zählt nicht. Und selbst musizieren auch nicht. Livemusik hat andere Regeln, hier geht es um Musik, die sich in den Alltag integrieren lässt.
Freie Musik
Und dann gibt es da noch die freie Musik - Musik unter freien Lizenzen. Das macht es natürlich schön unkompliziert: Stücke aussuchen und runterladen und immer dann hören, wenn man mag.
Es ist halt nicht so leicht, die zu finden. Ein guter Startpunkt kann die Website Jamendo sein. Dort habe ich auch die Grundlage für das Intro der Echokammer gefunden.

Fazit
Ich höre Musik beim kochen, beim essen, beim Programmieren und auch dazwischen. (Unterwegs höre ich Podcasts). Und eigentlich ist höre ich immer Internetradio, das funktioniert für mich einfach am besten.
Blogroll
Gewürzrevolver
Der Blog meiner Frau, es geht ums Kochen und Backen. Alle Rezepte haben wir selbst gekocht und probiert und dabei die Fotos gemacht. Und ich hatte sogar mal einen Gastbeitrag.
Sandsturm

Server haben ist anstrengend und man muss viel Geheimwissen haben. Außerdem funktioniert dauernd was nicht und wenn man mal was austesten will muss man ewige Dokumentation lesen, bis etwas geht. Ich bin schon oft gescheitert.
Sandstorm ist eine freie Software mit dem Ziel, Server so einfach zu machen wie Handys.
Alles wird über eine Website geregelt, die Knöpfe sind groß und gut beschriftet. Konsolen, Deamons, Prozesse sucht man vergebens, statt dessen gibt es “Apps” und einen “App Market”. Zum installieren sucht man sich etwas aus und drückt auf INSTALL … und wenige Sekunden später ist alles fertig, wie von Magie.
Ich setzte große Hoffnungen in Sandstorm. Die Entwickler schreiben kluge Sachen in ihren Blog und haben scheinbar wirklich verstanden, warum die meisten Leute keine Sachen selbst hosten. Außerdem ist Sandstorm freie Software. Hach… Es macht viel Freude das Projekt zu beobachten.
Welche Apps?
Im Moment ist hier nur freie Software vertreten. Das Angebot ist noch übersichtlich, aber es gibt schon jetzt einige Highlights:
- Gitlab - eine freie (und mächtigere) Alternative zu Github
- Ghost - dieses Blog läuft mit Ghost
- ttrss - habe ich schonmal verbloggt.
- Mediagoblin - ein bisschen wie flickr, aber dezentral und offen
- ShareLaTeX - online LaTeX, mit anderen gleichzeitig, ein bisschen wie Google Docs
- Roundcube - freier Mailclient
…
Da findet sich schon viel Tolles. Außerdem kann man natürlich eigenes Zeug verwalten, es ist ja immerhin auch der eigene Server.
Zu Gast in der Oase
“Und wenn ich keinen Server habe?”

Man kann sich seinen Sandstorm auch hosten lassen. Das heißt dann Oasis und ist wärend der Beta-phase kostenlos.
Ein Beispiel mit ganz vielen Bildern
Hier ist eine Anleitung, wie man Gitlab auf Sandstorm aufsetzt und ein bestehendes Repository hinzufügt. Es sind extra extra viele Bilder dabei
-
Man begibt sich auf seine Sandstorm Instanz oder auf die Oase und meldet sich an. Beim ersten Anmelden darf man eventuell noch ein Profil anlegen.
-
Wir sind drin und sehen ein paar Flächen, die recht selbst erklärend sind.

- Wir wollen Gitlab installieren, also klicken wir auf das große dicke + und sehen gelangen in den App Market. Welche App darf es sein?

- Wir entscheiden uns für “Gitlab” und bekommen nochmal eine Beschreibung der App.

- Wir klicken auf INSTALL. Fertig. Weil wir ohnehin nur freie Software benutzten müssen wir uns nicht mit einem Zahlungsprozess aufhalten (Wir werden später eine Spende erwägen). Das wars. Mehr müssen wir nicht machen. Die App ist installiert und bereit zum benutzt werden.

Keiner dieser fünf Schritte unterscheidet sich vom installieren von Apps auf dem iPhone. Wir klicken noch auf das App Icon und sind direkt dabei:

Noch ein Wort zu Gitlab
Um ein bestehendes Repository hinzuzufügen klickt man sucht man aus der Box die URL des Repos heraus, geht in den Ordner mit dem git Projekt und gibt diese beiden Befehle ein:
git remote add gitlab https://url-zu-meinem-repo.git
git push gitlab master
Das hat aber mit Sandstorm nun wirklich nichts zu tun.

tldr:
Sandstorm ist könnte alles ändern. Mit diesem Userinterface könnten auch nicht-Nerds Server bedienen. Das Argument “Das ist mir alles viiiiell zu kompliziert” könnte ausgehebelt werden, denn es macht sogar Spaß, in den Apps herum zu stöbern.
Gastbeitrag beim Gewürzrevolver

Ich habe einen Gastbeitrag auf www.gewürzrevolver.de veröffentlicht:
Die Supergeheime Pfannkuchentorte
Going up
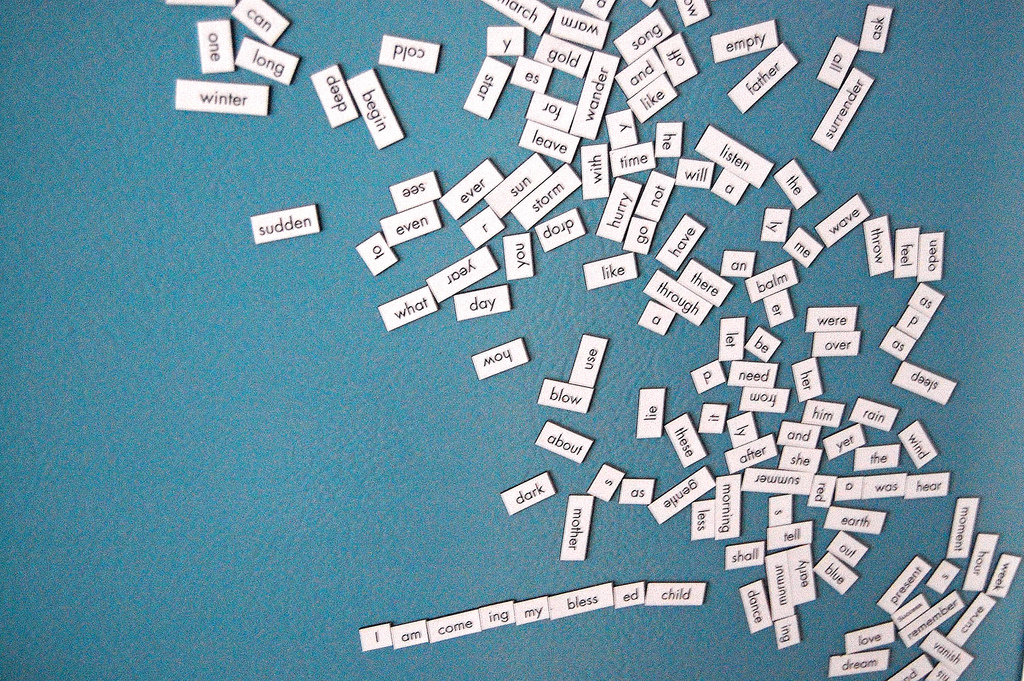
5
I I I I I I a I I I a a I a a I a a a I I a a a a a I I a I a I I I I I I I I I I a I a I a
150
I can not talk about anything.
200
I try to not to say those things that I am told not say.
300
I may not say some things, but still try not to talk like a baby. It is a hell of a job.
500
This is my try to deal with the problem of telling what the problem is and not to say any word that is not one of the 500 that people use most. It is really hard. For every word that gets lost from your word set gets, you need more words to say anything at all and it gets hard to understand what all this means, but I had help from a think-thing that does the some of the easy work. The idea came from a man, who’s work many people look at.
1000
This is a test, where I try to explain the test in the 1000 words people use most. The less words you have the more you have to talk. I had help from one of those think-thing that does some of the easy work. The idea came from a man, who’s work many people look at.
5000
This is an experiment, where I try to explain the experiment itself in the 5000 most common english words. It is actually pretty difficult not to use difficult terms, often you have to describe them. As a setup, I used a web based editor, that does the counting for me. The original idea is from a famous series of pictures from the Internet.
infinity
This is an experiment, where try I to explain the experiment itself in the n most common English words (where n is now finaly infinity, so I can say what I want). As it turns out, shrinking down your own vocabulary is pretty hard and you have to go back to the definitions. As a setup, I used a web based editor that does the counting for me. It was inspired by xkcd, a famous webcomic.
Am Arch

(Titelbild von olibac unter CC BY 2.0 von hier)
Bei meiner Wahl der Distribution habe ich einen Fehler gemacht.
Ich hatte damals meine Auswahlkriterien folgendermaßen definiert:
- modern: wenn es neues Zeug und coole Erfindungen gibt, will ich davon profitieren
- stabil: so modern nun auch wieder nicht, dass ständig alles abstürzt
- einsteigerfreundlich: ein System, das man auch als angagierter Anfänger meistern kann, eine Anlaufstelle für meine großen Haufen von Fragen
- lebendig: ein System das beständig weiterentwickelt wird, mit Sicherheitsupdates, neuste Versionen und Kompatibilität für alles
Die Wahl fiel damit auf Fedora, und diese Konsequenz würde ich heute auch noch so ziehen. Aber meine Präferenzen haben sich geändert:
Hilfe aus dem RL
(Wer nicht weiß was das RL ist, der verbringt entweder zuwenig Zeit am Computer oder sehr viel zuviel.) Manchmal bleibt man stecken und dann hilft einem die ganze schöne Dokumentation nicht. Dann helfen auch keine Wikis, Hilfeforen, dann nützt Stack Overflow nichts und Reddit versagt. Manchmal muss man jemanden fragen. Ich rate also jedem, sich eind Distribution zu suchen, die in der unmittelbaren Umgebung auch schon benutzt wird.
Bei uns in der Uni läuft ausschließlich Ubuntu in den Computerräumen. In meiner unmittelbaren Umgebung werden außerdem Debian, Arch und Mint eingesetzt. Künftig werde ich das in meine Entscheidungen mit einfließen lassen.
Neues Kriterium:
- RL-Support: zum über Dinge untehalten und sich gegenseitig Sachen zeigen kann
(Hätten wir unseren ursprünglichen Plan - gemeinsam auf Linux umzusteigen - direkt verwirklicht, dann wäre das kein Problem gewesen. Aber Till wechselt seine Betriebsysteme sobald der Wind sich dreht, da muss ich also in andere Richtungen suchen.)
Stabilität wird teuer erkauft
Kurz und gut: Die hoffnung ein modernes aber stabiles System zu bekommen war etwas zu optimistisch. Oft ist es mir schon passiert, dass ich von einer neuen Version eines Programmes gelesen habe, die dann aber nicht in den Repositorys aufgetaucht ist. Die Phrasen “gut abgehangen” und “bewährt” tauchen in diesem Zusammenhang immer wieder auf.
Weil ich dazu neige, die wenigen Programme die ich benutze auch etwas weiter auszureizen (das Wort “Poweruser” ist ja inzwischen so ausgelutscht das man es wahrhafig nicht nocheinmal in den Mund zu nehmen braucht) habe ich es trotzdem immer wieder geschaft, die Programme gegen die Wand zu fahren. Das passiert einfach.
Inzwischen weiß ich besser was ich will:
~~ modern: wenn es neues Zeug und coole Erfindungen gibt, will ich davon profitieren~~
Ich brauche nicht wirklich ein stabiles System. Ich brauche nur Backups und einen Packetmanager, der mir (auch gerne stündlich) die neusten Updates um die Ohren haut.
Konsequenz?
Ich bin weg von Fedora und komplett auf Arch Linux gewechselt. Zum Umzug später mehr.
Sane defaults for navigation keys?

When I switched to Emacs, I thought there would be a consistent plan for navigation in a file (or buffer). I thought there would be a key for
- __c__haracter,
- __w__ord,
- __l__ine,
- __s__entence,
- __p__aragraph,
- the whole __f__ile
…and so on. In addition (so I imagined) there would be a key for every standard function you could apply to such a text component, like
- __c__opy,
- __p__aste,
- __k__ill,
- __m__ark,
- jump __f__orward or __b__ackward,
- __r__eplicate,
- e__x__chage with neigbour,
- move __u__p and __d__own
etc.
This way I would be able to build commands like “kill a word” (C-k w), “duplicate line” (C-r l) or “mark the paragraph” (C-m p) etc. It wouldn’t be necessary to remember those shortcuts, you could easily derive them. Damn, you could even combine them (use (C-l C-w C-w k) to delete one line and two words). And they would perfectly fit together with the universal argument (C-u).
I don’t even know why I expected it to be so. I just thought that the best editors (and Emacs claims to be on the top, no doubt) would have a concept like this (or better) with their shortcuts.
Instead, there are these short, but hard to remember combinations. Wouldn’t it make sense to have similar shortcuts for similar tasks? In Emacs, this doesn’t seem to be the case. For example, “Move to the beginning of the file” (M-<) and “Move to the beginning of this line” (C-a) just don’t seem to be connected. Neither are “Kill word” (M-d) and “Kill line” (C-k).
Of course, I am far away of being some good at Emacs. I don’t know any saints in the Church of Emacs to ask. There are two possibilities:
- There is a deeper sense in the defaults, I just don’t see it. It would be so kind if someone could give me some hint (you can find my mail address in the impressum). At some point, I will achieve wisdom.
- The default keys were never designed, the just grew that way. And while this would be very disappointing, this is still Emacs, isn’t it? Nothing would stop me to define my own shortcuts, much better then the old ones. Perhaps someone did this before me and there is some module I should know?
I am still not sure what I want it to be.
Plotter
Im Mathestudium spielen Plots eine erstaunlich geringe Rolle (man möchte sich davor schützen, aus Bildern falsche Schlüsse zu ziehen). Trotzdem ist es manchmal nützlich/notwendig, es gibt hauptsächlich zwei Anwendungsfälle:
- Mal schnell rausfinden, wie eine Funktion aussieht oder wie sich ein Parameter auswirkt
- Eine schicke Grafik für ein Skript oder eine Präsentation erstellen.
Mit guten Plots kann man prima angeben. Und deshalb möchte ich hier mal die besten Plotter vorstellen, die ich im Laufe meines Studiums kennen und schätzen gelernt habe.
Um einen halbwegs sinnvollen Vergleich zu bekommen habe ich bei jedem Programm die Funktion f(x)= sin(1/x) geplottet.
Schnell und Flexibel
Für Zwischendurch und wenn man mal schnell eine Vorstellung oder Abschätzung des Graphen braucht. Die Programme sollen schnell zu bedienen sein und fix arbeiten. Wenn man mit Parametern arbeitet will man diese verschieben können und der Plot verändert sich live mit. Das Wort kompilieren will man hier nicht hören.
Quick Graph

Plattformen:
- iOS
Besondere Stärken:
- mal schnell was plotten
- großer Funktionsumfang auf mobilem Gerät
Ich habe seit Jahren keine andere App zum plotten auf dem iPhone als Quick Graph. Auf seinem Telefon will man ja meistens keine Wissenschaft machen sondern “mal schnell was rausfinden”.
Gibts in einer kostenlosen und einer Bezahlversion.
Grapher

Platform:
- Mac OS
Besondere Stärken:
- vorinstalliert
- (2D-)Vektorgrafik Export
- Navigieren im Plot (verschieben, zoomen)
- starke Mathematische Funktionen
- Vektorfelder (2D und 3D)
Demos:
- im Programmmenü unter Examples
Grapher ist das am meisten unterschätzte Programm auf dem Mac (finde ich).
Graphers Schwächen liegen in der Bedienung bei komplizierteren Funktionen. Bei schwierigeren Sachen muss man muss schon ein bisschen arbeiten, bis man das sieht was man wollte. Dafür funktionieren dann aber auch Dinge (Vektorfelder, Fallunterscheidungen, Spuren von Differetialgleichungen ect) die man sonst kaum findet.
Man sollte sich deswegen auf jeden Fall die mitgelieferten Beispiele anschauen, außerdem gibt es im Internet ein bisschen Dokumentation.
Graphing Calculator

Plattformen:
- Mac OS
- Windows
Vorteile:
- einfache Bedienung
Das Quick-Graph für den Desktop. Zum “schnell mal eben gucken” total gut. Starten, Funktion eintippen, Bild erscheint. Graphen exportieren geht leider nicht ordentlich.
Quick-Graph ist nicht herausragend, aber er macht was er soll und braucht keine Eingewöhnungszeit.
Google/Wolfram Alpha


Platformen:
- Browser
Vorteile:
- Verfügbarkeit
Geht natürlich auch. Wer nichts installieren will oder kann bekommt hier schnell was er braucht. Trotzdem würde ich nativen Programmen immer den Vorzug geben. Komplizierte Funktionen werden hier schnell knifflig und Parameter bekommt man nicht so einfach hin.
Seriös und elegant
Für Skripte, Präsentationen ect… Die Graphen sollen genau sein, gut aussehen, ordentlich beschriftet sein und wichtige Informationen vermitteln. Außerdem sollen verschiedene Ausgabeformate (pdf, svg, png..) unterstützt werden (Vektorgraphiken sind besser als Pixelgrafiken). Dafür ist es auch gerechtfertigt, etwas mehr Arbeit und Zeit zu investieren.
Weil es hier mehr um Programmieren als um Programme geht schreibe ich die Plattform nicht jedes mal dazu - auf Linux, OS X, BSD und Windows wird jedes der Programme laufen.
Gnuplot

Demos
Besondere Stärken:
- Datenpunkte plotten
- programmierbar/automatisierbar
- Open Source
Ich muss aber zugeben dass ich (damals) auf dem Mac Schwierigkeiten hatte Gnuplot zu installieren - gelohnt hat es sich trotzdem. Auf Linux hatte ich keine Probleme.
Wer es nicht installieren will kann Gnuplot auch im Browser ausführen (auch wenn man dann die meisten Vorteile verliert). Zum Beispiel hier oder hier.
Mit Gnuplot kann man hervorragend Messdaten visualisieren, plotten und diese Prozesse automatisieren. In meiner Bachelorarbeit musste ich den Verlauf eines chaotischen Algorithmuses nachvollziehen und hier kann man die Stärken des Programms wirklich ausspielen: Man lässt sich die Logdateien des Algorithmus ausgeben und lässt diese von Gnuplot auslesen und parsen. Auch bei großen Datenmengen ging das wunderbar, wo andere Programme schon in die Knie gegangen sind.
R

Demos
Besondere Stärken:
- Daten visualisieren
- Mit Zufallsdaten arbeiten
- Nicht-Funktionen-Plots
- programmierbar/automatisierbar
R ist eigentlch ein Statistik Programm. Aber es ist auch super im Daten visualisieren, besonders wenn es nicht um normale Plots geht sondern um Histogramme, Kuchendiagramme, Punktdiagramme, gefittete Funktionen ect.
Ich selbst kenne mich nicht so gut aus mit R (denn ich habe selten mit Wahrscheinlichkeitsrechnung zu tun), aber die Ergebnisse waren immer extrem gut.
Ach ja, eines noch: Der Name ist extrem dumm. Der Nächste der vorschlägt, etwas nach einem Buchstaben zu benennen sollte sich vorher genau überlegen, wie man im Internet nach Dokumentation dafür suchen soll.
LaTeX

Besondere Stärken:
- direktes Erzeugen im Latexdokument
- extrem detailfreudig wenn nötig
(Wer nicht weiß was LaTeX ist sollte jetzt wirklich aufhören diesen Artikel zu lesen und sich schleunigst damit beschäftigen (etwa hier).)
Wenn man ein Dokument mit Latex erstellt liegt es nahe, auch die Graphiken damit zu machen. Geht auch. Das Paket heißt PGFPlots und basiert auf TikZ.
Die Vorteile liegen auf der Hand:
- der Stil des Plots ist genau der des restlichen Dokumentes
- wenn sich die Daten nochmal ändern sollten muss man nicht alles neu plotten sonder nur einmal sein File neu kompilieren
- es gibt keine third-party, auf die man sich verlassen muss
Die Beispielseite zeigt auch recht deutlich, dass man es hier mit den Details wirklich ernst nimmt. Sehr (sehr) viele Varianten mit sehr feinen Unterschieden. Wer sich fragt ob man sich über Plots überhaupt so viele Gedanken machen kann, den bitte ich einfach einmal durch das Handbuch zu scrollen. (Man braucht es nicht lesen, einfach einmal von oben bis unten scrollen und ein paar Bilder anschauen.)
Ich habe mit PGFPlots selbst noch nicht gearbeitet, aber TikZ selbst schon sehr viel. Es ist immer viel Arbeit, aber man hat die absolute Kontrolle über alles und die Ergebnisse sind immer großartig gewesen.
Python

Mit den meisten Programmiersprachen kann man auf die eine oder andere Weise plotten. Matplotlib ist eine Python Bibliothek, die das halt auch kann.
Besonders toll finde ich aber die xkcd-Style Plots.
Vor kurzem hat dieser Artikel ein paar Wellen geschlagen. Es geht darum, warum es (manchmal) gut ist wenn Bilder/Diagramme wie gemalt wirken. Dann achtet man nämlich nicht mehr auf die genauen Werte, sondern nur noch auf den Verlauf der Kurve. Manchmal will man ja genau das.
Und in Matplotlib ist das auch sehr einfach zu machen. Man ruft einfach vor dem plotten einmal matplotlib.pyplot.xkcd() auf und alles sieht aus wie von Randall Munroe persönlich gezeichnet. Mein Script sieht so aus:
import numpy as np
import matplotlib.pyplot as plt
plt.xkcd()
x = np.linspace(-1.0, 1.0, 1000)
y = np.sin(1/x)
plt.plot(x, y, 'r-')
plt.title('plotted in xkcd-style')
plt.ylabel('sin(1/x)')
plt.show()
Bilanz
Und welchen Plotter soll ich jetzt nehmen?
- automatisiert Daten auswerten
- Gnuplot
- einzelne PLots für Folien und Skripte
- Gnuplot (für weniger aufwendige Sachen)
- Python (für Folien, der xkcd-Style kommt im Vortrag gut an)
- Grapher (wenns ganz schnell gehen muss)
- LaTeX (wenns um ungewöhnliche Details geht)
- schnell eine Funktion anschauen
- irgendwas
Emacs lernen, Tag 3, 4 und 5
Emacs lernen, Tag 3
- bin wieder dabei, los gehts
- versuche, einen eingebauten Markdown-Mode zu finden. Es scheint keinen zu geben - wo kann ich Modes kennen lernen? Schau ich später nach, jetzt mach ich noch den Rest vom Tutorial zu Ende.
- Dokumentation zu Befehlen gibt es mit
C-h cfür den Funktionennamen (was oft ausreicht) und mitC-h k BEFEHLfür ein ausführlichere Beschreibung. - Heute komme ich nicht recht vorran, andere Sachen wollen erledigt werden.
- Tutorial ist fertig. Kam nichts Interesantes mehr.
- Was mache ich jetzt? Ich könnte mich wieder mit dem Handbuch beschäftigen. Oder ich schaue mal, welche Modes ich so brauchen könnte.
- Ich schau mal nach Modes. Für Haskell gibt es eine tolle Anleitung , aber die ist so lang, dass ich das nach hinten verschiebe. Erstmal Markdown.
- Ein Markdownpackage ist scheinbar nicht installiert, zumindest finde ich mit
M-xnichts. Auch der Packetmanager findet nichts, das auf emacs und markdown matcht. - Es gibt ein Emacs-Wiki mit einem Eintrag zu einem Markdown Mode. Darin auch ein Link zur Website des Entwickler dieses Moduses.
- Aha, ich soll emacs-goodies installieren. Kein Problem.
- Der Emacs muss neu gestartet werden, damit die Completion den markdown modus kennt. Dann endlich ist es geschaft - ich hab Markdown-Syntax-Highlighting.
- Der Markdown-Modus ist nicht so schmeichelhaft wie ich erhofft hatte. Wenn ich eine Liste mache und enter drücke, muss ich das
*selbst tippen. Das ärgert mich ein bisschen. Immerhin gibt es nur 2 sinnvolle Dinge, die ich dann manchen wollen kann: Die Liste mit einem neuen Element fortsetzten (*) oder die Liste beenden (zwei Newlines).
Für heute muss ich Schluss machen, gibt viel zu tun.
Emacs lernen, Tag 4
- So, jetzt würde ich gerne etwas programmieren. In Haskell
- Mache ein neues File auf und fange an zu tippen.
- Nach zwei Zeilen merke ich, dass das ohne Syntaxhighlighting keinen Spaß macht.
- rufe [https://github.com/serras/emacs-haskell-tutorial/blob/master/tutorial.md](die Anleitung zum Haskellcodeschreiben im Emacs) auf. Hoffentlich funktioniert das jetzt schön flott.
- Ich soll
(find-file user-init-file)evaluieren. Nach dem dritten Versuch kommt mir, dass ich die Klammern mit tippen muss. Wahrscheinlich ist das so bei Lisp. - Ich benutze heute mal den Graphischen Emacs um zumindest einer Menubar zu haben, mit der ich etwas anfangen kann.
- Installiere den Haskell mode. Tada!
- Beim Rumklicken im Menü stelle ich fest, dass es das Tutorium auch auf Deutsch gegeben hätte. Super.
- Programmiere hin und her. Mir fehlen noch viele der wichtigen Shortcuts, aber ich hab schon wirklich Schwierigkeiten mit dem Courser. Immer wieder springe ich an stellen, wo ich nicht hin wollte.
- Immerhin der Shortcut für Zwischenspeichern sitzt schon bombenfest. Das macht ja Hoffnung für den Rest.
- Es hilft auch nicht dass das, was ich gerne coden würde nicht funktioniert.
Pause
Emacs lernen, Tag 5
- Ein paar Tage sind vergangen seit ich das letzte mal einen Editor angefasst habe. Die Uni hat ein bisschen Zeit gefordert.
- Es ist seltsam: Ich kann mich seit dem letzten mal an kaum einen Shortcut erinnern, aber wenn ich sie brauche sind sie da. Eigentlich cool, hoffentlich klappt das ab jetzt ja immer so.
- Kein Syntaxhighlighting. Wie wechselt man nochmal den Modus?
C-x m, und der Editor erwartet von mir, dass ich eine Mail schreibe. Seltsam, das war es wohl nicht.- Immer noch nicht gefunden, dafür (in der graphischen Variante) unter ‘Options’ irgendwo Themes gefunden. Von den dort verfügbaren hat mir keines gut gefallen. Darum kümmere ich mich später.
- Schön: Der Schortcut
C-lscrollt so, dass der Courser in der Mitte ist - auch wenn das File noch gar nicht so lang ist. Wenn man einen Text schreibt ist das ganz angenehm: Oben das Geschriebene, unten noch leerer Platz. Das fühlt sich richtig an, ist für Code aber nicht nützlich.

- Etwas Recherche: In
~/.emacskann man auch konfigurieren, das Files mit bestimmten Endungen (.md oder .hs) in bestimmten modi geöffnet werden. - Gleichmal alles mit git versionieren. Ich hab ja schonmal geschrieben, dass ich meine Configs auf Github hochlade. Die .emacs liegt hier.
- Arbeite jetzt zum ersten mal sinnvoll mit zweigeteiltem Editor. Einmal um diesen Text zu schreiben, der andere Teil ist für ein Haskellprogramm. Damit kann ich mir jetzt schön Stück für Stück meinen Haskellmode konfiguriern.
- Was sich als etwas schwieriger herausstellt als gedacht.
- Jetzt habe ich eine Promt im Emacs aufgemacht (cool, dass das geht) und bekomme den Rahmen nicht mehr zu.
- Habs jetzt doch geschafft. Man geht in den Befehlsmods (
M-x) und tippt “delete-window” ein. Bin ich sogar selbst drauf gekommen :)
Für mich reichts jetzt, ich geh ins Bett.
Bilanz der letzten Tage
Trotz längerer Pause habe ich das Gefühl, dass die zumindest die grundlegensten Befehle funktionieren. Emacs fühlt sich immernoch wie rießiges Monstrum an, dass ich nicht im Ansatz verstehe. Aber immerhin durfte ich schon ein bisschen von den Vorzügen kosten. Ich werde jetzt mal meinen Primäreditor auf Emacs umstellen und sehen, ob sich das bewährt.
Emacs lernen, Tag 2
Logbuch, Tag 2
- Starte Emacs mit
emacs -nwwie gestern gelernt. - Starte einen zweiten emacs, um das Logbuch mit zu tippen. Wie bekomme ich jetzt eine neue Datei? Hab keine Ahnung. Behelfe mich schließlich mit
emacs -nw Blogeintrag.mdown. Das geht noch besser. - Weil die Pfeiltasten noch abgeklebt sind muss ich die Shortcuts benutzen um hin und her zu springen. Juhu!
- Bevor ich loslege sollte ich wahrscheinlich lernen, wie man eine Textdatei speichert. Sonst gibts nachher Tränen.
- Speichern geht mit
C-x C-s - Der erste Hammer des Tages: Paste ist nicht, wie erwartet
C-vsondernC-yfür __y__ank (großzügig übersetzt mit zurückreißen). - Yank ist komplizierter als gedacht.
- Der Shortcut für undo (
C-\macht auf amerikanischen Tastaturen mehr Sinn, weil dort das\direkt unter dem Delete Key ist. Mist - ich habe eine Deutsche Tastatur an meinem Laptop und daran wird sich so bald auch nichts ändern. - Lerne ich lieber
C-_dafür, da muss man sich nicht so verrenken. - Undo wird erklärt, aber wie geht redo? Wird hier nicht erklärt, hätte ich aber gerne.
- Warum ist undo eigentlich nicht
C-z? AAAAAAAAAAAAAARrrrrrrgh! Ich wollte es doch nur ausprobieren, nicht den Emacs schließen! Nein! und das letzte mal, dass ich das Logbuch gespeichert habe ist ewig her. - Als ich die Datei wieder öffne und beginnen will, das verlorene wieder einzutippen, erhalte ich eine seltsame Nachricht:

- Gibt es noch Hoffnung für meine Änderungen? Ich tippe
sund der Dialog verschwindet - ohne die erwünschte Wirkung. Mist, das wäre mal ein Feature gewesen das ich brauchen kann. (später lerne ich: Hätte man ins Terminal einfach fg getippt wäre alles ok gewesen. Tja) - Viel zwischenspeichern ab jetzt.
C-x C-sC-x C-sC-x C-sC-x C-s - Ein Bisschen Theorie über Buffer. Alles wo Text drin steht ist ein Buffer.
- Man kann Buffer scheinbar wie Tabs benutzen, nur ohne die Tableiste. Dafür mit
C-x bund dann den Namen von dem Tab eingeben. - Ein File öffnen geht mit
C-x C-f. Das steht angeblich für “_f_ind file”, aber ich merke mir einfach _f_ile. - Mittagspause
- Mir wird erklärt, dass die Datei vorhin nicht wirklcih weg war, sondern “nur in den Hintergrund gerückt”.
C-zist auch eigentlich kein Emacs-Befehl sondern geht direkt an das Terminal, in dem der Emacs läuft. Ich habe noch keinen Überblick über die vielen Schichten der Komplexen Programme, die hier laufen. - Es gibt eine Art Notificationcenter (eigentlich ein Buffer), wo alle eingegangenen Nachrichten (in der unteren Zeile aufgeführt werden. Langsam wird mir klar, warum Leute Emacs als Betriebssystem verstehen.
- Nach dem ich 57% des Tutorials durchlaufen habe wird erklärt, wie man Emacs beendet. Ich habe es ja schon schmerzhaft selbst herausgefunden.
- Die Echo Area (letzte Zeile, wo die Tastencombos angezeigt werden die man bereits getippt hat) hat einen eingebauten Delay. Das finde ich schlecht, sobald ich weiß wie hier alles läuft mache ich den Weg.
- Zwischendurch was trinken, ist ja auch wichtig.
- Jetzt wird es spannend. Es gibt Modes. Für verschiedene Programmiersprachen verwendet man verschiedene Modi, die Dinge verändern (zum Beispiel, wie ein Kommentar aussieht oder was ein Paragraph ist)
- Es gibt Major-Modi und Minor-Modi. Man kann nur einen Major- aber mehrere Minor-Modi gleichzeitig benutzen.
- Ich wechsle sofort vom Fundamental-(Major-)Mode in den Text-(Major-)Mode.
- Fühle mich gleich besser. Es ist gut, wenn der Editor weiß, was ich tue (wenn ich es schon nicht immer weiß)
- Der Minor Mode Autofill nervt eher. Was ich nicht mag, wird nicht benutzt. Ha!
- Ich habe das Gefühl, ein großer Teil der Flexibilität von Emacs wird aus diesen Modes kommen.
- Mein Kopf brummt. Gut dass heute nicht viel los ist.
- Weiter machen: Searching
- Die Incremental search ist genau das, was bei Sublimetext das
Strg-Imacht. Nur nicht fuzzy. - fuzzy search wird überhaupt immernoch viel zu sehr unterschätzt, außer Sublimetext macht das kaum einer richtig.
- Mehrere Frames in einem Fenster. Den Teil überfliege ich nur, von sowas bin ich kein großer Freund. Schön, dass es geht.
- Shortcut des Tages:
<Esc> <Esc> <Esc>als ein all-purpose “get out” command. Das ist gut, denn das drückt man sowieso meistens ganz panisch.
Bilanz, Tag 2
- Diesen Text habe ich im Emacs getippt, Yeah! (und es ist mir nur einmal schief gegangen.
- Das Tutorium habe ich zu 90% durch, sehr gut. Morgen suche ich mir was anderes zum Üben.
- Leider hab ich, als es etwas zu Programmieren gab noch Schwierigkeiten gehabt und dann doch schnell Sublimetext genommen. Ein Moralischer Fehltritt.
- Vielleicht suche ich mir morgen ein paar Modes heraus, die mich beim Schreiben wirklich unterstützen - heute habe ich von ihnen kaum was gemerkt.
Ich freu mich auf morgen.
Emacs lernen, Tag 1
Auf der Suche nach einem Editor beschäftige ich mit Emacs. Auf Emacs selbst gehe ich später noch genauer ein, hier geht es um meine ersten Kontakte damit.
Logbuch, Tag 1
- Fange jetzt an, Emacs zu lernen. Ich google nach einem Handbuch und werde fündig: https://www.gnu.org/software/emacs/manual/emacs.html
- Tippe
emacsin die Konsole. Eine Hässliche GUI geht auf. Die will ich nicht. Tipp meines Nachbarn: MitDISPLAY =emacsbekommt man einen Terminalbasierten Emacs. Schon besser. (Später lerne ich, dass es mitemacs -nwbesser geht) - Außer mir sind noch andere Personen im Raum, die vergnügt Tipps geben Details aus Richard Stallmanns Leben rezitieren. Alle Tipps sind verwirrend.
- Das Handbuch erklärt erstmal, wie toll Emacs ist. Doof.
- Einer der Kollegen zieht aus seinem Schreibtisch zwei Seiten (klein gedruckte) Emacs Schortcuts: Die GNU Emacs Reference Card
- Es gibt eine Tutorial, ähnlich dem
vimtutor. Dieser ist aber natürlich erst später eingeführt worden, Emacs war erster! Das Tutorial bekommt man in Emacs mitC-h t. - Habe die letzten Minuten damit verbracht, Emacs abzuschießen (weil ich nicht mehr rauskam) und das Tutorial wieder aufzurufen. Wie man Emacs richig beendet habe ich noch nicht rausgefunden.
- Mittagspause
- Das Tutorial ist ganz gut. Manche von den Shortcuts kann ich sogar nachvollziehen. Ich lass das Handbuch beiseite und arbeitet mich durch das Tutorial.
- Die Shortcuts in Emacs werden auf eine bestimmte Weiße aufgeschreiben:
Msteht für Meta (also Alt)Csteht für Controll (also Strg)-trennt mehrere Tasten, die man gleichzeitig drückt (im Gegensatz zu Leerzeichen, wo Sachen hintereinander gedrückt werden)- Kleine Buchstaben bedeuten die jeweilige Taste.
- Den Emacs verlässt man mit
C-x C-c. Das Bedeutet übersetzt: “Drücke erstStrgundX(gleichzeitig) und dannStrgundC(gleichzeitig). Dabei ist es kein Problem, wenn manStrgnicht loslässt. - Das Tutorial findet man mit
C-h t, alsStrgundhgleichzeitig und dann (ohne andere Tasten) eint.
- Bis jetzt kann ich mit originalen Emacs Shortcuts: Ein(e)(n) Buchstaben/Wort/Zeile/Seite vor/zurück springen. Hat mit den alten Tasten ja auch viel zu lange gedauert. Schön: Die Shortcuts sind mit den Tasten
back,forward,previous, undnext belegt. Das kann man sich ja sogar merken :) - Hmmm,
C-aundC-efür __A__nfang/__E__nde der Zeile. Auf deutsch ganz gut zu merken, im Englischen sind mir die Shortcuts nicht gnaz so klar. - Man kann Befehle mehrfach hintereinander ausführen lassen. Das kenne ich noch aus meinen wenigen Vim-Erfahrungen. Schön, dass es hier auch geht.
- Die Syntax dafür ist
C-u Anzahl Eigentlicher-Befehl. Ich merke mir mal u wie in __u__nit. - Jonathan neben mir beginnt mit zu fiebern. Er tippt wild Programme in Emacs, aber benutzt nicht genug Shortcuts. Ich klebe uns beiden die Pfeiltasten ab, um die Emacsshortcuts zu erzwingen.
- In Zeile 316 des Tutorials das erste mal ein Hinweis darauf, wie man text manipuliert: “If you want to insert text, just type the text.” Bisher bin nur vor und zurück gesprungen.
- Das Abkleben der verführerischen Tasten funktioniert: Selbst wenn man sie noch ein bisschen benutzen kann, fühlt man sich schlecht dabei.
- Im Gegensatz zu Vim scheint es keinen Commandmode zu geben. Daraus folgen Zwei Dinge:
- Wenn man was tippen will kann man das einfach tun
- Wenn man Shortcuts benutzen will, sind diese länger (werden zum Beispiel mit
C-xeingeleitet).
- Es gibt einen Unterschied zwischen delete (einfach löschen) und kill (nur ausschneiden, aber noch zum wieder einfügen in den Buffer legen). Manche Befehle machen das eine, andere das andere. Meine Güte, das wird kompliziert.
- Obwohl alle um mich herum Vi(m) benutzen, sind sie aufgeschlossen und fiebern mit. Der eine ehemalige Emacsuser gibt Ratschläge und entusiastisch vorgetragene Anekdoten zum besten.
- An den Commandmode hatte ich mich scheinbar mehr gewöhnt als gedacht. Ab und zu suche ich ihn noch und wundere mich, wenn komische Dinge passieren (oder nicht passieren)
- Mit
C-u 100 rkann man Hundert rs auf einmal schreiben :) - rrrrrrrrrrrrrrrrrrrrrrrrrrrrrrrrrrrrrrrrrrrrrrrrrrrrrrrrrrrrrrrrrrrrrrrrrrrrrrrrrrrrrrrrrrrrrrrrrrrr
- Dieses Log schreibe ich im Moment noch in Sublime Text, aber langsam fühle ich mich tatsächlich fit genug, das auch direkt in Emacs zu machen.
Bilanz, 1 Tag
- Hat Spaß gemacht heute.
- Viele ungewohnte Shortcuts gelernt, auch für Dinge die ich schon vorher anders konnte. (Ich soll zum Beispiel kein Page Up/Down und keine Pfeiltasten benutzen)
- Einige Dinge kommen einem zuerst komisch vor, machen aber später Sinn. (Zum Beispiel werden einzelne Buchstaben immer gelöscht (delete), ganze Worte, Sätze und Zeilen aber gekillt, so dass man sie schnell an anderer Stelle wieder einfügen kann.)
- Das Tutorium ist besser geschrieben als der Vimtutor. Dort werden die Shortcuts hauptsächlich eingeführt, bei Emacs wird erklärt, warum sie sinnvoll sind. Das macht viel aus.
- Von der wahren Macht von Emacs habe ich noch nicht kosten dürfen. Alles bisherige kannte ich anders auch aus Sublimetext, abgesehen von dem
C-u,C-l,M-aundM-e.
Morgen mache ich weiter und schreibe das Log in Emacs.
Digitaler Haushalt
Wer nach dem Urlaub nach Hause kommt muss erstmal einiges an Haushalt erledigen: Sachen einräumen, den Kühlschrank auffüllen, Wäsche waschen, durchfegen, Blumen gießen, sich bei Nachbarn und Freunden melden und sich um die Post kümmern.
Im Digitalen fallen erstaunlich ähnliche Dinge an. Nach einer Woche Offline-Abstinenz in Italien (nur gelegentlich unterbrochen von kurzen Netz-Momenten) geht es ans Liegengebliebene:
- RSS-Nachrichten der letzten Tage durchgehen
- zumindest grob, vielleicht war ja was interessantes dabei
- RSS-Feeds auffrischen
- Von ein paar schönen Blogs habe auf der Heimfahrt gelesen, die kommen dazu.
- Ein paar Nachrichtenseiten gehen mir langsam zu sehr auf den Keks, weg damit.
- Späterlesendienst ausschütteln
- auf der Fahrt habe ich zwar einiges weggelesen, aber mir ist aufgefallen dass ich schon seit Monaten kein Inbox Zero mehr hatte.
- Was ich in den letzten 8 Wochen nicht gelesen habe lese ich wohl nicht mehr. Hier darf großzügig gelöscht werden.
- Mails beantworten
- Zum Glück nicht zu viele, dafür aber ein paar Wichtige.
- Ham zu Ham, Spam zu Spam
- Sich in den Sozialen Netzwerken blicken lassen
- Urlaubsfotos archivieren
- Alle Fotos von Allen Urlaubsteilnehmern sollen auch allen zur Verfügung stehen.
- Wird Zeit dass ich mal eine Mediagobblin Instanz aufsetzte. Hmmmm, später.
- Frisch geplante Projekte müssen auf Tauglichkeit überprüft und in den Alltag eingebettet werden, ohne dass die Arbeit drunter leidet
Tatsächlich ist es genau wie Hausarbeit: Es tut gut, mal alles liegen zu lassen. Dannach fängt man an und je mehr man tut desto mehr müsste man noch machen. Ganz sauber wird es nie, nur sauberer.
Editoren
Wer Code schreiben will, braucht einen Code-Editor. Es lohnt sich, sich einen Guten zu suchen, denn man wird viel Zeit mit ihm verbringen und er ist schnell ein essentieller Teil des Computers.
Ich selbst bin noch immer auf der Suche nach einem Editor, der mich restlos zufrieden stellt.
Was ich will
Ein Editor mit dem ich glücklich werde müsste ein paar Mindestanforderung erfüllen.
- Open Source
- Erweiterbar durch Plugins
- Cross-Platform zumindest für alle Unixoiden Systeme. Wer weiß schon was die Zukunft bringt.
- schnell (auch bei wirklich großen Files mit mehr als 100000 Zeilen)
- durchdacht und nicht durchwachsen. Man merkt einem Programm an ob es designed wurde oder mit der Zeit gewachsen ist.
- Starken Language Support für die Sprachen, die ich oft benutze. Das ist im Moment hauptsächlich Haskell und Markdown.
- Starke Shortcuts die das editieren erleichtern und schneller machen
- Git Integration gerne auch durch Plugin
- Build um Code auch mal direkt im Editor auführen zu lassen
Außerdem gibt es noch ein paar Standardfeatures, die ohnehin bei den meisten Editoren dabei sind, wie
- Zeilennummern
- Wortergänzung
- Syntax Highlighting
- Klammer Support für runde, eckige, geschweifte, spitze Klammern und was für die jeweilige Sprache noch als Klammer dient (bei Markdown zum Beispiel auch
_,__,*,**etc) - Distractionfree Programming (eher wenn man normalen Text schreibt und dafür keine Seitenleisten, Menüleisten, Vorschau… braucht)
- …
Shortcuts
Shortcuts die ich besonders häufig verwende sind
- Zeile löschen
- Zeile dublizieren
- Zeile verschieben (nach oben oder unten)
- Zeile markieren
- Wort markieren
- nächstes gleiches Wort markieren (Multicursor)
- zu Wort springen (mit fuzzy search oder regulären Ausdrücken)
Ich lerne langsam auch neue dazu (man muss sie ja dann auch verwenden), aber das braucht immer etwas Zeit. Im Idealfall finde ich einen Editor der all das erfüllt und verwachse so sehr mit ihm, dass alle Shortuts intuitiv werden.
Besonders toll (auch wenn ich es nie gelernt habe) finde ich die modularen Shortcuts beim vim:
- man tippt
3um den Befehl dreimal auszuführen,dfür delete undawfür a word. Der Editor entfernt dann die nächsten 3 Worte. - man tippt
dfür delete und0für Anfang der Zeile. Der Editor entfernt alles vom Anfang der Zeile bis zum Courser. - man tippt
10für zehnmal undxfür delete Character und die nächsten 10 Buchstaben werden entfernt.
Wer das einmal verinnerlicht hat will das sicher nicht mehr missen.
große Files
Manchmal verprogrammiert man sich und erzeugt aus Versehen rießige Dateien. Manchmal muss man Logfiles anschauen und bearbeiten, die seit Jahren geschreiben werden. Manchmal muss man eine seltsame Datei im Editor aufmachen, weil man dann vielleicht versteht welches Format sie hat (funktioniert öfter als man denkt, probiert das mal mit PDF/Bilddateien/Websiten).
Deshalb muss mein Editor mit Files umgehen können, die seeeeeehr lang sind.
Language Support
Knifflig, da will man ja immer was anderes.
Für Markdown reicht mir eine Semi-Vorschau im Editor und ab und zu ein Blick auf das gerenderte (html-)Dokument im Browser. Immerhin ist Markdown (Aktuelle Lösung: Sublimetext im Distraction Free Mode mit den Paketen MarkdownEditing (dark) und Markdown Priview und Firefox mit dem Plugin Auto Reload).

Für Haskell (und alle Sprachen die ich danach lerne) will ich die krasseste Unterstützung die auf diesem Planeten möglich ist, bitte. Ich wünsche mir
- Syntax Highlighting
- Qualifizierte Vorschläge und Ergänzungen
- Snippets
- Automatische Einrückung
- Cabal Support
- Linting
- Warungen bei unnötigen imports
- integrierte Documentation (auch zum offline abrufen)
- Benchmarking
- Automatische Berechnung von Signaturen
Sprich, wenn ich Code schreibe soll mein Editor zur mächtigen IDE werden. Das ist alles möglich (und im ghc schon angelegt), also keine Ausreden!
Die Kandidaten
Es gibt ein paar Kandidaten die erstmal in die engere Auswahl kommen. Ich werde zu den Einzelnen noch etwas schreiben, vielleicht (hoffentlich) kommen ja noch was dazu. Bis jetzt habe ich auf dem Schirm:
- Sublime Text
- Vim
- Atom
- Emacs
Ich habe schon einige Editoren getestet und mit den meisten bin ich nicht recht warm geworden. Von den vielen seien hier erwähnt:
Wer noch Tipps für mich hat, immer her damit. Die Mailadresse steht zum Beispiel im Impressum.
To be continiued…
Meine Configs
Viele Programme besonders unter Unix kann man sogenannten configs (“Konfigurationsdateien”) tunen. Es sind einfache Textfiles, in die man Anweisungen für das Programm aufschreibt und die man dann an eine bestimmte stelle im Dateisystem legt, wo sie das Programm dann auch findet.
Es gibt ein paar Dinge, die einem recht schnell klar werden wenn man sich mit configs beschäftigt:
- In einer config kann sehr viel Arbeit drin stecken.
- Wenn man sich mit dem Programm noch nicht auskennt ist es oft nützlich Beispielconfigs zu haben.
- Die Syntax ist nicht einheitlich festgelegt. Zumindest kann man meistens mit
#auskommentieren. - configs können beliebig komplex und kompliziert werden.
- Bei manchen Programmen sind sehr nützliche Beispielconfigs gleich mitgeliefert.
- Es ist nicht immer klar, wo die config zu einem Programm liegen soll. Oft (naja, eher ab und zu) liegt sie unter ~/.config/programmname oder direct im home. Dann heißt sie oft ._programmname_rc (das rc steht angeblich für “run commands”, aber das halte ich für keinen guten Namen).
Wer ein bestimmtes Programm oft verwenden will hat wahrscheinlich einen Vorteil, wenn er ein bisschen in dessen config rumspielt.
Beispiel!
Meine bashrc (die die Kommandozeile an meine Bedürfnisse anpasst) sieht im Moment so aus:
# .bashrc

# Source global definitions
if [ -f /etc/bashrc ]; then
	. /etc/bashrc
fi

# User specific aliases and functions

# ls: als detailierte Liste mit Indikatoren (*/=>@|) anzeigen
alias ls='ls -F -l'

# bei rm und mv immer nachfragen, bevor man was kaput macht
alias rm='rm -i'
alias mv='mv -i'

# bei less soll die tablaenge immer 4 sein
alias less='less --tabs=4'

# gramps soll auf Deutsch laufen
alias gramps='LANG=de_DE.UTF-8 gramps'

# dump .o and .hi files in an extra directory
alias ghc='ghc -outputdir=ghc_outputdir'

# rm .o and .hi files
alias ghcleanup='rm *.o *.hi'

# very simple promt.
export PS1="\[\e[00;31m\]\W\[\e[0m\]\[\e[00;37m\] \[\e[0m\]\[\e[00;31m\]\\$\[\e[0m\]\[\e[00;37m\] \[\e[0m\]"

# my editor
export EDITOR="subl -n -w"
Versionskontrolle für configs
Mir ist relativ schnell bewusst geworden, dass ich meine configs mit git versionieren möchte. Deswegen liegt neben jeder config, mit der ich mich beschäfftigt habe eine .git Datei. (Wer sich mit git nicht auskennt, sollte sich mal damit beschäftigen. Wirklich)
Das hat sich für mich schon das eine oder andere mal ausgezahlt, wie es halt mit Verionskontrolle so ist.
Freiheit für configfiles!
Ich finde, dass noch zu wenig configs im Internet stehen. Oft einmal hätte ich das eine oder andere Beispiel brauchen können und habe keines gefunden.
Deshalb stelle ich alle meine configs öffentlich ins Netz und zwar auf Github.
Configs auf Github
Warum github?
Dafür gibt es ein paar einfache Gründe:
- Ich versioniere mit git
- Ich mag die Website von Github
- Man bekommt dort beliebig viele öffentliche Repositorys
Wie macht man das?
Es ist wirklich einfach, Github selbst liefert eine gute Anleitung (siehe Bild).

Ich schreibe die Schritte hier trotzdem nochmal übersichtlich auf.
config auf Github hochladen
- Schreibe und bearbeite ein configfile, hier als Beispiel die .bashrc
- Versioniere es mit git
- Lege ein Konto auf Github an. Wenn es ok für dich ist, dass dein Code öffentlich ist reicht ein kostenloses Konto absolut aus.

- Erstelle auf Github ein neues Repository (idealerweise gleich mit einer freien Lizens)
- Füge mit
git remote add origin [PfadZuDeinemRepository]
dein neues Repository zu git hinzu.
- Schiebe deinen aktuellen Stand zum Remote mit
git push origin master
oder (noch kürzer) mit
git push
zu Github.
- Gib deinen Username und dein Passwort an.
configs auf Github aktualisieren
Wenn man später nocheinmal etwas an seiner Config ändert, so comittet man mit git und führt dannach noch einmal den Befehl
git push
aus. Fertig.
Wo liegen die configs denn jetzt?
Ist die Welt dadurch besser geworden?
Ja, denn jetzt sind die configs…
- öffentlich einsehbar für alle, die sich gerade damit herumschlagen. Diesen Menschen hast du geholfen.
- auf Github vor Datenverlust geschützt. Wenn der Computer abschmiert kannst du sie dir einfach wieder hersyncen, selbst wenn du sie sonst nicht gebackupt hast.
- syncron auf allen deinen Rechnern und Geräten, denn du kannst, stat alles mehrmals zu schreiben einfach deine configs dorthin _pull_en, wo du sie hinhaben willst.
Client und Reader in einem
Nachtrag zur RSS Software:

Na gut, ich sehe es ja ein…
… ich hab was vergessen.
Wer nur ein Gerät hat auf dem er Nachrichten ließt oder wem Sync allgemein auf den Keks geht oder keine Lust hat irgendwas in der Cloud zu machen oder was weiß ich - der kann auch einfach alles in einem Programm haben. Man installiere dazu einen Newsreader auf einem seiner Geräte.
Der Workflow
- Ich finde eine interessante Website im Internet und aboniere sie in meinem Newsreader. Ab jetzt beobachtet mein Feedreader die Website.
- Ein Autor schreibt einen Artikel auf der Website.
- Wenn ich meinen Feedreader öffne erkennt er den neuen Inhalt, befreit ihn von dem Websitedesign (so gut wie möglich) und legt ihn zum lesen bereit.
- Ich lese die neuen Artikel von verschiedenen Websiten, alle in einem Programm gebündelt.
Der Zwischenschritt über den RSS Reader fällt also weg.
Vorteile
- Die Feeds liegen nicht in der Cloud
- Ich hab alles an einer Stelle und muss nicht hoffen, dass alle Programme gut aufeinander abgestimmt sind (oder evtl sogar mit Plugins nachhelfen)
- Die Einstiegshürde ist niedriger.
Nachteile
- Kein Sync. Sobald ich auf mehreren Geräten gleichzeitig lesen will, funktioniert es nicht mehr.
- Der Newsreader muss jede abonierte Website selbst besuchen (und verbraucht dabei evtl wertvolles mobiles Datenvolumen). Er kann sich nicht einfach mit einem (!) Server verbinden, der das schon für ihn gemacht hat.
Zusammen führt das dazu, dass man (zumindest wenn man ab und zu auf dem Telefon Feeds lesen will) sich lieber nach einer Serverseitigen Lösung umsehen sollte. (Meine Meinung)
Clients
Wer das ganze mal testen will:
- NetNewsWire: für OSX, freundliche Empfehlung von Tim Pritlove (der nach eigener Aussage zur Zeit kein RSS benutzt), sehr schick und wird gerade neu geschrieben (es gibt ne public Beta!), fühlt sich dabei sehr durchdacht an. NNW ist ein echtes Urgestein (seit 2002 dabei) und wird immernoch/wieder aktiv weiterentwickelt. Respekt.

- Reeder: für iOS kann das auch. Spricht ja auch nichts dagegen, dass auch noch zu unterstützem - ich finde es auf dem Telefon halt nur halbgar
- Opera & Firefox: Browser können auch RSS Feeds verarbeiten. Es macht irgendwie Sinn, soetwas in den Browser einzuarbeiten, aber ich konnte mich nie damit anfreunden. Danke an Fernsehmüll für den Tipp
Noch mehr Software
Meine Blogartikel erhaben eigentlich nie den Anspruch auf Vollständigkeit. Feedback ist natürlich sehr willkommen (wirklich, ich freue mich dann).
Eine sehr viel längere Liste für RSS-Software findet ihr hier.
RSS Software
tldr: RSS gehört für mich zu den wichtigsten Bausteinen des Internets. Ich finde jeder sollte davon wissen. Es gibt große Auswahl an guter Software.
Eine Website besteht aus zwei Teilen: Der Inhalt (RSS) und das Design (CSS). Bei vielen Websiten interessiert mich nur der Inhalt und eigentlich auch nur, wenn etwas neues dazu kommt. Bei Blogs zum Beispiel.
Ein RSS-Reader ist wie eine Websiten-Überwachungsstation, die Websiten beobachtet, schaut was sich verändert und mir das wichtige (den neuen Inhalt) zuliefert. Sehr praktisch ist das zum Beispiel für
- Blogs, weil da selten neue Artikel auftauchen, die dann aber meist sehr interessant sind
- Nachrichtenseiten, weil die sich permanent ändern und man per RSS nur den Inhalt übersichtlich aufgelistet bekommt
- totgesglaubte Seiten, weil man sie ohne Mehraufwand weiterverfolgen kann und ein plötzliches wiederaufleben sofort mitbekommt
- Podcasts, denn das sind (technisch gesehen) Audioblogs, die sich sehr ähnlich verhalten
- Social Networks die einen Newsstream anbieten, den man oft auch per RSS abonieren kann (zB: Github, App.net, reddit)
Workflow
- Ich finde eine interessante Website im Internet und aboniere sie. Ab jetzt beobachtet mein Feedreader die Website.
- Ein Autor schreibt einen Artikel auf der Website.
- Mein Feedreader erkennt den neuen Inhalt, befreit ihn von dem Websitedesign (so gut wie möglich) und legt ihn zum lesen bereit
- Ich öffne den RSS-Client auf meinem Telefon oder Rechner. Er fragt meinen Feedreader was es neues gibt und bekommt einen Haufen neuer Artikel.
- Ich lese die neuen Artikel von verschiedenen Websiten, alle in einem Programm gebündelt.
Feed Reader
Die Websiten-Überwachungsstation.
Früher…
Es gab eine Zeit, da gab es in erster Linie einen Feed Reader: Den Google Reader. Er war wirklich toll und fast jeder hat ihn benutzt. Kaum ein Client hat etwas anderen unterstützt, wozu auch? Doch dann hat Google den Reader eingestampft und das war ein echter Schock damals. Keiner wusste wirklich warum und niemand wusste, was man stat dessen benutzen sollte.
Heute…
Im Nachhinein betrachtet hat es dem Ökosystem aber gut getan. Viele neue Dienste wurden aus dem Boden gestampft oder aus der Versenkung hervorgehohlt. Besonders auffällig waren dabei (nach meiner Zuneigung sortiert)
- tiny tiny RSS: (kurz: ttrss)
Open Source, muss man selbst hosten, Multiuser Support, konfigurierbar, langsame aber stabile Entwicklung - benutze ich selbst und kann es nur empfehlen

- Fever: einmal kaufen, für immer besitzen, selbst hosten, fancy Features… der Entwickler antwortet leider nicht auf Emails, also hab ichs nicht weiter getestet
- Feed Wrangler: 19$/Jahr, ich habe nur Gutes gehört
- Feedbin: 30$/Jahr, sieht ganz schnuffig aus, kann aber nicht viel dazu sagen
- Feedly: freemium, sehr viele User, schlechtes Userinterface, da war ich schnell wieder weg. Vielleicht sind sie inzwischen besser geworden.
Die werden inzwischen von allen gängigen Rss-Clients unterstützt, die Ausnahme ist leider ausgerechnet ttrss. Deswegen hat sich jemand ein Plugin ausgedacht, dass die Fever-Api nachimplementiert. Das funktioniert hervorragend und deswegen kann man auch als Opensourceler alle schicken Clients voll ausnutzen. Eine gute Anleitung für das Plugin findet man zum Beispiel hier.
Clients
Verbingung zur Überwachungsstation
Ich lese meine Feeds zu 95% auf dem Telefon (Es geht zur Not auch auf der Website des Feedreaders). Da der Client das Programm ist, das ich letztlich benutzte (oft mehrmals täglich) und auf dem ich auch lange Artikel lese zahlt sich hier gut designte Software besonders aus.
Getestet und für gut befunden
… habe ich diese drei:
- Reeder: für iOS, einfach, schick, schnell zu bedienen. Diese App benutze ich jeden Tag am häufigsten.
- unread: für iOS, fancy und schick, von einem Hardcoredesigner gemacht. Unread fühlt sich irendwie undgewöhlich an.
- Reeder:
für OSX, mit der Tastatur superschnell bedienbar und angenehm

Sie alle funktionieren mit den oben genannten Feedreadern.
Weitere Clients
… für verschiedene Betriebssysteme:
- Liferea:
für Linux, mit GUI. Da scheint es mir wenig gute Alternativen zu geben.
Mir gefällt das Design nur so mittel und ich habe noch nicht rausgefunden wie ich es ändern kann,
aber eigentlich tut der schon das Richtige.

- der offizielle ttrss-Client für Android,
- Mr Reader: fürs iPad, mit netten Themes und einer ordentlichen Website. Ich kenne Leute die sehr zufrieden damit sind. Sieht gut aus.
- Press: für Android, der Till benutzt das und ist zufrieden
- ReadKit:
für OSX, Client für alle möglichen Dienste (unter anderem Pocket und eben Fever), ganz nett und eigentlich auch zuverlässig, offline nur mittelmäßig, irgendwie konnte ich mich nie so richtig damit anfreunden

Fazit
Mein Leben hat sich durch RSS ernsthaft vereinfacht. Ich bin besser informiert und muss weniger Aufwand treiben. Wenn jemand das auch mal ausprobieren möchte und Hilfe braucht kann er/sie mich gerne anschreiben.
Bildschirmhelligkeit
(Alles was in diesem Eintrag steht habe ich übrigends von Jonathan Krebs, danke.)
Aufgabenstellung: Wir wollen die Bildschirmhelligkeit einstellen und dabei nur das Terminal verwenden.
Einfach
Das Programm xbacklight macht alles was wir wollen. Die Helligkeit wird in Prozent gemessen. Wir können sie abfragen:
$ xbacklight -get
70
Und natürlich kann man den Wert selbst festlegen:
$ xbacklight -set 80
Mehr will man ja meistens garnicht.
Nachteil: Die Helligkeitsstufen sind recht grob. Außerdem ist die niedrigste Helligkeit immer noch recht hell.
Schwer
Es geht auch über das Filesystem:
$ cd /sys/class/backlight/intel_backlight/
Wer den Pfad nicht findet kann es mal mit find versuchen. Bei mir sah das so aus:
$ find -name 'backlight' 2>/dev/null~
./var/lib/systemd/backlight
./sys/devices/pci0000:00/0000:00:02.0/backlight
./sys/class/backlight
./usr/lib/modules/3.14.2-200.fc20.x86_64/kernel/drivers/video/backlight
./usr/lib/modules/3.11.10-301.fc20.x86_64/kernel/drivers/video/backlight
./usr/lib/modules/3.13.10-200.fc20.x86_64/kernel/drivers/video/backlight
Irgendeiner der Ordner wird schon der sein, den wir brauchen, bei mir wars das dritte Ergebnis (ausprobieren).
Hier angekommen schauen wir uns um (ls -l) und sehen 2 wichtige Dateien:
- max_brightness Hier steht genau eine Zahl drin (bei mir 851). Die Datei ist read only, auch für den root, hier kann man also nichts machen. Da es soetwas wie min_brightness nicht gibt kann man annehmen, das die Untergerenze 0 sein wird.
- brightness Die Zahl die hier drin steht bestimmt die Helligkeit. Heureka! Wir können sie als superuser leicht ändern.
$ su
Password:
# echo 400 > brightness
Die Helligkeit ändert sich sofot. Wunderbar. Und wenn wir mit xbacklight die Helligkeit neu einstellen, ändert sich die Zahl. Alles macht Sinn.
Achtung: Wer glaubt, er muss die brightness hier einfach auf 0 setzten sollte sich vorher überlegen, ob er das wieder rückgängig machen kann wenn der Bildschirm völlig schwarz ist.
Verspielt
Wir schreiben in kurzes Python Skript (sinus.py) und legen es auf dem Desktop ab.
#!/usr/bin/python
# Gibt alle 0.05 Sekunden einen Wert auf einer Sinuskurve aus.
import math
import time, sys

# max_brightness
Max=851

while True:
	s=math.sin(time.time())
	print(int((s*Max/2)+Max/2))
	sys.stdout.flush()
Dann gehen wir zurück zu unseren magischen Dateien brightness und max_brightness und führen als superuser aus:
python /home/johannes/Desktop/sinus.py > brightness
Ergebnis: Die Helligkeit oszilliert mit einer Periode von etwa 6 Sekunden (Für die Besserwisser: 2*pi). Wenn man das Programm mit Str+C abbricht, bleibt die Helligkeit wie sie gerade ist.
Und mal ganz ehrlich: Das ist es doch was wir die ganze Zeit wollten.
Computer umziehen
Jetzt sitze ich also für kurze Zeit (meine Freundin steht in den Startlöchern, um den alten abzunehmen) auf 2 Laptops und soll mein Produktivsystem umstellen.
Dateien
- alles was in Home liegt (außer den Ordnern “Owncloud”, “Dropbox” und “Downloads”)
- Meine PGP-Keys, vor allem die Privaten Schlüssel (und das soll ordentlich passieren, nicht über Dropbox)
- Bilder, Musik, Filme
Noch mehr? Ich weiß nicht genau. Wie viel information liegt in den Apps?
Programme
Wenn man das Betriebssystem wechelt wechselt man fast alle seine Programme. Schwierig schwierig…
Konversation Table
Um nicht völlig unvorbereitet da zu stehen haben wir (Till und ich) eine gemeinsame Tabelle angelegt, in der wir im vorhinein mal Gedanken dazu machen. Im Moment sieht sie etwa so aus:
- Dropbox -> Owncloud
- 1Password -> KeepassX2
- Mail -> Geary, Thunderbird
- Kalendersync -> Owncloud
- Kontaktesync -> Owncloud
- Kontakte Client -> Gnome Contacts
- Browser -> Firefox
- Podcast aufnehmen -> ardour (Empfehlung von hier)
- Maps -> Irgendwas mit OpenStreetMap
- Appstore -> Paketmanager, konkret yum
- Dasy-Disk -> baobab
- keyword search im Safarie -> Instant Quick Search
- Marked -> Firefox
Im Detail
Für beinahe jedes Programm muss ein angemessener Ersatz gefunden werden. Besondere Schwierigkeiten ergeben sich bei:
-
1Password: Die Alternative (unserer Wahl) heißt KeePassX. Aber die Passworte umzuziehen stellt sich als nicht trivial heraus. 1Passwort kann als CVS Datei exportieren, aber das schluckt KeePassX nicht direkt. Vielleicht muss ich noch einen Converter schreiben. (Ich hab aber keine Lust)
-
Marked: Ich schreibe diese Artikel alle in Markdown. Marked zeigt eine .md Datei gerendert an, wärend ich sie in einem anderen (beliebigen) Programm bearbeite. Das funktioniert Mac-typisch sehr schick. Für Linux habe ich soetwas noch nicht gesehen. Es gibt ein Firefox Plugin, das ähnlich arbeitet, aber die Ergebnisse sind nicht halb so schön und Umlaute funktionieren nicht.


-
Editor: Ich schreibe demnächst nochmal was zu Editoren, hier nur so viel: Wer einen mächtigen graphischen Editor unter Linux sucht und nicht die vi-Shortcuts lernen will hat echt ein Problem.
Backup
Ich habe mir noch keine Backupstrategie für Linux überlegt. Ich weiß das das nicht gut ist, aber alles braucht seine Zeit. Backup mache ich, wenn ich nur noch einen Laptop habe. Gibt es Tipps?
Schreiben
Wirtschaftsprofessor : "Also wenn Sie einen Text erstellen wollen, dann kommen Sie an den Microsoft Office Paketen nicht vorbei."

Ach so ist das.
Als wir diesen Post in einem sozialen Netzwerk sahen mussten wir alle sehr lachen: Diese Wirtschaftler in ihrer kleinen Microsoft-Welt. So süß.
Aber gerade weil diese Aussage aus einem akademischen Umfeld kommt, möchte ich diese Aussage auf keinen Fall so stehen lassen. Darum hier eine (sehr kleine) Auswahl aus dem Großen Feld der Programme, mit denen man hervoragend “einen Text schreiben” kann.
Latex
Die klare Nummer 1. Mit Latex wird im Naturwissenschaftlichen Umfeld alles geschrieben, was auch nur Halbwegs professionell wirken soll: Wissenschaftliche Arbeiten, Skripte, Handouts, Beamerfolien…
Formeln
Die größte Stärke von Latex sind eindeutig Formeln - in keinem mir bekannten Programm werden diese auch nur annährend so gut unterstützt. Nicht nur wird jedes Zeichen (und sei es auch noch so absurd) unterstützt, die Formeln werden auch ordentlich und sauber dargestellt. Beispiele findet man unter anderen hier. Man ist nicht auf einen abstrusen Formeleditor angewiesen, sondern kann sie direkt auf der Tastatur tippen. Und sie sehen immer gut aus.
Dokumentenklassen
Da Latex wirklich weit verbreitet ist, gibt es eine große Anzahl von Vorlagen für alle möglichen Zwecke. Beispiele findet man hier.
Weil für Beamerfolien und Skripte die gleiche Quelle verwendet werden kann sind diese auch wunderbar kompatibel. Man muss in erster Linie die Dokumentenklasse ändern (zum Beispiel von article auf beamer).
Trennung von Inhalt und Format
Texte schreiben ist Arbeit. Es ist schwierig, braucht Konzentration und man muss viel nachdenken.
Dinge auf die ich beim schreiben achten will:
- mein Text
- meine Quellen
Dinge auf die ich beim schreiben nicht achten will:
- Zeilenabstände
- Schriftgröße
- Schriftart
- Rechtbündige, Linkbündig, Mittig, Blocksatz
- Worttrennung, Zeilen und Seitenumbrüche
- Header und Footer
- Textbreite und Korrekturrand
Deswegen ist in Latex der Inhalt von der Formatierung getrennt. So kann man sich auf das konzentrieren, was wichtig ist.
Verfügbarkeit
Latex ist nicht nur schon recht alt sondern auch Opensource und kann auf allen denkbaren Systemen installiert werden. Das schließt Windows, MacOS X, Linux, Bsd und Solaris ein, aber aber auch Mobile Systeme (Android, iOS …). Wer eine Wissenschaftliche Arbeit auf seinem Tablet oder gar Telefon schreiben will sollte zwar vielleicht nochmal über das Wort “Produktivität” nachdenken, aber möglich ist es.
Einfach drucken
Machen sie mal einen eifachen Test: Gehen sie in einen Copy-Shop (die Läden, wo man seine Arbeiten drucken und binden lassen kann) und fragen sie nach, welche pdfs mehr Probleme machen: Die mit MS-Word erstellten oder die mit Latex. Microsoft hält sich nicht (nur so halb) an den PDF-Standard. Latex schon. Das merkt man zum Beispiel beim drucken, wo (auch explizit Windows-kompatible) Drucker regelmäßig scheitern. Die Open Source Gemeinde dagegen ist gut im Einhalten von Standards, denn eine wichtige Unix-Grundregel lautet: “Programme sollen gut zusammen arbeiten können.”
Lernkurve
Die Lernkurve bei Latex ohne Frage steiler als bei anderen Programmen (das Stichwort heißt hier: What You See Is What You Mean).
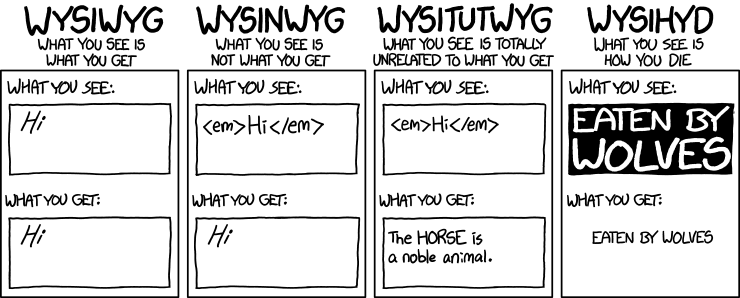 (Bildquelle: https://xkcd.com/1341/)
Wem das zu schwierig ist, der sei auf Lyx verwiesen, einem Editor der vielleicht mehr den Maßstäben eines Word-Anhängers genügt, aber dennoch einwandfreien Latex-Code erzeugt. Lyx ist übrigends auch der Editor meiner Wahl (zumindest wenn es um irgendetwas geht was jemand anderes nochmal lesen soll).
(Bildquelle: https://xkcd.com/1341/)
Wem das zu schwierig ist, der sei auf Lyx verwiesen, einem Editor der vielleicht mehr den Maßstäben eines Word-Anhängers genügt, aber dennoch einwandfreien Latex-Code erzeugt. Lyx ist übrigends auch der Editor meiner Wahl (zumindest wenn es um irgendetwas geht was jemand anderes nochmal lesen soll).
Austesten
Wer keine Lust hat sich was zu installieren kann Latex auch einfach mal im Browser testen, inzwischen sogar collaborativ.
All das führt dazu, dass (natur-) wissenschaftliche Arbeiten die nicht in Latex geschrieben sind oft sehr schräg von der Seite angeschaut werden.
Markdown
Markdown besticht durch Einfachheit. Man sucht sich irgendeinen Editor, tippt einfach drauf los und es kommt das heraus, was man meint. (TODO:Format Überprüfen) Einfache Beispiele:
-
Aufzählungen: für einfache Aufzählunen wie diese hier
- bli
- bla
- blub
tippt man einfach
* bli
* bla
* blub
- Überschriften: Man tippt
# Kartoffelsalatund bekommt eine Überschrift, schön groß und so. - Hyperlinks:
Keine Rechtsklick und seltsame Menüs - stat dessen tippt man mitten im Text
[lalala](www.google.de)und bekommt lalala. Gerade diese Syntax für Links ist gerad drauf und dran der de fakto (TODO: Prüfen) Standard in allen möglichen Bereichen zu werden.
Wenn man dann seinen Text fertig hat kann man ihn mit einem der diversen Programme dafür in Pdf, Html oder sonst ein Format umwandeln lassen. Alle Inhalte dieses Blogs sind zum Beispiel in Markdown geschrieben. Und wer Formeln mag kann sie mittels MathJax auch im Latex-Format tippen.
Die Vorteile sind bestechend:
- Lernkurve: Flach, sehr flach. Eigentlich hat jeder schon mal eine Liste mit Asterisken (so heißten diese kleinen Sterne: * ) markiert.
- Schreibgeschwindigkeit: kein herumgeklicke und gesuche in komplizierten Menüs - man muss die Hände nicht von der Tastatur nehmen
- Vielfalt: Markdown kann in ziemlich jedes Format konvertieren
- Verbreitung: Es gibt eine Vielzahl von Editoren, die sich besonders gut für Markdown eignen (mit live-Vorschau, Formatierungshilfe ect). Ich empfehle hier mal Haroopad, der ist open Source und für alle Desktop-Betriebsysteme
- Mobil: Wegen der großen Einfachheit macht Markdown übrigends auch für Tablets und Telefone Sinn, passende Apps gibt es wie Sand am Meer.
Libre Office / Open Office
Ok, ich gebs zu: Latex und Markdown sind eigentlich keine Programme sondern Standards (sogenannte Markaup languages), die in allen Möglichen Editoren geschrieben werden können. Wer sich aber gar nicht vom Konzept der Officepakete losreißen kann sei auf Libre Office und Open Office verwiesen. Mit jedem dieser Pakete (die miteinander nur wenig zu tun haben) bekommt man einen Ersatz für Word, Excel und Powerpoint (Für den Mac gibts dann noch iWork). Der benutzte OpenDocument Standard ist teilweise auch kompatibel mit den Formaten die Microsoft verwendet. Ich benutze sie selbst nicht aber ausprobieren kostet ja nichts. Hier sind die Links: (Libre Office)[https://de.libreoffice.org/] & (Open Office)[https://www.openoffice.org/de/]
irgendein Editor
Dir gefallen die alle nicht? Dann nimm doch einfach irgendeinen Editor. Es gibt ja wahrhaftig genug. George R. R. Martin, der Autor der Vorlage der Serie “Game of Thrones” schreibt nach eigener Aussage zum Beispiel in WordStar 4.0, einem Editor von 1987. Wer auf viele Features steht kann sich ja mal mit vi, vim und emacs beschäftigen.
Und warum nicht einfach Microsoft Office?
Die vorgestellten Programme haben alle (bis auf WordStar) eine Gemeinsamkeit: Sie sind Open Source und basieren auf freien und offenen Standards. Das ist bei MSOffice nicht der Fall. Das hat mehrere wichtige Folgen:
- Cross Platform: (TODO:Rechtschreibung) Man kann sie auf jeder Platform (Windows, MacOS X, Linux…) verwenden.
- Kostenlos: Man kann sie einfach runterladen und ausprobieren. Keine Lizenzkeys, keine Trialversionen. Man bekommt das volle Paket, einfach so. Eine Private Lizenz von Office (für genau 1 Computer) kostet zur Zeit 70€.
- Frei: Wissen muss frei sein, deswegen haben wir unabhängige Schulen und Universitäten. Für mich macht es Sinn dieses Wissen auch so abzulegen, dass es frei verfügbar ist - auch wenn man seine Soft- und Hardware nicht von Firmen aus den USA lizensieren lassen möchte.
Ich finde dass sich die Aussage, man käme um die Microsoft Office Pakete nicht herum, nicht halten lässt.
Laptop kaufen
Warum?
Für mein Linux Projekt wollte ich einen neuen Computer. Mein treuer Begleiter bisher war ein 13 Zoll MacBook Pro (Early 2011). Der ist auch noch gut, für den Wechsel gab es aber mehrere Gründe:
- Ich habe schon einmal (2010) Linux (Ubuntu 10.10) auf einem MacBook laufen gehabt. Es war die Katastrophe: Laut, schlechte Hardwareunterstützung und die Batterie hielt nur noch 2 Stunden. So etwas wäre also schade um die Hardware, die mit OSX noch hervoragend läuft.
- Meine Freundin braucht einen neuen Computer und möchte von Windows auf OSX umsteigen (dazu vielleicht ein andermal mehr). Das MacBook wird also weitergenutzt und ich spare mir das umständliche weiterverkaufen.
- Ein MacBook kann man quasi nicht upgraden. Ich möchte gerne einen Computer, bei dem das möglich ist.
Wie man einen Laptop auswählt
Ich habe Till gefragt und er hat mit mir einen ausgesucht. Till kann so etwas sehr gut und ich beschreibe kurz den Vorgang:
-
Man überlegt sich vorher worauf man Wert legt. In meinem Fall war das:
- möglichst viele Teile sollen austauschbar sein (Akku, Speicher, Festplatten, SSDs ect)
- Gewicht (ich bin viel unterwegs und nehme meinen Computer quasi immer mit)
- Bildschirm (ordentliche Auflößung, matt)
- 13 Zoll hat sich in der Uni bewärt. Damit passt man auf jeden Tisch und die Bildschirm ist groß genug zum ordentlich arbeiten
- Weniger als 8 GB Ram sind 2014 lächerlich
- Wie viel will ich ausgeben?
-
Man sucht die Website Geizhalz auf. Dort hat man eine große Auswahl an Hardware und ein erstaunlich gut funktionierendes Filtersystem, mit dem man seine Wahl von 1. sehr genau einstellen kann.
-
Man betrachtet die übrig gebliebenen Geräte und trägt mögliche Kandidaten in eine Liste ein. Bei zu wenig Auswahl lockert man den Filter ein wenig, aber nicht zu sehr. Wenn man im Vorhinein schon Kandidaren hat kommen die auch auf die Liste.
-
Die Liste wird zur Tabelle erweitert. Technische Details werden von den offizillen Seiten zusammengsucht, Besonderheiten aufgeschrieben. Unterpunkte sind zum Beispiel:
- Vorteile
- Nachteile
- Preis
- Auflösung
- Prozessor
- …
-
Jetzt wird es schwierig. Bei mir blieben 3 Modelle zur Auswahl, bei anderen vielleicht mehr. Wir haben Testberichte gelesen und diskutiert. Welches Gerät passt am besten, welche Nachteile wiegen am schwersten? Wo bin ich am ehesten bereit für Abstriche? Hier ist es wirklich gut eine zweite Person dabei zu haben - besonders wenn sie einen kennt und technische Expertise hat.
Und zum Schluss schläft man eine Nacht drüber und bestellt ihn. So einfach ist das.
Noch ein paar Anmerkungen
- Die vorgestellte Methode hat mir sehr geholfen aus der unüberschaubaren Flut von angeboten eine Wahl zu treffen, mit der ich zufrieden bin. Ich empfehle sie hiermit weiter.
- Es hilft, im Elektronikmarkt auch mal ein paar Geräte angeschaut zu haben.
- Als Student bekommmt man Rabatte, als Berufstätiger kann man das Gerät eventuell absetzen.
- Die Rechnungen hebt man in jedem Fall gut auf.
Eine Distribution auswählen
Also Linux, na toll. Und da gibt es ja auch nur unendlich viele davon (Statistiken gibts auf Distro Watch). Natürlich kann man auch im Nachhinein wechseln, aber es wäre ja schon gut, wenn man was hätte, wo man sich wohl fühlt. Wie also auswählen?
Meine Kriterien
- modern: wenn es neues Zeug und coole Erfindungen gibt, will ich davon profitieren
- stabil: so modern nun auch wieder nicht, dass ständig alles abstürzt
- einsteigerfreundlich: ein System, das man auch als angagierter Anfänger meistern kann, eine Anlaufstelle für meine großen Haufen von Fragen
- lebendig: ein System das beständig weiterentwickelt wird, mit Sicherheitsupdates, neuste Versionen und Kompatibilität für alles
Mehr oder weniger nimmt so ziemlich jede Distribution für sich in Anspruch, das alles zu erfüllen. Ein guter Startpunkt für die Recherche ist vielleicht hier.
Auf Tills Vorschlag hin haben wir uns erstmal für Fedora entschieden.
Warum ausgerechnet Fedora?
- Fedora ist das Testvehikel von Red Hat Enterprise Linux. Deswegen gibts da immer den heißen Scheiß der vielleicht auch mal in Red Hat reinkommt. (+)
- Das bedeutet für mich auch, dass die Entwicklung nicht morgen eingestellt wird, weil es an Geld mangelt. (+)
- Außerdem ist die Führung der Distribution an eine unabhängige Institution abgegeben worden, die sind also nicht morgen evil und bauen jede Menge Backdoors und Werbung ein. (+)
- Fedora ist eine von den größeren Distributionen, die von vielen Leuten (sogut man das halt feststellen kann) als Desktopumgebung benutzt wird. Da gibt es also eine Community. (+)
- Bei einem ersten Reinschnuppern macht alles eine ganz gute Figur. Besonders fällt auf, das OwnCloud out of the Box unterstützt wird. Cool! (+)
- Der Updatezyklus ist 6 Monate. Der Support für eine Version dauert 12 Monate, man kann also (nur) eine Version gefahrlos überspringen. Klingt fair. (+-)
- Red Hat ist eine Distribution für Unternehmen. Entsprechend ist Fedora nicht in erster Linie als Desktopumgebung entworfen worden. Wir werden sehen, wie sich das auswirkt. (-)
Insgesammt klingt das recht vielversprechend. Mal sehen wie sich die Punkte bewahrheiten werden
Marinieren
TLDR: Seit ich das Fleisch vor dem anbraten noch mariniere hat sich meine Lebensqualität erhöht.
Ich wollte nur darauf hinweißen, dass mariniertes Fleisch nochmal so gut schmeckt. (Marinieren heißt quasi “in würzige Sauce einlegen”. Ich kannte es nicht bevors meine Freundin mir gezeigt hat, drum erwähne ichs lieber noch mal.)
Rezept
Ich hab keines genaues, darum gings hier eigentlich auch nicht. Ich nehme…
- ein paar Asiatische Soßen
- Senf
- Essig
- Peffer+Salz
- eine geschnittene Chillishote (wenn mans scharf mag)
- einen kleinen Schluck Wasser
…in irgendeinem Verhältnis. Einmal umrühren bis sich alles gelößt hat, das Fleisch dazu und ab in den Kühlschrank.
Im Internet stehen auch noch tollere Rezepte.
Einfache Grungregeln
- Zwischen Einlegen und Zubereiten sollte Zeit vergehen, damit der Geschmack auch einziehen kann. 30 min - 6 Stunden
- Man braucht weniger Marinade als man denkt
- Wenn man zuviel gemacht hat kann man den Rest immernoch super zum anbraten benutzen und bekommt noch viel guten Geschmack heraus.
Aufwandseinschätzung
Extrem niedrig. Die Marinade macht man in 2 Minuten. Man muss nur dran denken es ein paar Stunden vor dem Kochen zu machen.
Tipp zum Schluss
Nicht nur Fleisch eingelegt werden, da geht noch mehr:
- Zwiebeln
- Tofu
- Nudeln
- …
Webserver
Langfristiges Ziel: So viel wie möglich Infrastruktur auf dem eigenen Server hosten. Dazu sollen gehören
- eigene Website mit Blog
- RSS und ein Späterlesen-Dienst
- Kalender und Adressbuch
- Cloudstorage
- Chatten (Jabber?)
Grundidee: Webspace anmieten. Das ist vorerst sinnvoller als in Hardware zu inverstieren und sehr viel billiger.
Gehostete Websiten
Ich habe mir mal bei Netcup eine gehostete Website gemietet. Die Kosten sind minimal[1], der Funktionsumfang aber auch. Es ist eine Domain dabei, ich darf meine Mailadresse da haben und MySQL-Datenbanken anlegen. Es reicht also für ein Wordpress Blog.
Für mehr aber auch nicht. Recht schnell kommt man an die Grenzen seines Vertrages:
- Kein Comandline Accses zum Server hinter dem ganzen
- Mehrere MySQL Datenbanken, aber nur ein Passwort für alle
- Confixx ist vom ersten Moment an unsympathisch und stinkt
- Es kann fast nur Software installiert werden, die von Netcup auch vorgesehen ist.
Im Verlauf des Jahres werde ich also einen richtigen Webserver brauchen, der mir diese Probleme hoffentlich vom Hals schafft. Eventuell ist es sinnvoll, das mit Freunden zusammen zu tun, denn die Preis-Leistungskurve wächst in diesen Preisklassen scheinbar exponentiell[2].
Einiges habe ich aber schon gelernt, das meiste von Till. Seine Ausführungen liegen glücklicherweise in diesem Podcast (ab 1:26:50) vor und haben mich mehrmals sehr weitergebracht (Hörempfehlung). Außerdem ist ein Passwortmanager nützlich, sonst dreht man durch.
Bilanz: An dieser Stelle muss ich später weiterforschen. Für die hohen Ziele habe ich zu kurz gegriffen. Die Erfahrung war es aber wert, man lernt sehr viel über Websiten.
Dropbox
Dropbox hat sich in den letzten Jahren als sehr zuverlässig erwiesen. Daten gehen eigentlich nie verloren und das Syncing ist schnell, bequem und problemlos. Aber langsam verlieren sie (bei mir) ihr makelloses Image:
- es gibt keine Kontrolle über die Daten
- ich weiß nicht ob sie verschlüsselt werden
- Dropbox könnte mir Dateien unterschieben
- die Dateien werden geöffnet
- Dropbox schluckt gute Dienste
- Condoleezza Rice wird plötzlich in den Vorstand einberufen
- … das ist die mit dem Waterbording
Die Dropbox Idee ist genial, aber die Firma wird mir langsam unheimlich. Je schneller ich da weg komme desto besser.
OwnCloud
OwnCloud ist wie eine Kombination aus iCloud und Dropbox in Open Source. Man kann sie selbst hosten oder irgendwo anmieten und sie synct so ziemlich alles zwischen allen Geräten:
- Dateien
- Kalender
- Kontakte
- To-Do-Listen
- Musik
- Photos
- …
Alles kann verschlüsselt abgelegt, gesynct und geshared werden, bei Bedarf auch passwortgeschützt geshared. Es gibt ein Webinterface und wenn man einzelne Funktionen nicht mag, kann man das Modul einfach rauswerfen. Außerdem wird OwnCloud von vielen Linuxen nativ unterstützt. Klingt ja alles sehr vielversprechend[3].

Till hat auf dem Server, auf dem auch unsere Podcasts liegen eine OwnCloud installiert, die wir Drei von der Echokammer (und inzwischen auch ein paar andere) benutzen. Es ist schon der zweite Versuch, beim ersten Mal ging irgendetwas kaputt und wir haben abgebrochen. Aber OwnCloud wird permanent weiterentwickelt und im Moment sieht es gut aus.
Ausblick
Wir trauen OwnCloud noch nicht wirklich und haben von allem irgendwo ein Backup - aber sie läuft jetzt schon längere Zeit (3 Monate) sehr gut und ist ein großer Schritt in die richtige Richtung. Später noch mehr dazu.
1. 17,91€ für 12 Monate. Till hatte noch einen 5€ Gutschein für mich. Insgesamt viel billiger als ich dachte. ↩ 2. Das ist gut wenn man viel mietet (und sehr gut wenn man noch mehr mietet). ↩ 3. Wer möchte kann sich auch mal Seafile anschauen.↩
Woher und wohin
Von Apple…
Ich bin Mathematikstudent. Seit 2011 benutze ich ein MacbookPro und seit 2012 ein iPhone 4S, ich bin gut eingelebt in der Applewelt. Es gibt vieles, was sehr einfach funktioniert, wenn man nur Appleprodukte verwendet. In den letzten Jahren habe ich mir keine Gedanken machen müssen über:
- Treiber
- Festplattendefragmentierung
- wo man Sachen einstellt
- das Innere meines Computers
- Viren
- wie man etwas mit der Konsole macht (außer ich wollte es)
- Kompatibilität
- woher ich Software bekomme
Einen Teil davon, vielleicht sogar alles, werde ich in der nächsten Zeit aufgeben müssen und ich habe schon ein wenig Angst.
… zu Linux
Es wird schwierig, unbequem und ein Haufen Arbeit. Manches/vieles/alles wird komplizierter werden und nicht so gut funktionieren wie davor - zumindest in der ersten Zeit.
Ich bin bereit, mich da reinzuhängen, aber nicht uneingeschränkt. Wenn sich alles als zu schwierig herausstellen sollte werde ich zurückrudern. Wenn Sachen nicht funktionieren, muss ich auf meine alten Systeme zurückgreifen.
Im Idealfall bekomme ich ein mächtiges und schnelles System mit genau dem, was ich für nötig halte und mit großer Kontrolle über die einzelnen Komponenten. Im schlimmsten Fall muss ich das gesamte Projekt als Fehlschlag verzeichnen und kehre zurück zu alten Gewohnheiten.
Auf zu sicheren Ufern
Es wird Zeit, proprietärer Software den Rücken zuzukehren. Endlich. Die Gründe dafür sind einfach:
- Sicherheit: Seit den Snowdenleaks (spätestens) sollte klar sein, warum man Software nicht mehr trauen kann, deren Quellcode man nicht sehen darf. Zeit, ein bisschen Courage zu zeigen.
- Linux: Das Linux Universum hat durchaus seine Reize. Paketmanagment, Freaksoftware und irgendwie waren die coolen Leute auch schon immer irgendwie bei Linux.
- Proof of Concept: Ich bin jung, halbwegs intelligent und beschäftige mich gerne mit Computern. Wenn ich das nicht schaffe, ist Linux für den Otto-Normaluser wohl noch nicht reif.
Welche Bereiche meines digitalen Lebens betrifft das nun? Wie sich herausstellt, beinahe alle:
- Webdienste: Google, Dropbox, iCloud, Facebook…
- Kommunikation: Verschlüsseln. Und selber hosten. Und ganz viel verschlüsseln.
- Handy: kein iPhone mehr, alles wird anders
- Desktop-PC: Linux. Beinahe alle Workflows, die ich bisher benutzt habe werden neu überdacht werden müssen…
Das kann man natürlich nicht alles auf einmal lösen. Aber vielleicht Schritt für Schritt. Und darum soll es hier gehen.